1. Set up payroll
Do this once, before your first pay run. It takes you through the Payroll settings in the order Easy needs them, then shows you where Easy tells you what is still missing. Allow about an hour if you have your staff details to hand.
About the screenshots
Most screenshots are from Easy's demo company, Little Polynesian Café. The figures, rates and names are examples. Take your own rates and dates from the Revenue Management Division (RMD) and CINSF notices, not from the pictures. A few first-time screens (the empty pay calendar and its four steps, the public holidays after Add the Act's holidays, and New pay run with no calendar) are from a practice company, Dev Sandbox, because the café already has its calendar and settings.
Before you start
You need:
- Full Payroll switched on. Payroll Lite records one person's pay with no tax, CINSF or leave. Full Payroll adds those. Turn it on under Billing & plan. If you can't see it there, contact Project Five. (Payroll Lite and Full Payroll)
- Your company's RMD number and, if you have one, your CINSF employer reference. They are entered once in Settings → Business details, and payroll reads them from there.
- For each employee: their name, start date, pay rate or salary, RMD PAYE reference, CINSF number, and bank account.
Where everything lives
Open Payroll → Payroll settings. Choose a section on the left to see its pages.
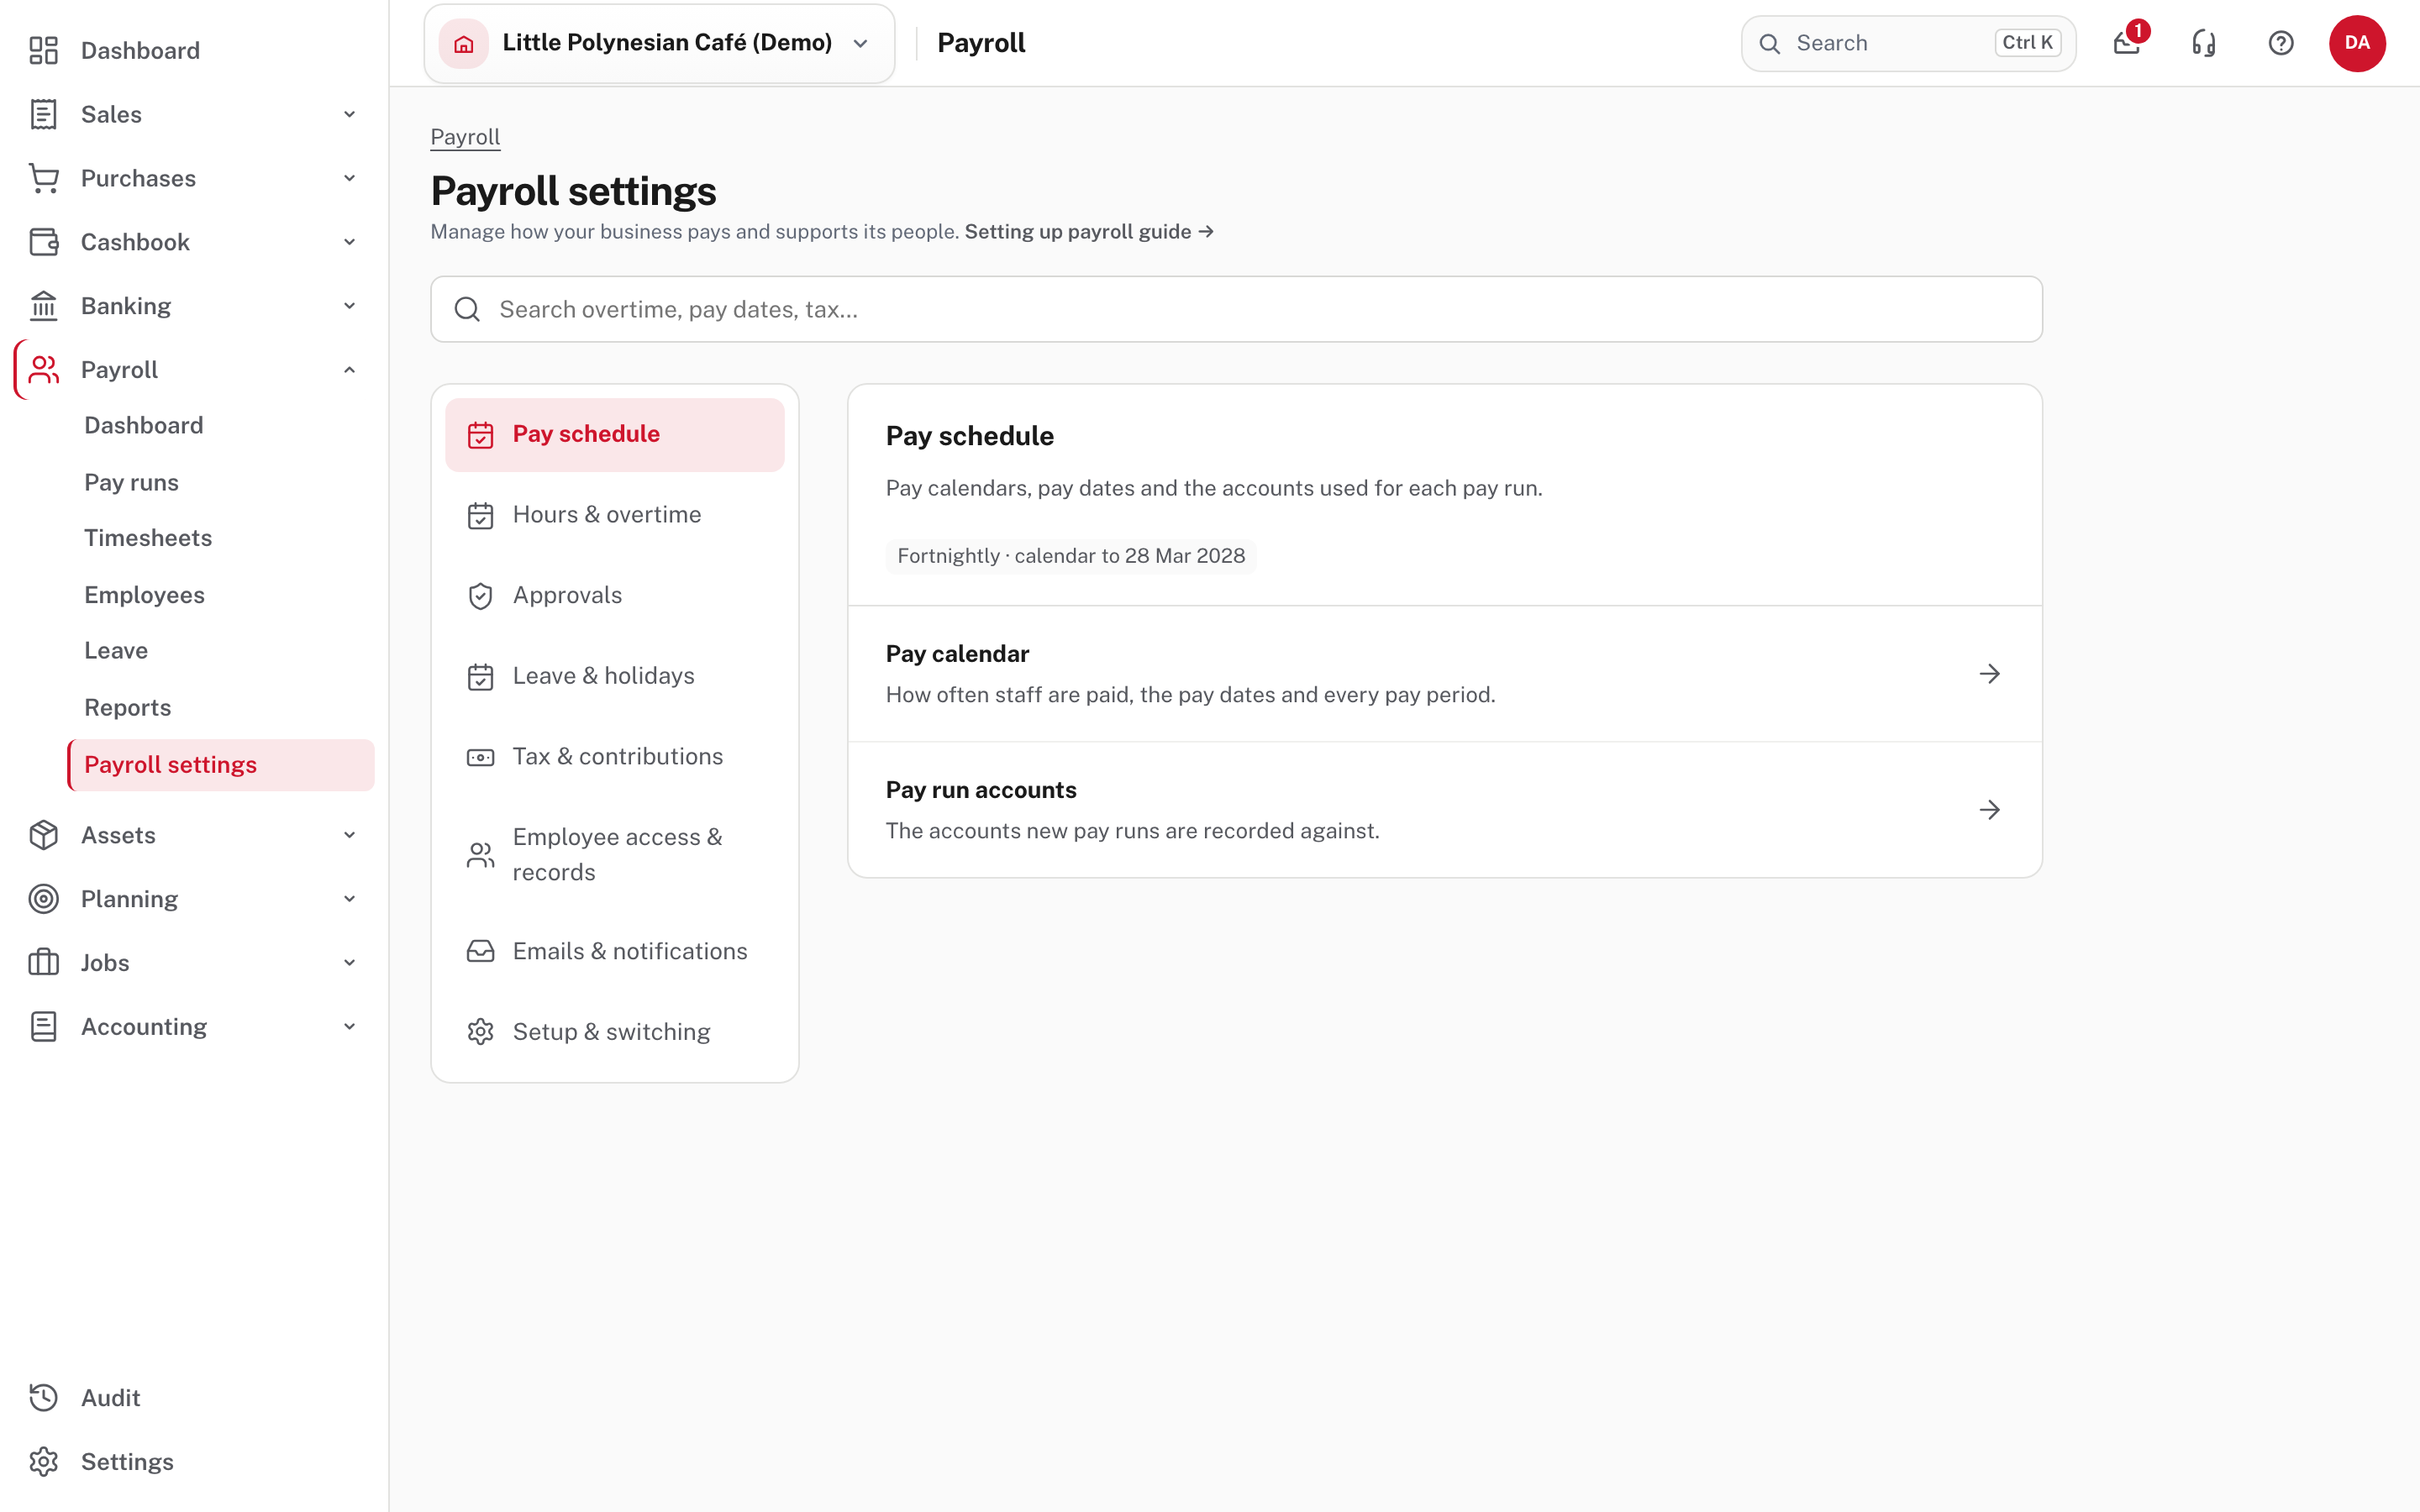
| Section | Pages in it | Used in |
|---|---|---|
| Pay schedule | Pay calendar, Pay run accounts | Steps 2 and 4 |
| Hours & overtime | Work patterns, Hours & overtime | Step 3 |
| Approvals | Approval policies | Step 7 |
| Leave & holidays | Leave rules, Public holidays | Step 6 |
| Tax & contributions | PAYE, CINSF, Minimum wage | Step 5 |
| Employee access & records, Emails & notifications | One page each | Step 8 |
| Setup & switching | Imports & opening balances, goPayroll import, Payroll comparison | Switching from goPayroll |
Each page also shows its section's pages as tabs along the top, so you can move between neighbours without going back.
Step 1. Look at the Payroll dashboard
Open Payroll → Dashboard. You will come back here for every pay run.
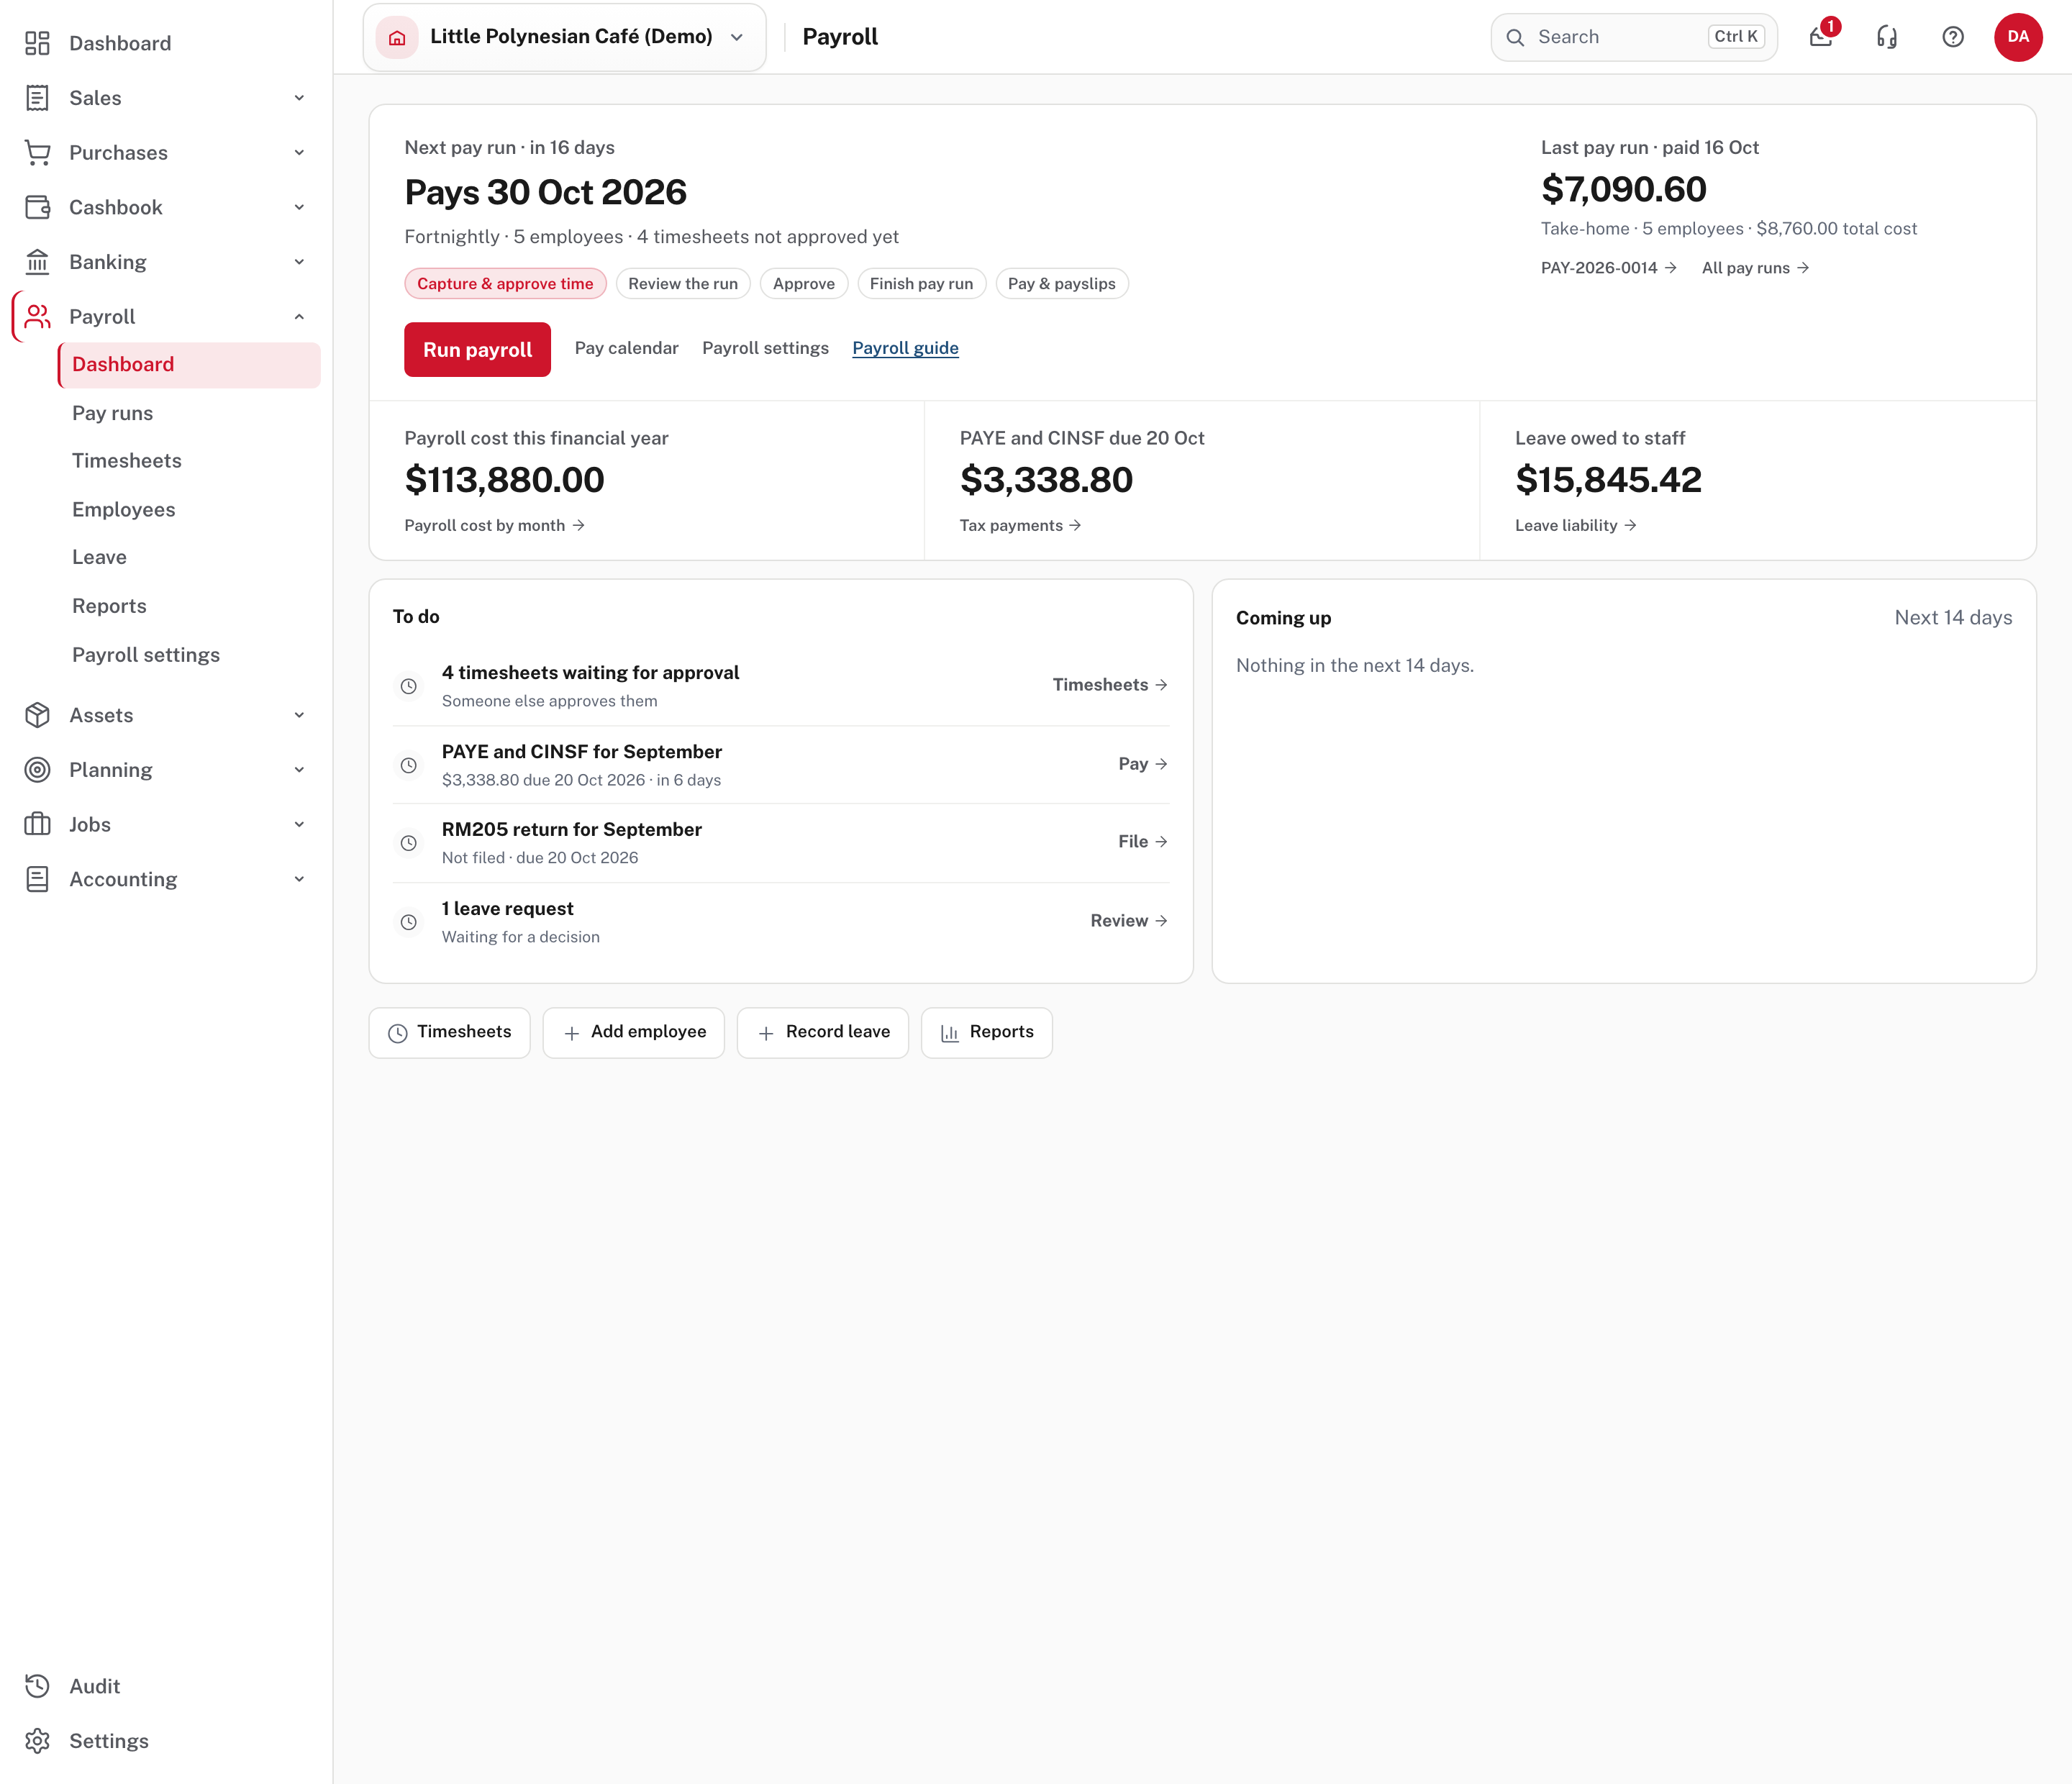
From the top down:
- The Next pay run card gives the pay date and how many days are left, the pay frequency, how many employees and how many timesheets are not approved yet. Under it are the run's steps, Capture & approve time, Review the run, Approve, Finish pay run and Pay & payslips, with the one you are on marked in red. Run payroll starts the run; Pay calendar, Payroll settings and the Payroll guide are beside it.
- The Last pay run card, on the right of it, shows the last run's take-home and its total cost, with a link to the run and to All pay runs.
- Three figures sit under them: Payroll cost this financial year (with Payroll cost by month), PAYE and CINSF due with the date (with Tax payments), and Leave owed to staff (with Leave liability). Each links to the lines behind it.
- To do lists what needs doing next, each item with a button: timesheets waiting for approval, PAYE and CINSF to pay, the RM205 return to file, leave requests to review. Coming up shows the next fourteen days: approved leave, birthdays, work anniversaries, new starters and last days.
- The buttons along the bottom are shortcuts: Timesheets, Add employee, Record leave and Reports.
Not shown in the demo, from Easy's Help: before the first pay run, the Next pay run card shows the Get ready to pay questions instead of the run's steps (step 10).
Step 2. Set the pay calendar
Payroll settings → Pay schedule → Pay calendar.
The pay calendar is the list of pay periods. Timesheets are recorded against it, and pay runs are made from it.
A new company: generate the periods
A company with no calendar sees No pay periods yet. Choose Generate periods.
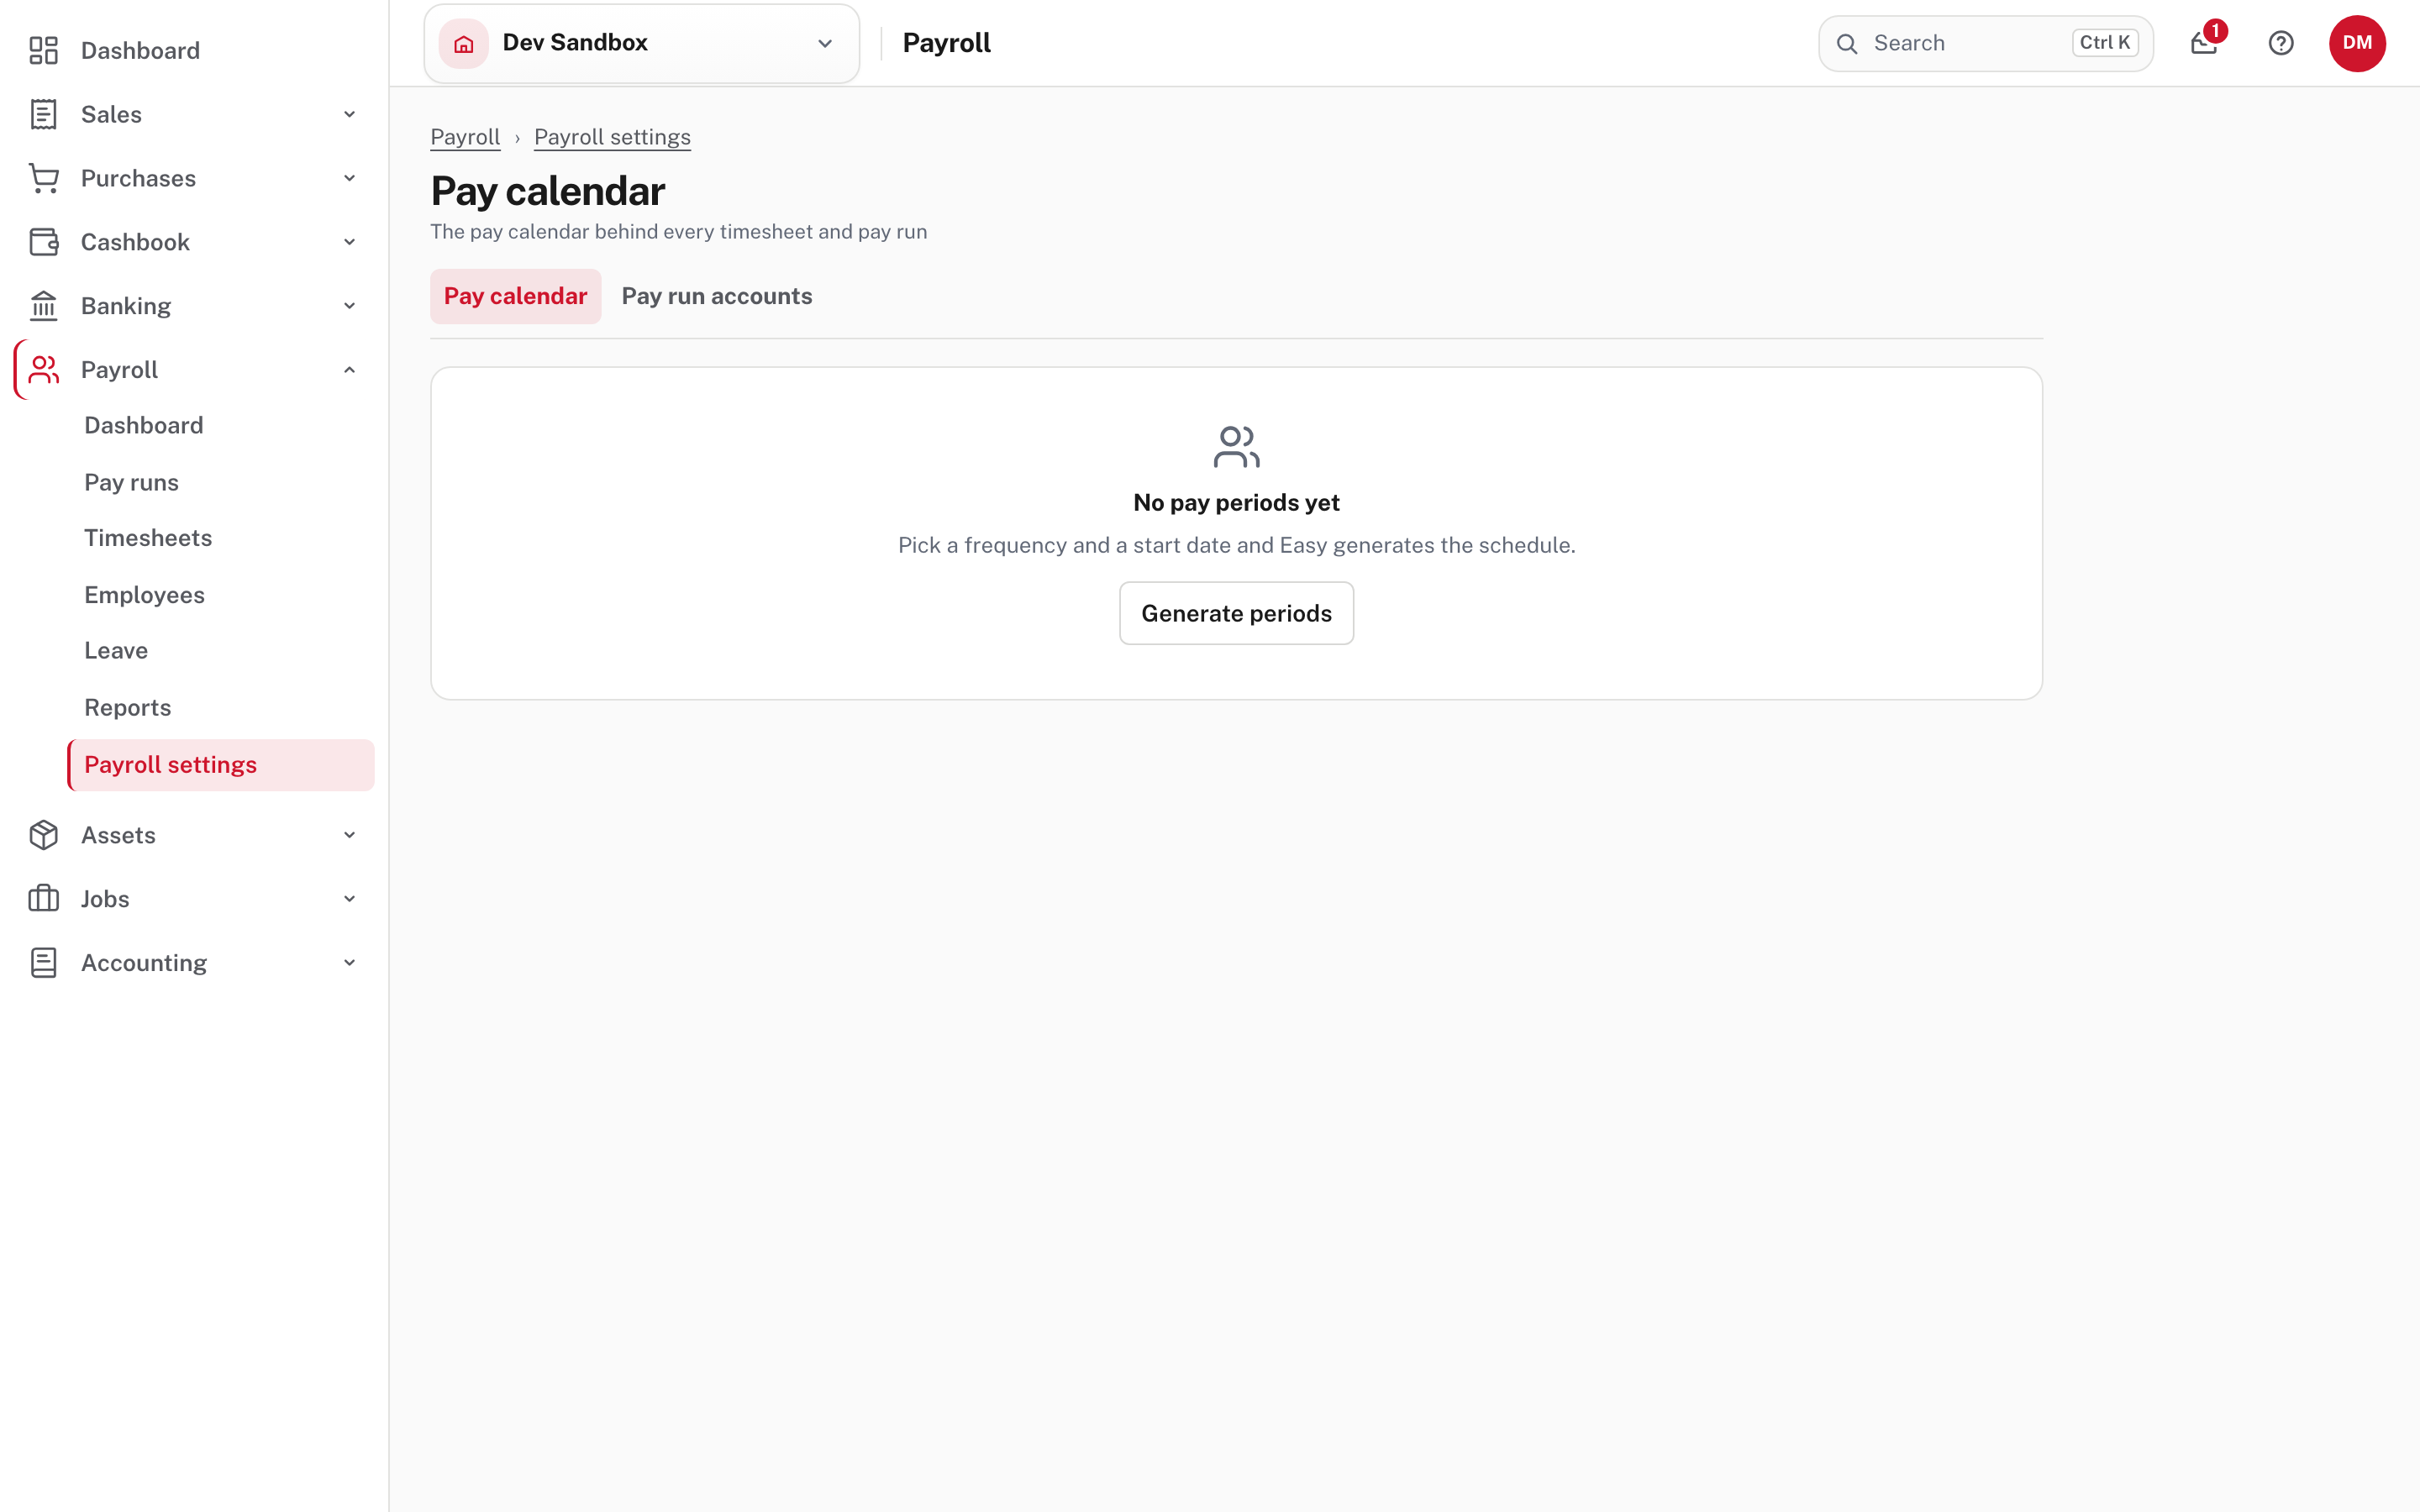
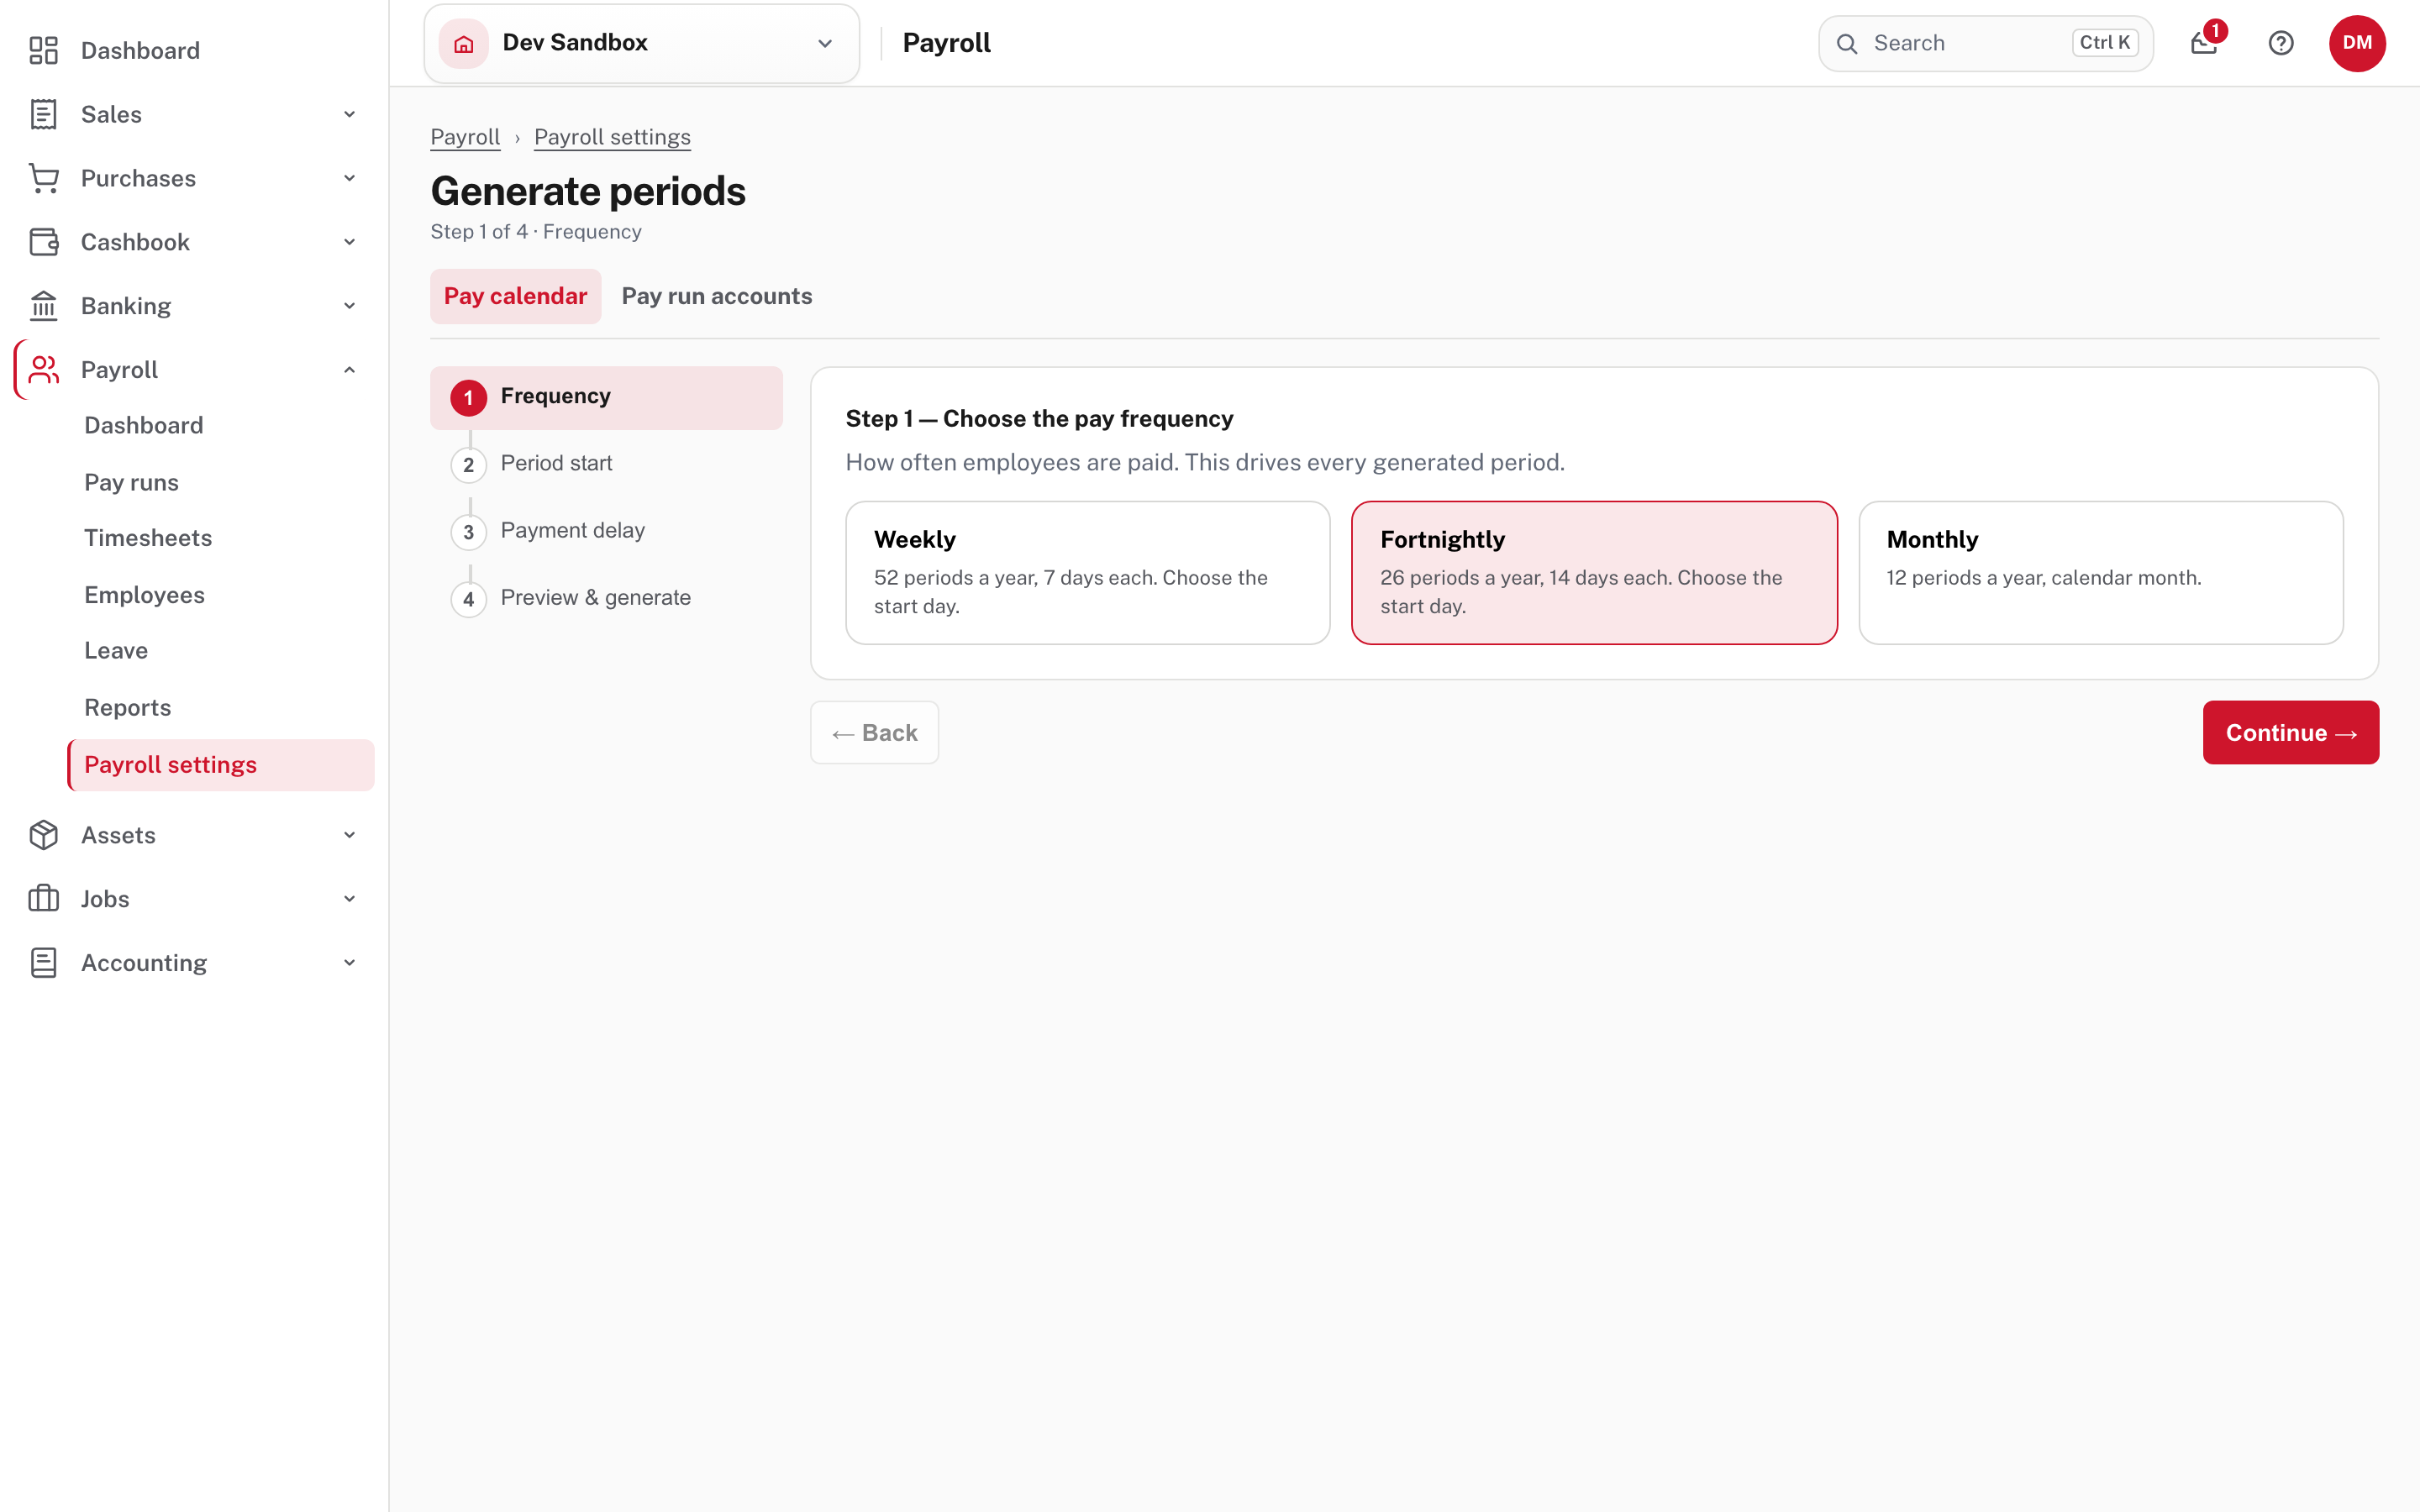
It is four short steps, listed down the left of the page:
- Frequency. Weekly (52 periods a year, 7 days each), Fortnightly (26 periods, 14 days each) or Monthly (12 periods, a calendar month).
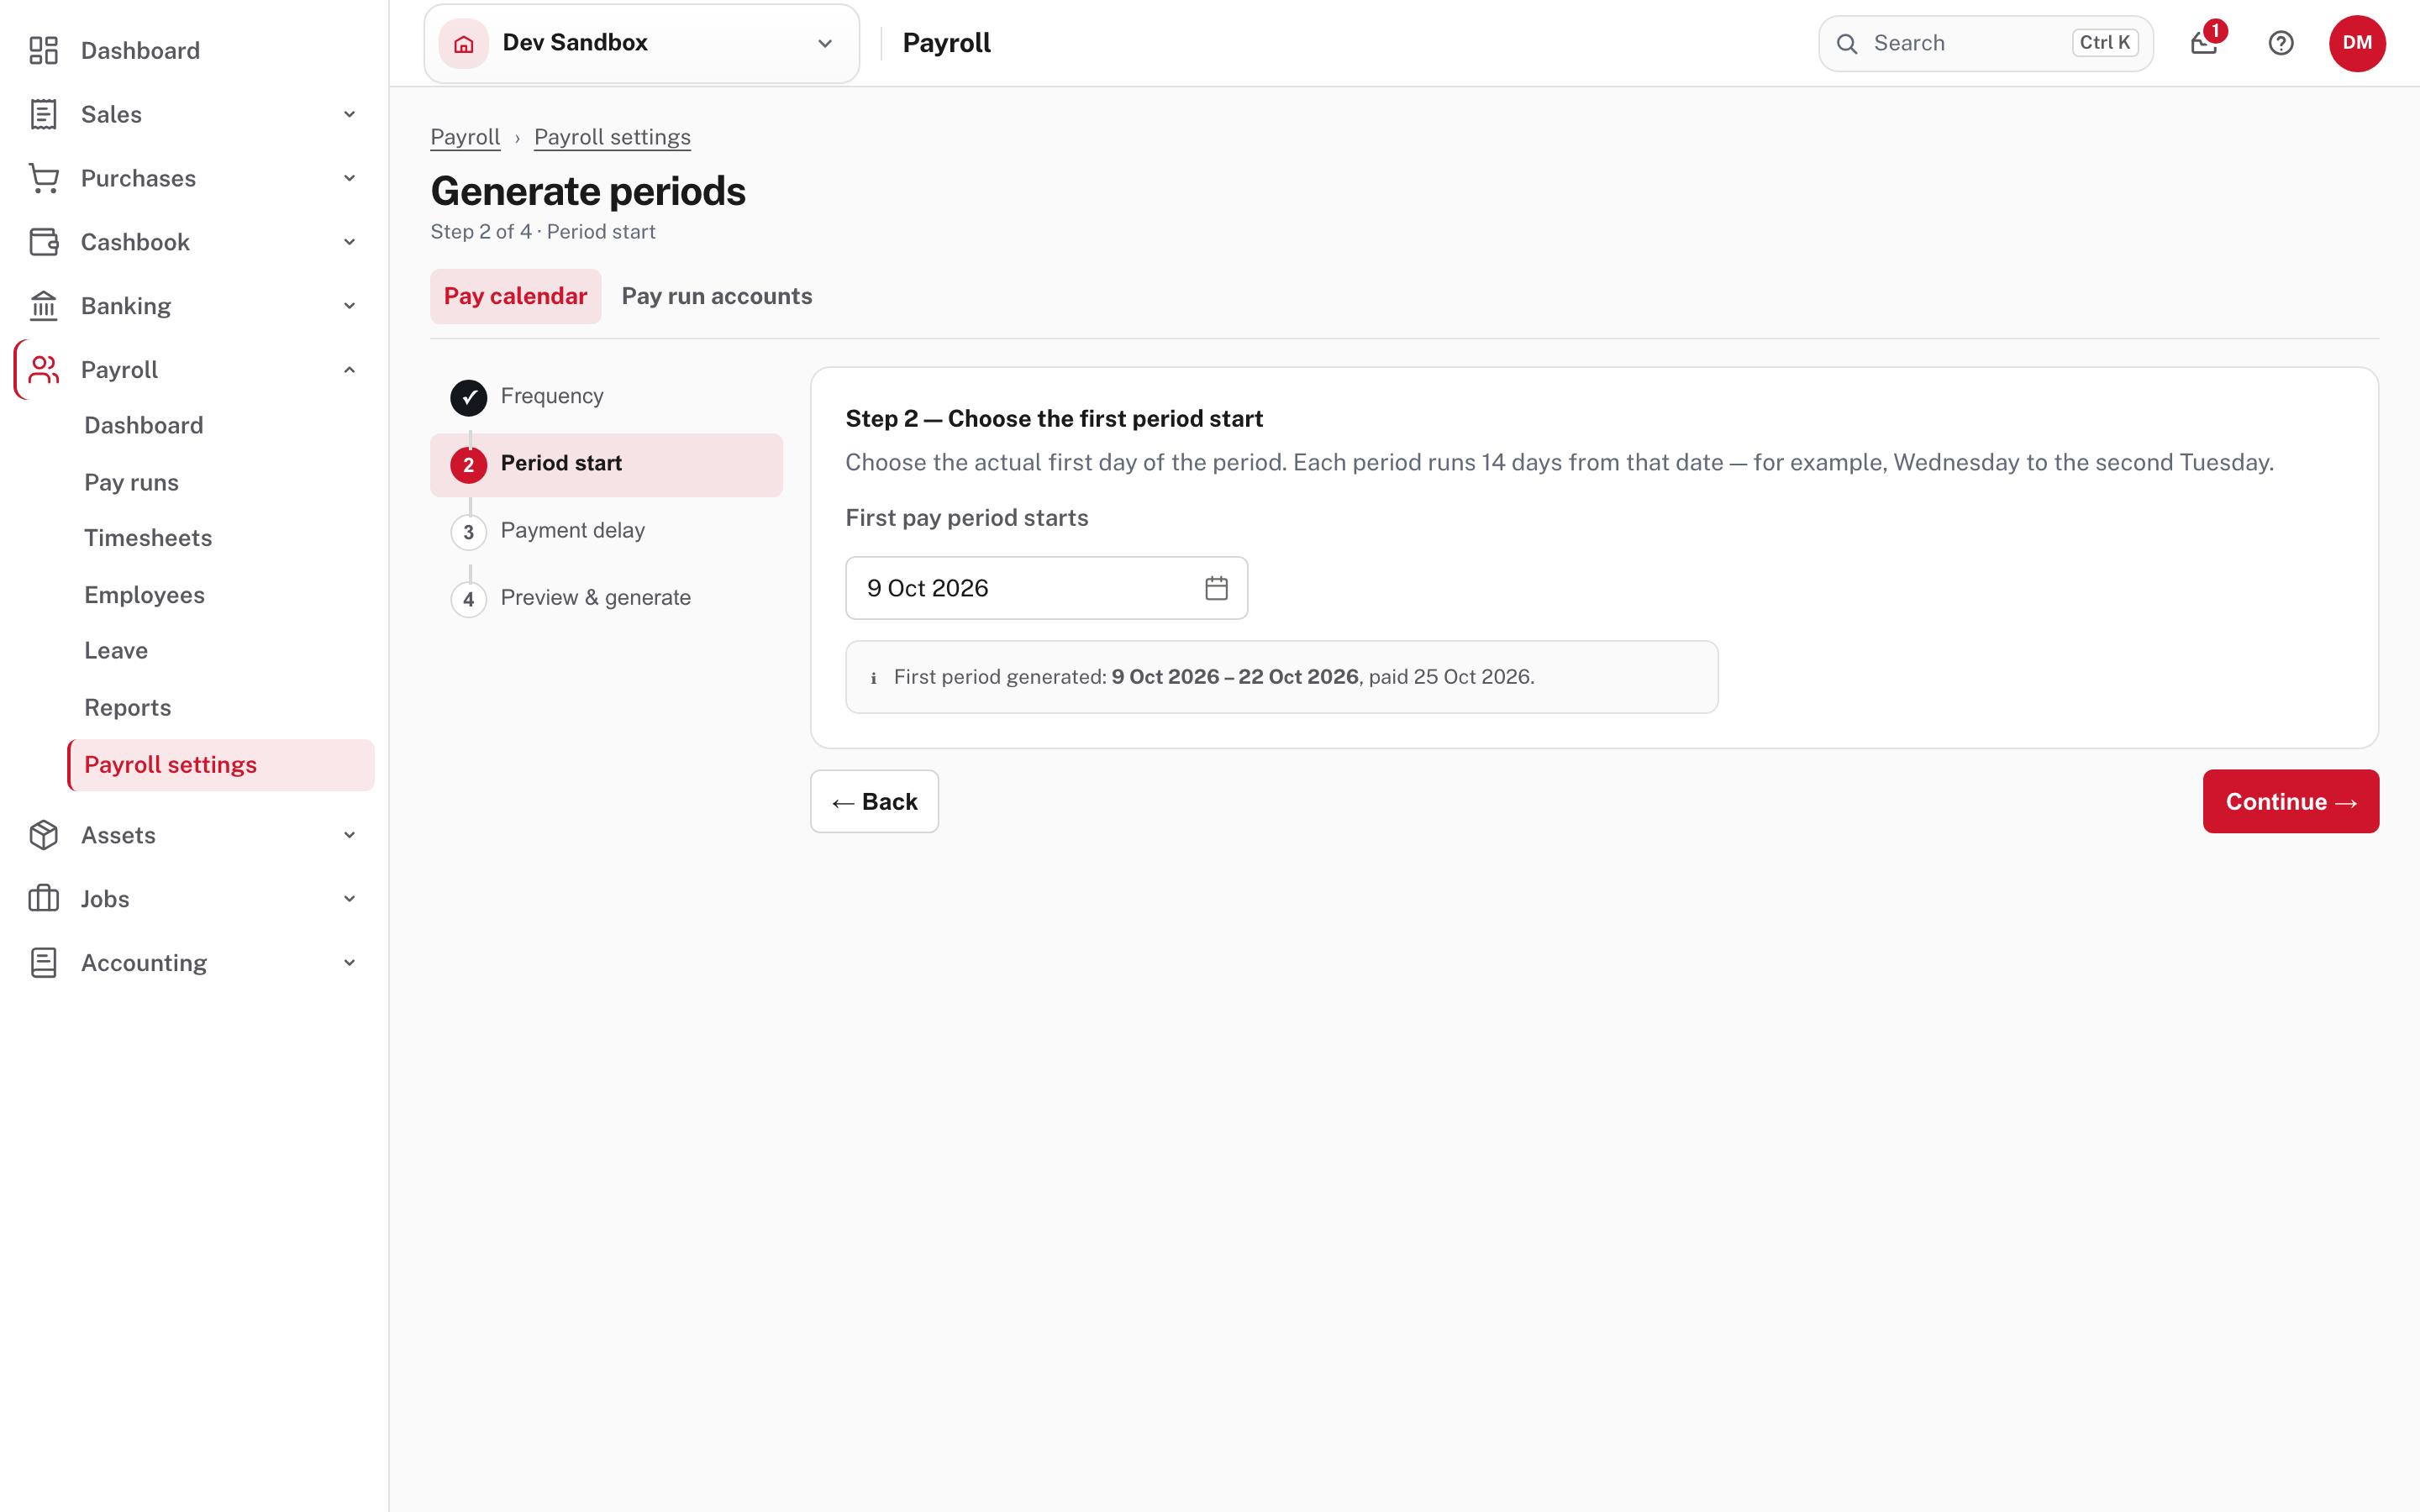
- Period start. For weekly and fortnightly pay, choose the actual first day of the first period. Each period then runs 7 or 14 days from that date, so a Wednesday start gives Wednesday-to-Tuesday periods: the periods do not have to start on a Monday. Easy shows the first period it will make and its pay date. (For monthly pay you pick any date in the first month, and every period runs from the 1st to the last day.)
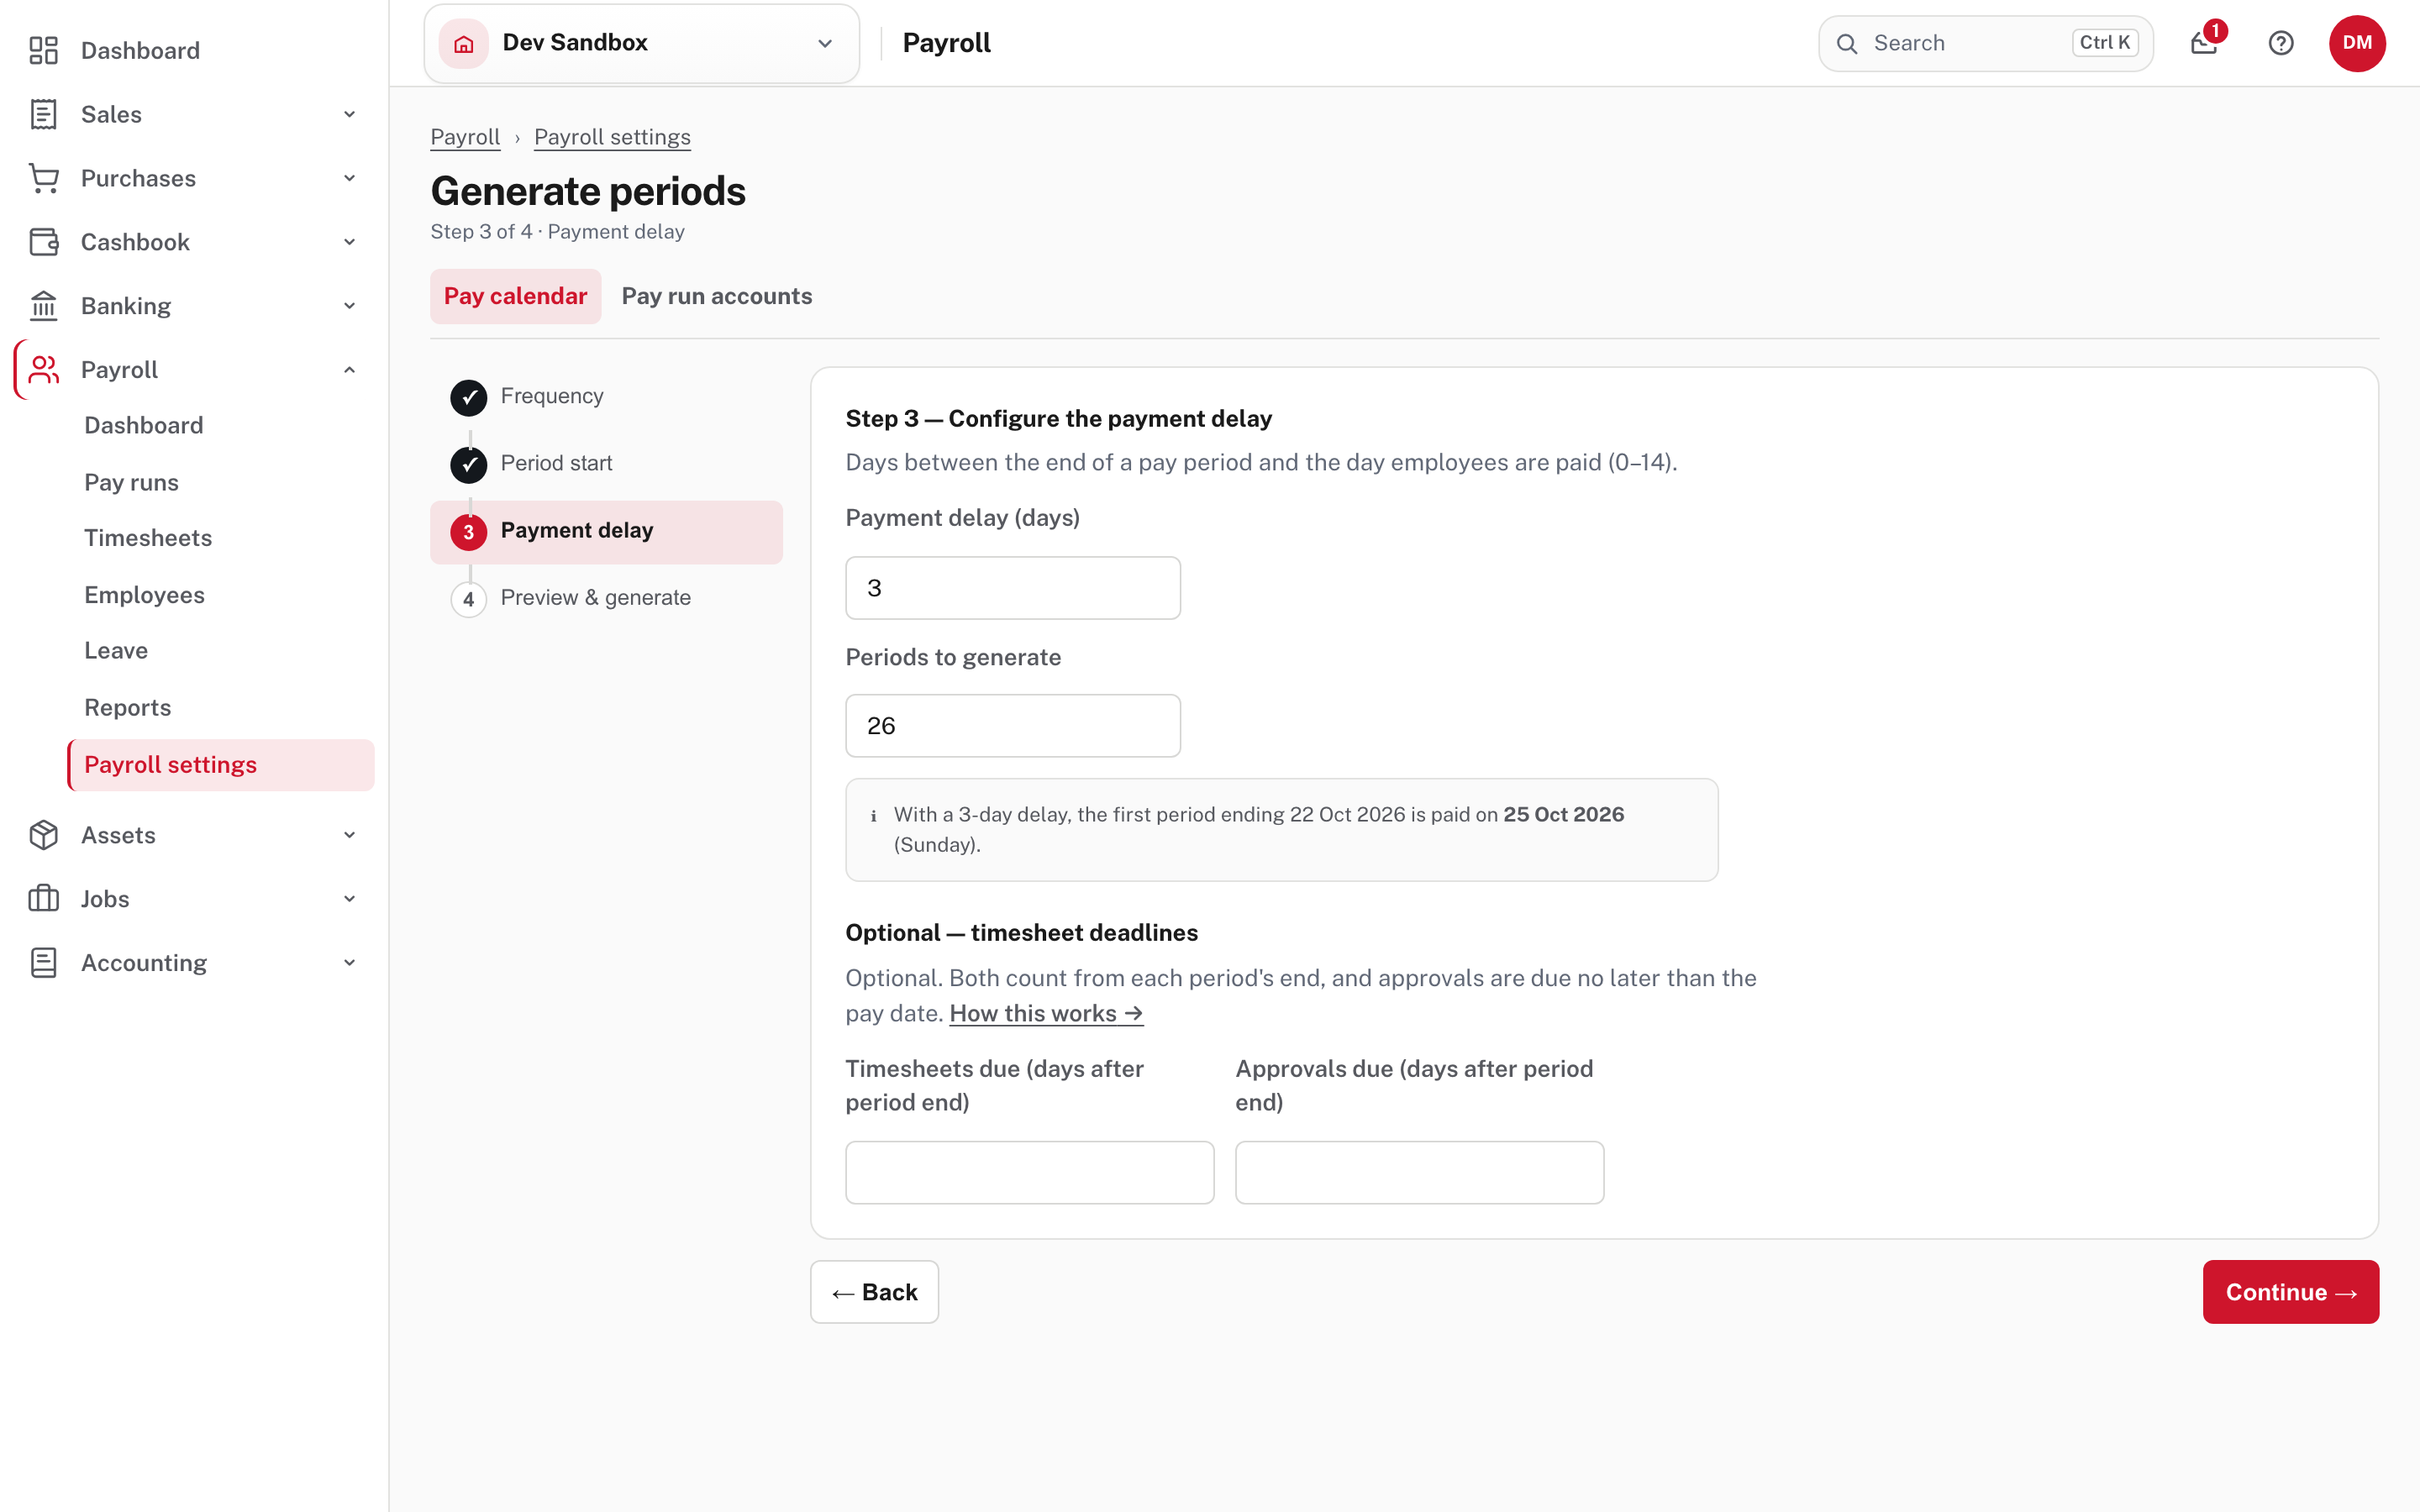
- Payment delay. The days between the end of a period and pay day (0 to 14), and how many periods to generate. Easy spells out the first pay date and the weekday it falls on, so look at the weekday: in the picture a 3-day delay puts the first pay date on a Sunday. Here you can also set the optional timesheet deadlines: Timesheets due and Approvals due, in days after the period ends. Leave them blank for no deadline.
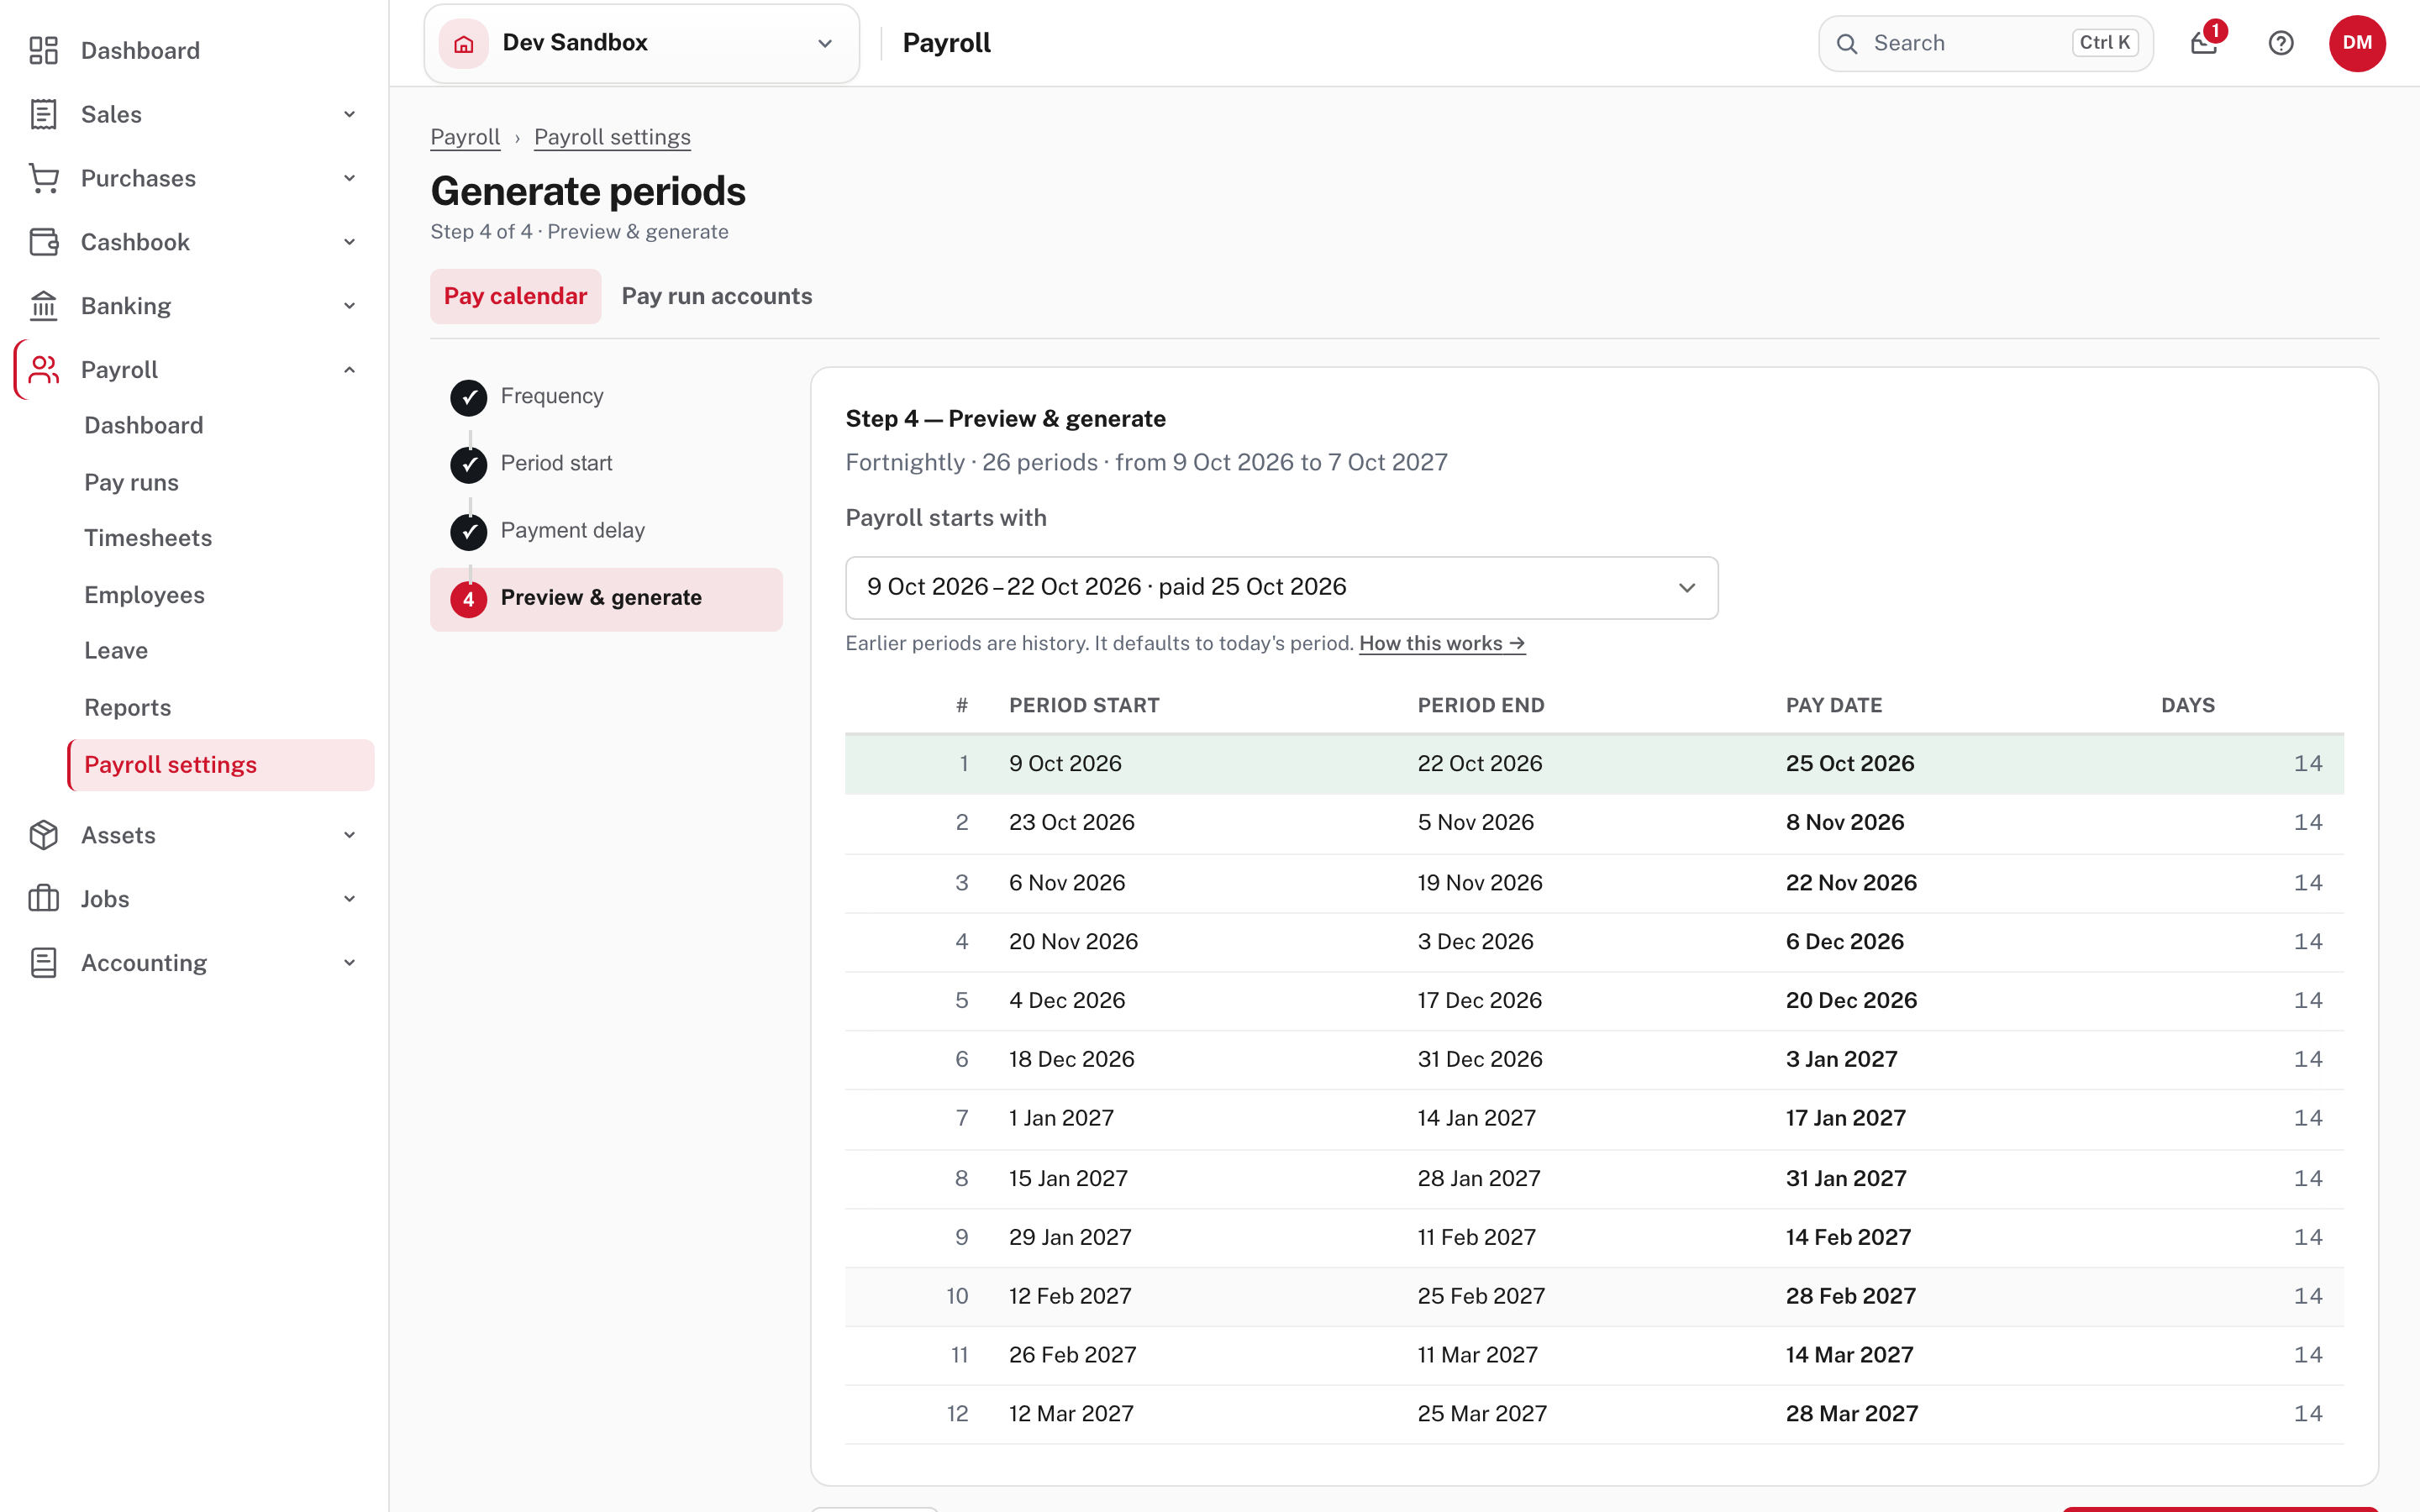
- Preview & generate. Check the list of periods and pay dates. Payroll starts with is the first period you will actually run; it defaults to the period you are in today, and earlier periods become history. Then choose the button at the foot of the page, Generate and the number of periods (for example Generate 26 pay periods).
Not shown in the demo: pressing Generate, which would fill the practice company's calendar.
Overtime is always counted over Monday-to-Sunday weeks, whatever day your pay periods start on (Pay calendar and periods).
A company that already has a calendar
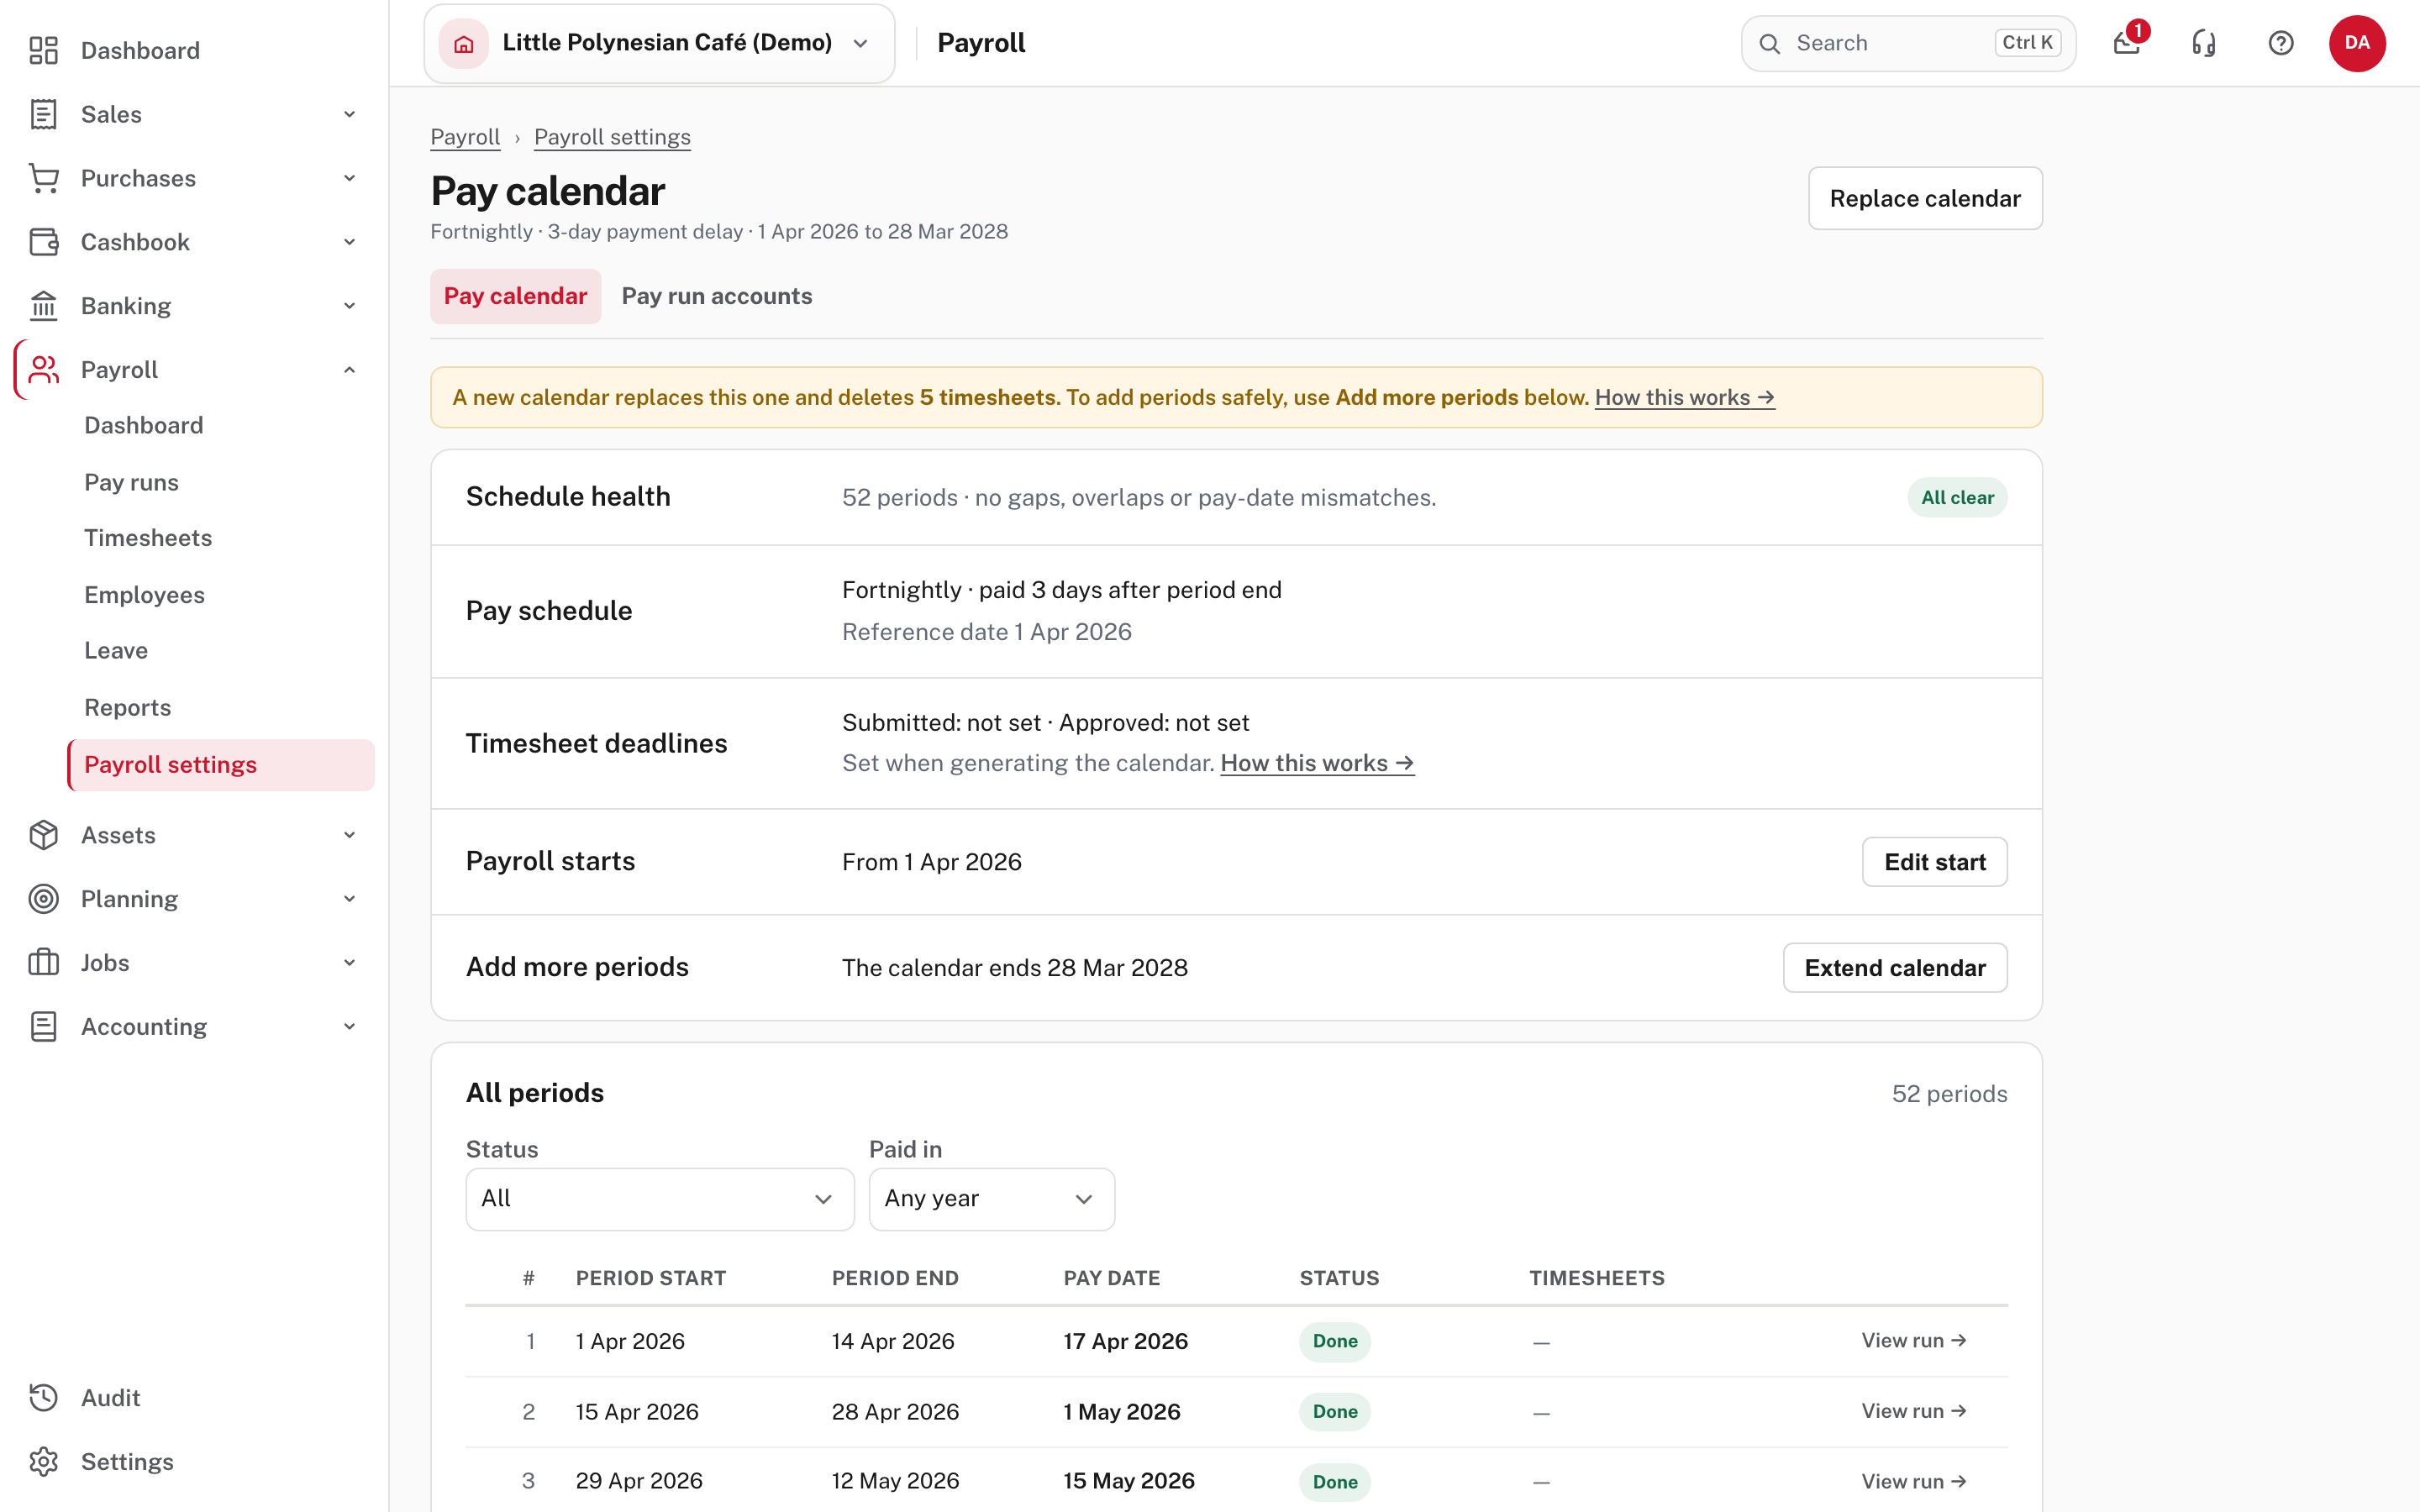
- Schedule health should say All clear: no gaps, no overlaps, no pay-date mismatches.
- Pay schedule shows the frequency, how many days after the period ends staff are paid, and the reference date, the first day the periods count from.
- Timesheet deadlines are optional. Submitted is when timesheets close; Approved is when approval is due.
- Payroll starts matters if you move to Easy part-way through a year. Earlier periods are history: they are never owed or "up next". Change it with Edit start, as long as you don't move it past a period payroll has already run.
- Add more periods (Extend calendar) adds periods at the end and says how many and to which date, without touching anything already there.
- All periods lists every period with its pay date, Status (Overdue, Up next, Open, Not due yet, Done, Before payroll started) and timesheets, with a View run link on paid periods.
Replace calendar deletes timesheets
Replace calendar throws away every period and every timesheet recorded against them, and it can't be undone: the bar at the top of the page says how many timesheets would go. Once a scheduled pay run has been finished, Easy refuses (below). To add more periods safely, use Extend calendar.
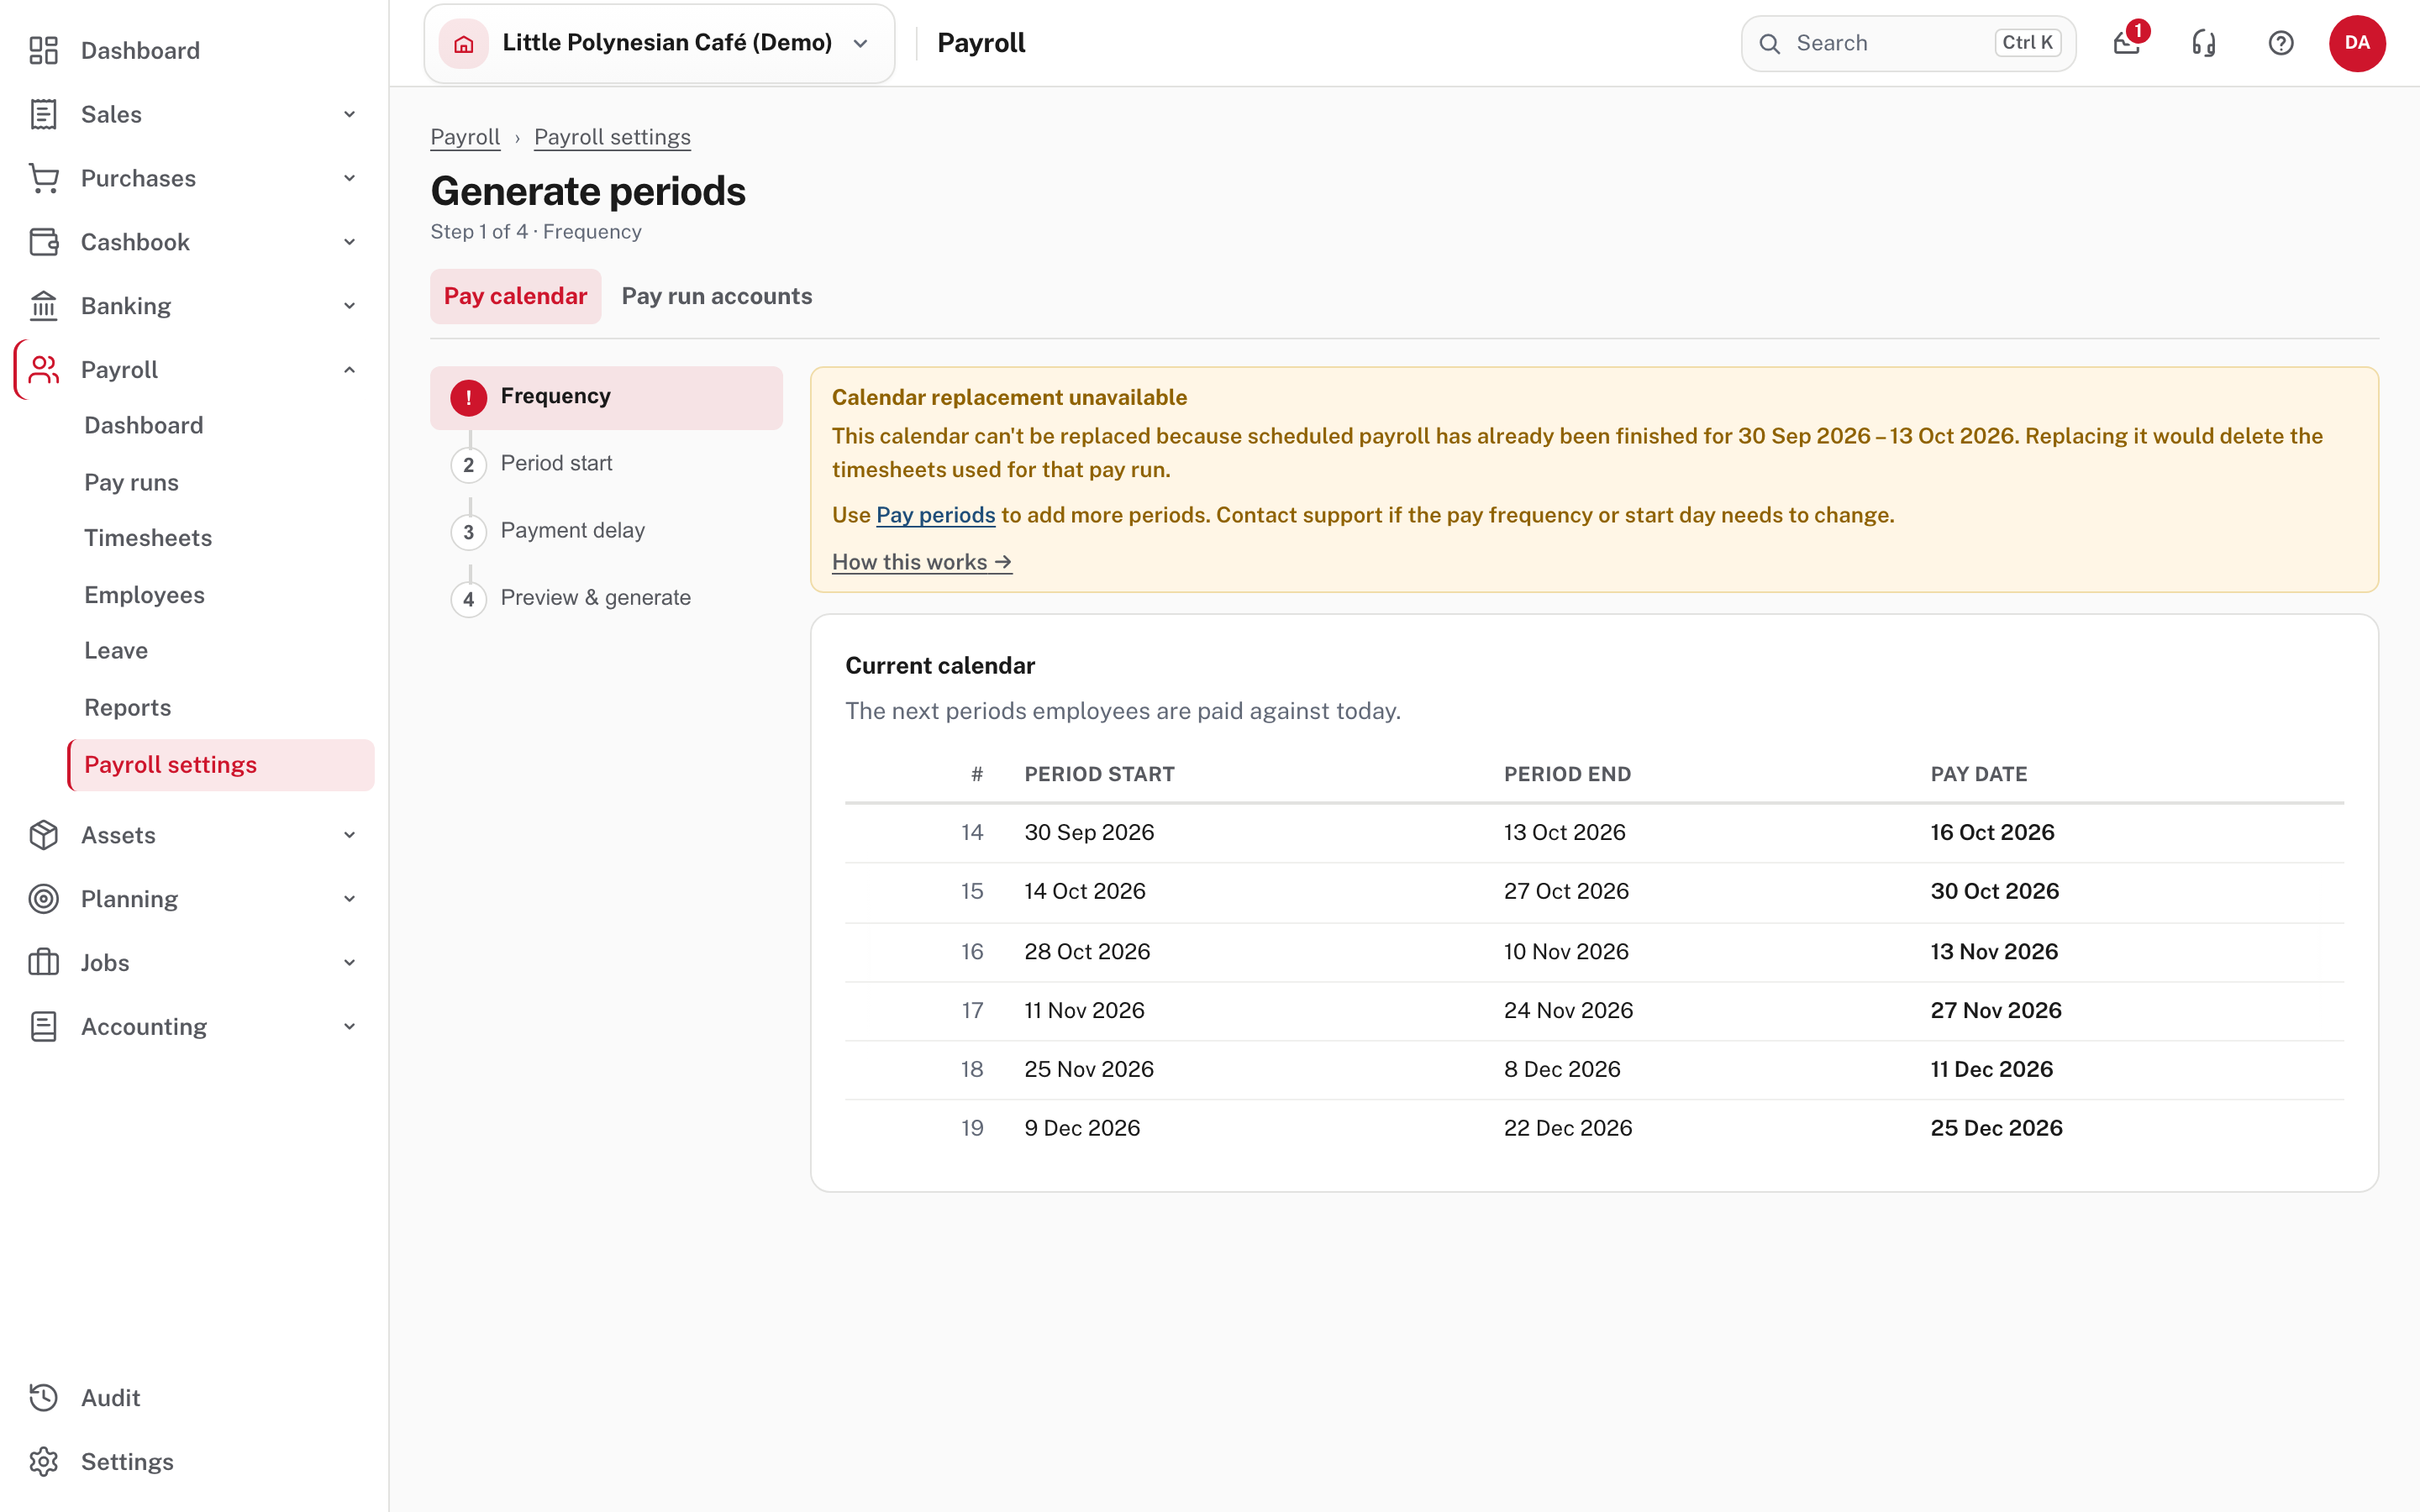
On a company that has finished a scheduled pay run, Replace calendar opens the same four steps but stops with Calendar replacement unavailable: replacing the calendar would delete the timesheets that run was paid from. The page sends you to Pay periods to add more periods and says to contact support if the pay frequency or start day has to change. Not shown in the demo, from Easy's Help: an open, processed pay run blocks replacement as well, and a run that was finished and later undone keeps the calendar locked (Pay calendar and periods).
Step 3. Set up work patterns and overtime
Work patterns (recommended)
Payroll settings → Hours & overtime → Work patterns → + New pattern.
A work pattern is a working week you put people on, for example Full time, Monday to Friday, 40 hours.
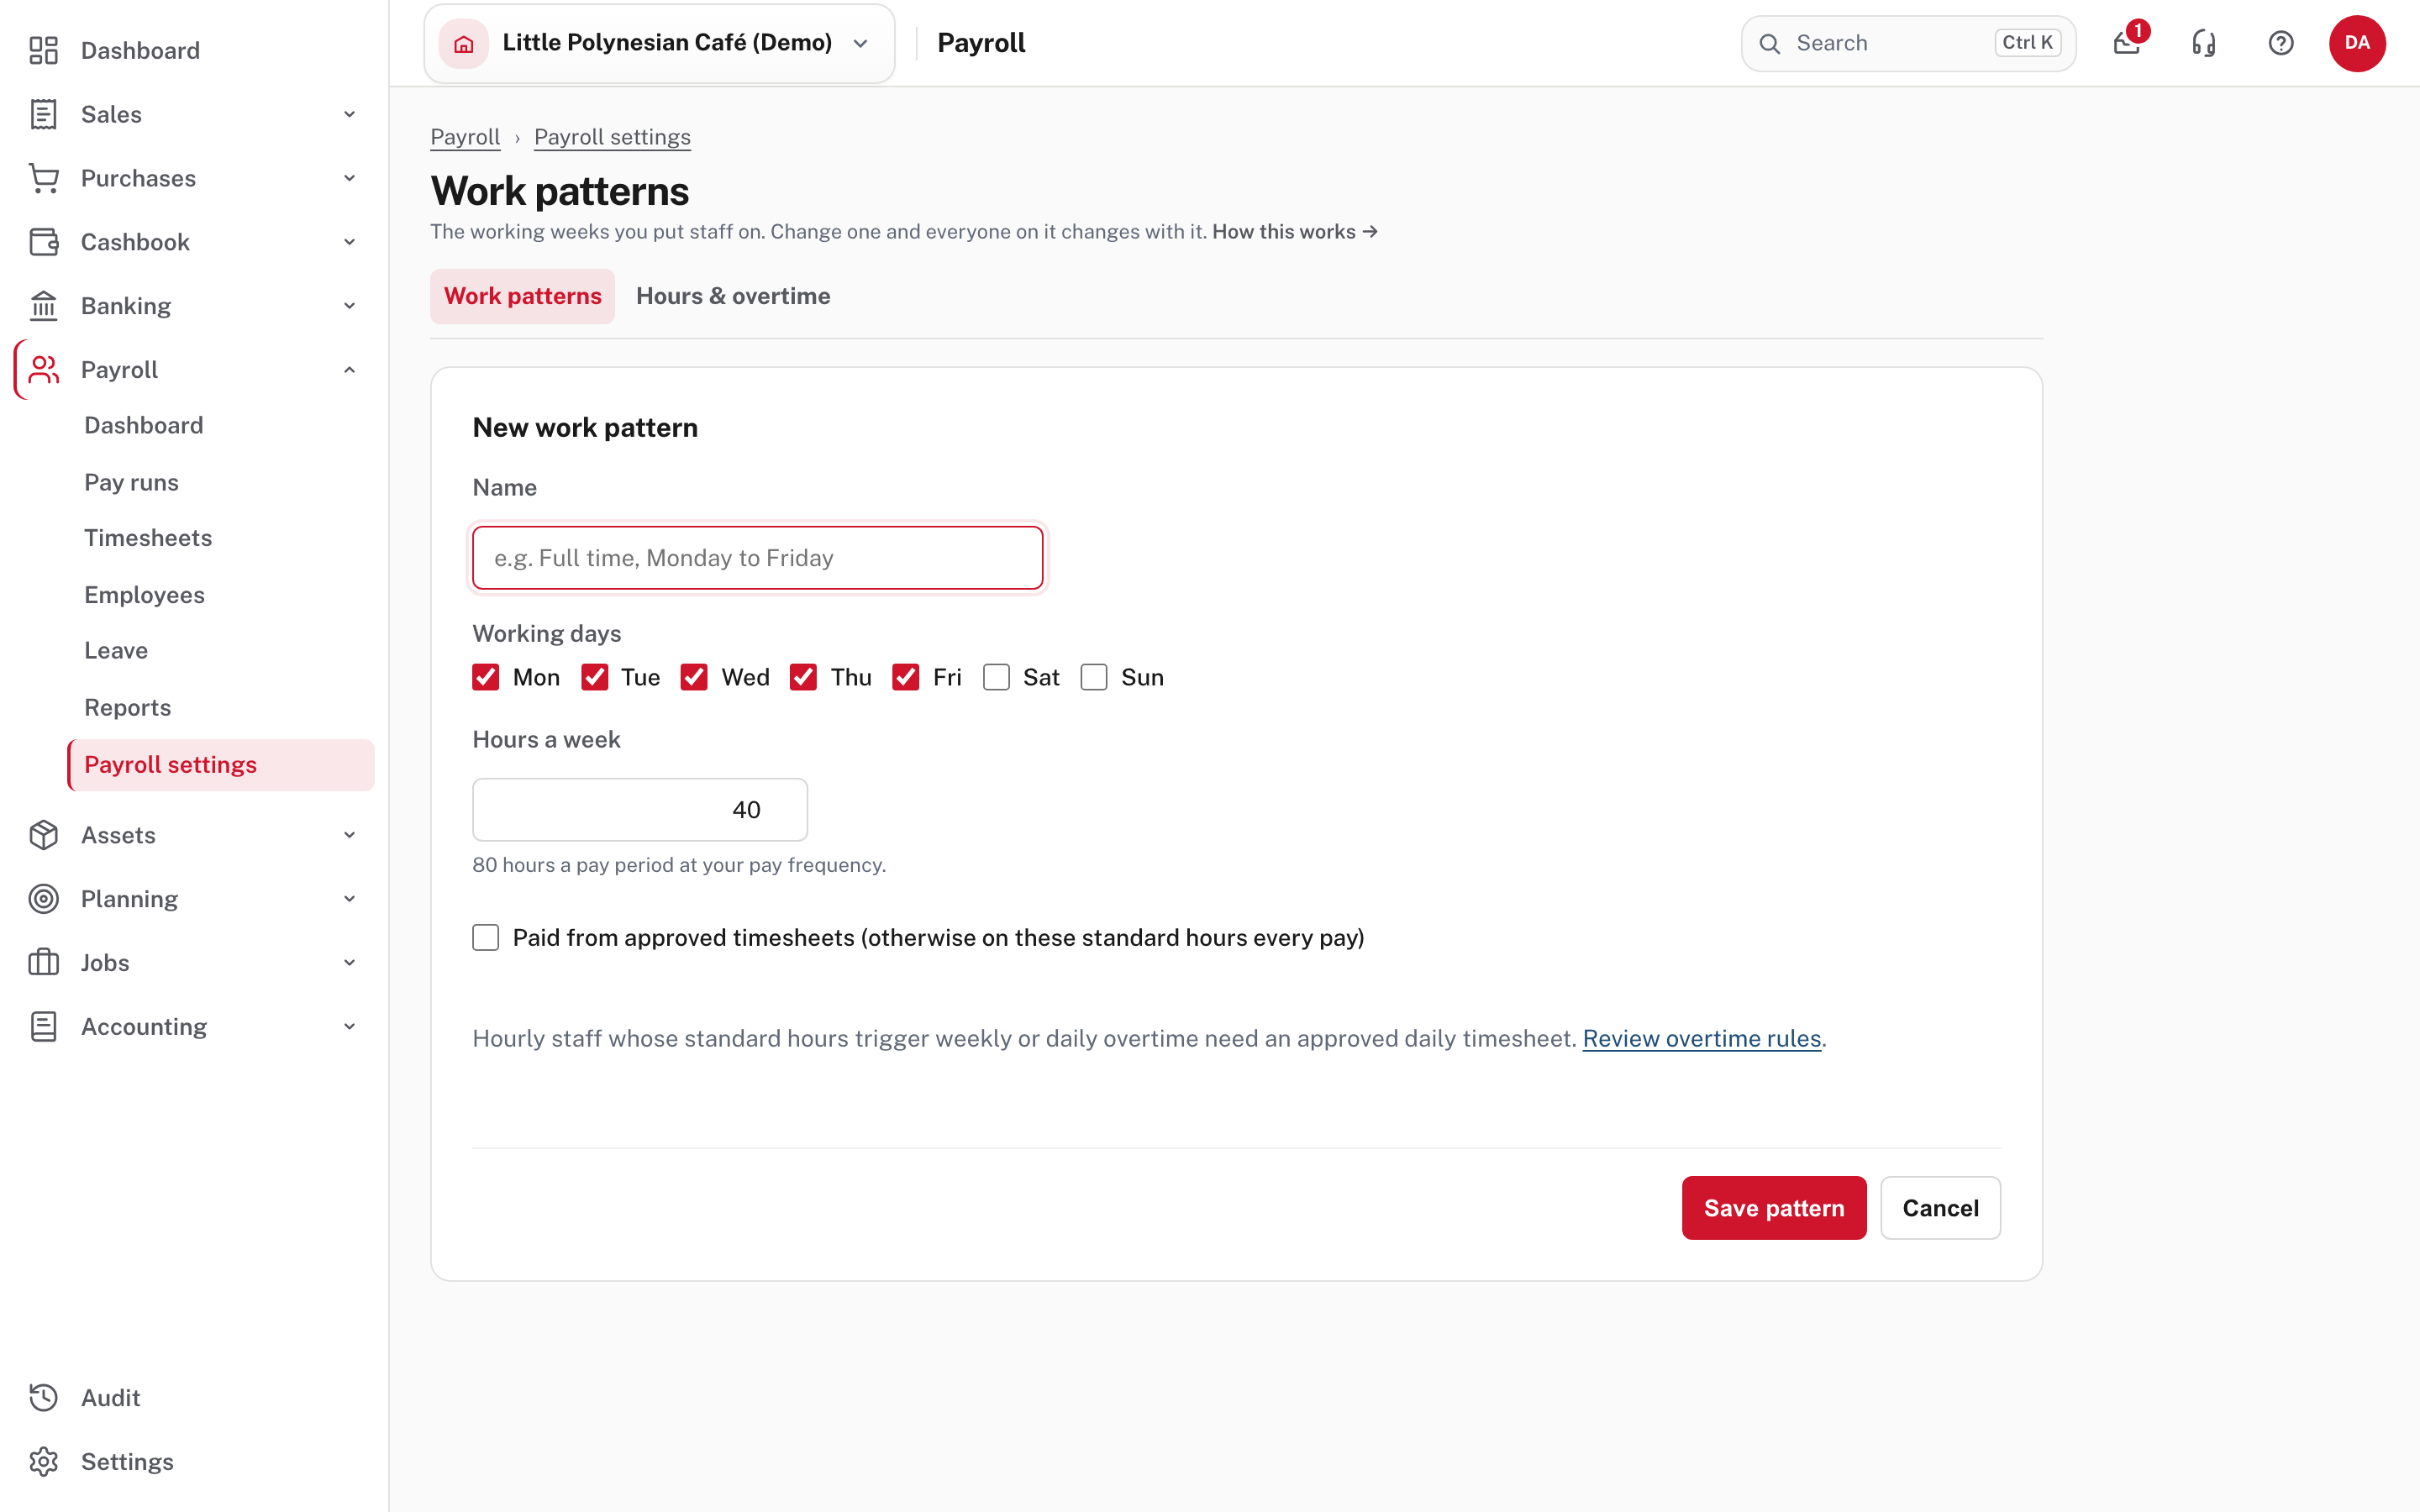
- Name: what you will pick from on the employee's record.
- Working days: tick the days of the week.
- Hours a week: the form shows the hours this makes in each pay period (40 a week is 80 a fortnight).
- Paid from approved timesheets: tick it if the person's pay follows their approved timesheet each period. Leave it unticked and they are paid the standard hours every pay.
A line under the box reminds you that hourly staff whose standard hours trigger weekly or daily overtime need an approved daily timesheet, and links to the overtime rules below.
Choose Save pattern. Then choose the pattern on each employee's Pay & work pattern section (step 9). If you later change a pattern, everyone on it changes from their next pay run. Not shown in the demo: saving a pattern. The café has none yet, so its employees' Work pattern box reads Their own pattern (set below).
More detail: Employee records, work patterns.
Hours & overtime
Payroll settings → Hours & overtime → Hours & overtime (the second tab).
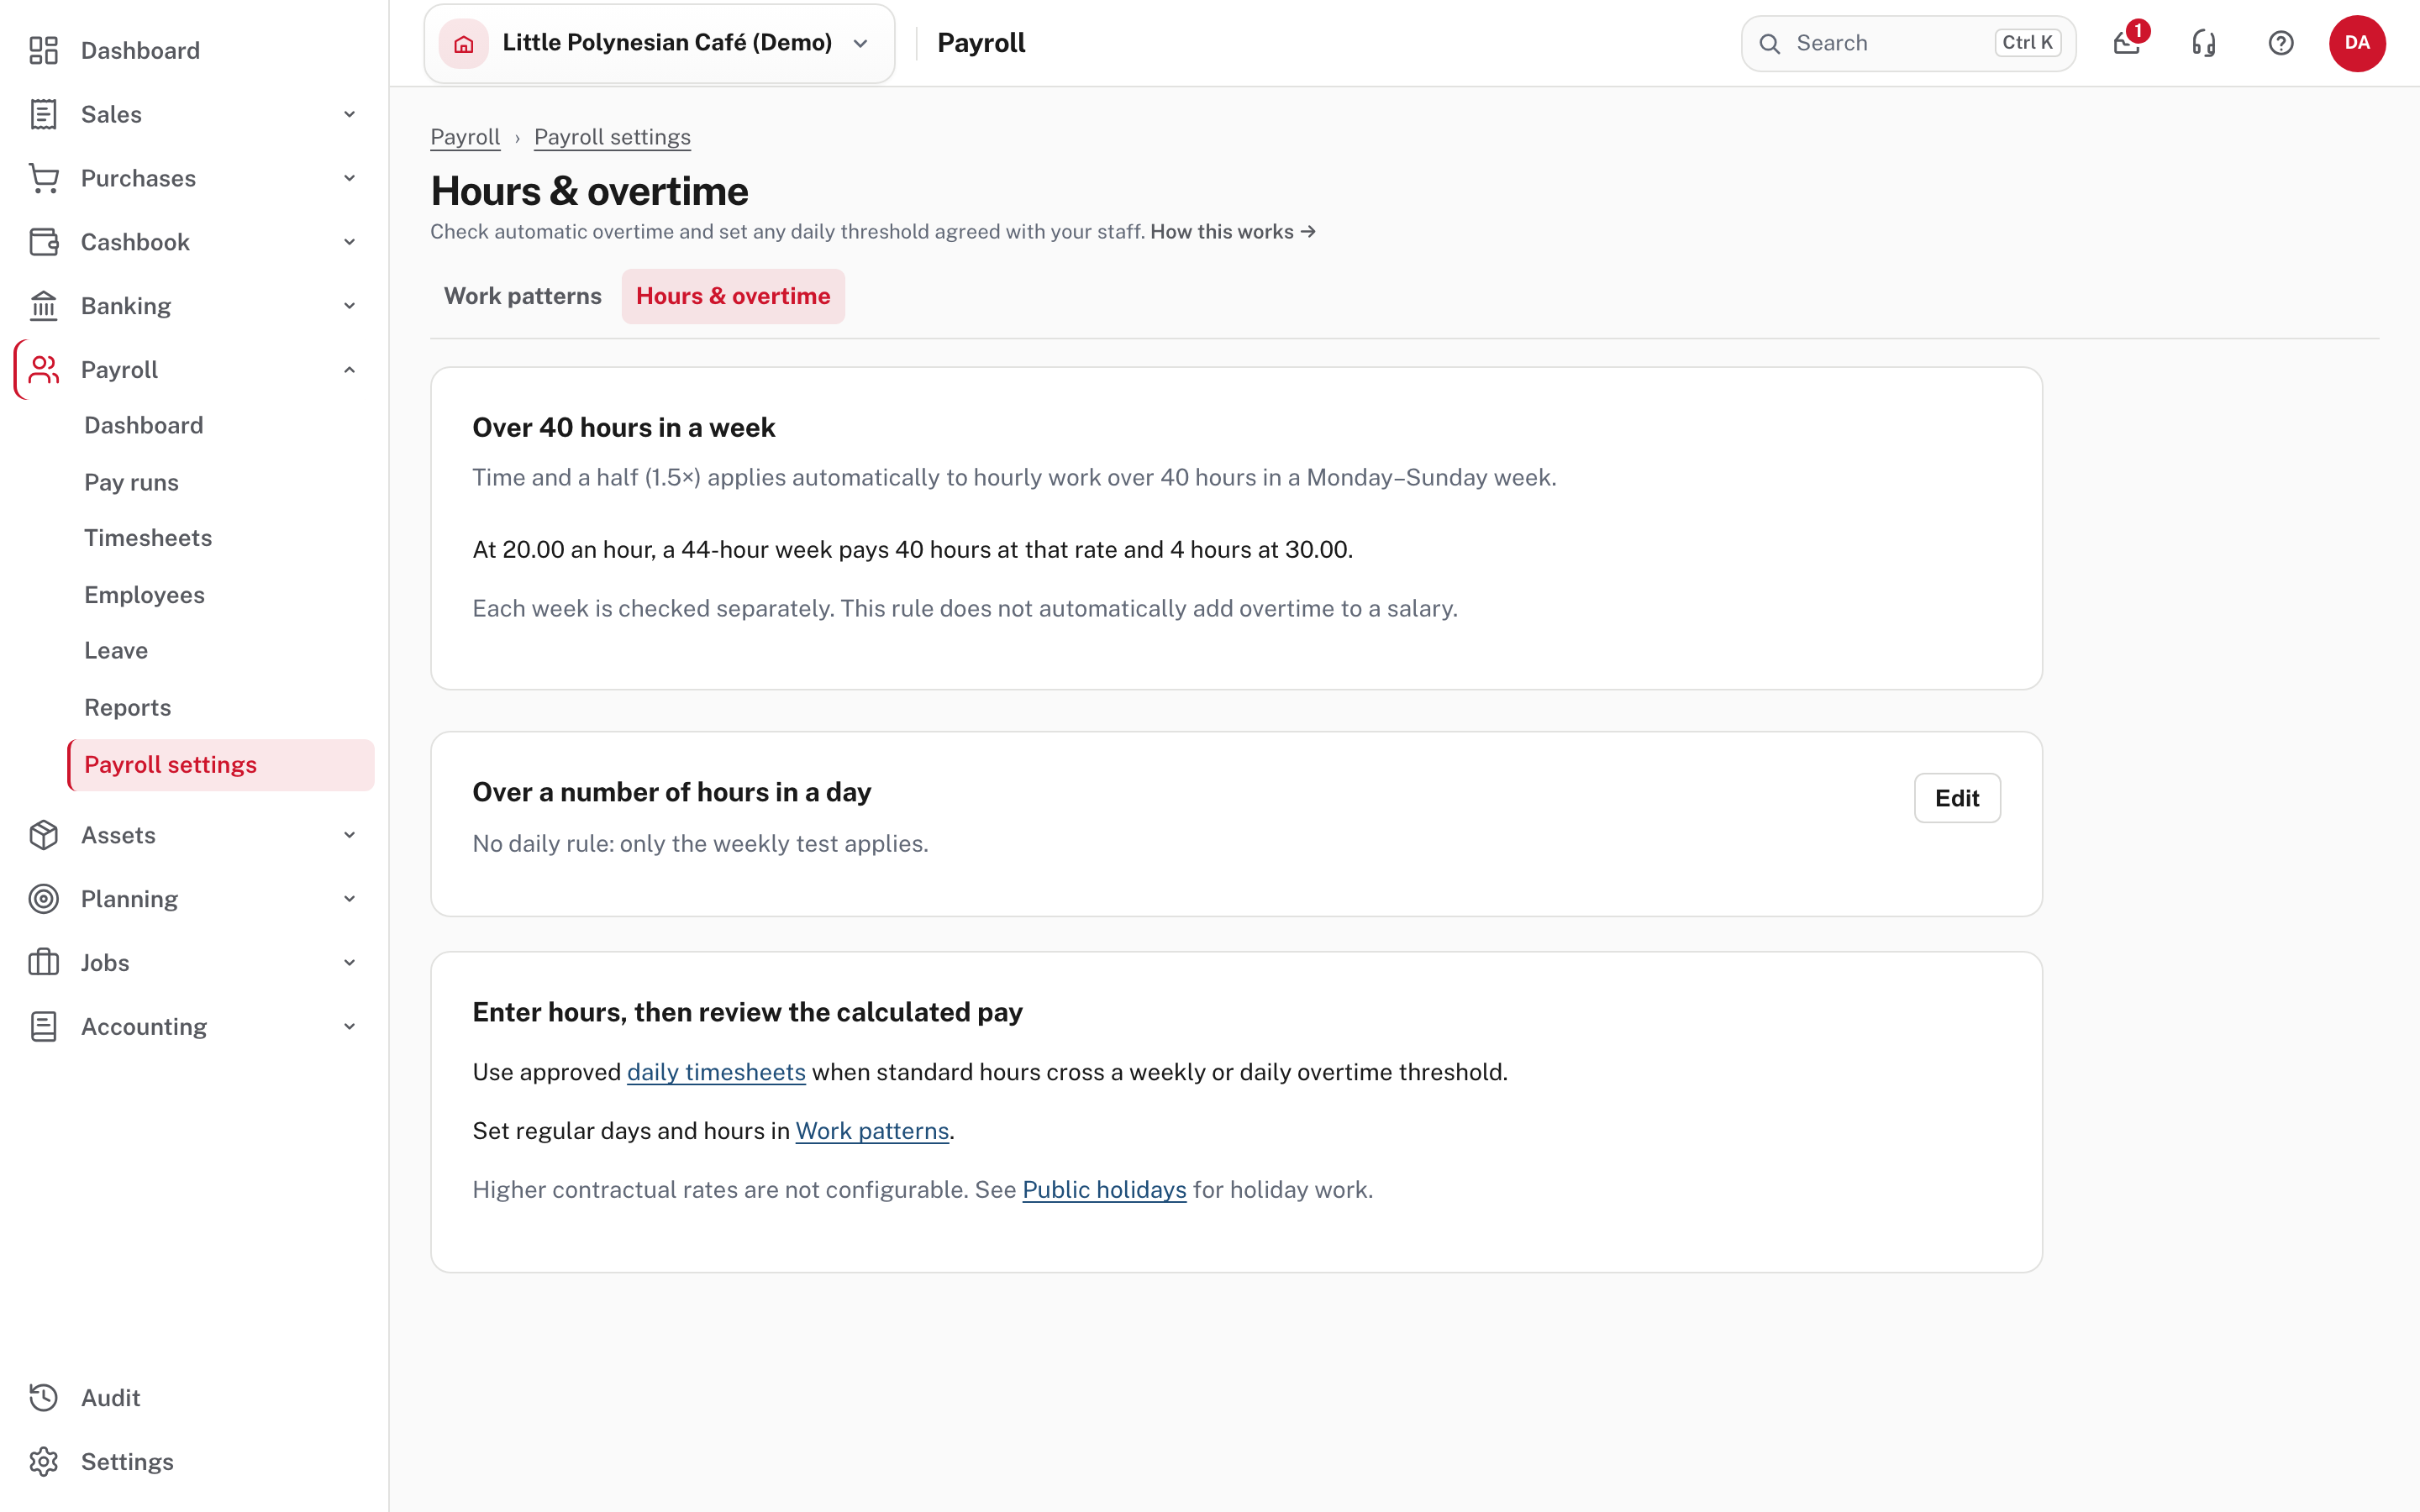
- Over 40 hours in a week. Time and a half (1.5×) applies automatically to hourly work over 40 hours in a Monday-to-Sunday week. There is no switch for it. The page works an example: a 44-hour week pays 40 hours at the rate and 4 hours at one and a half times. It does not add overtime to a salary.
- Over a number of hours in a day. Optional. If your agreements pay overtime after so many hours in a day, choose Edit, enter the hours under Overtime after (hours in a day) and choose Save rule. Leave it blank for no daily rule. A change applies to the next pay run built from timesheets.
- The last card says that higher contractual rates are not configurable, so check any agreement more generous than the standard before you rely on the calculation, and that standard hours which cross a threshold need approved daily timesheets (Timesheets).
More detail: How an employee's pay is calculated, overtime.
Step 4. Check the pay run accounts
Payroll settings → Pay schedule → Pay run accounts.
These are the accounts every new pay run uses.
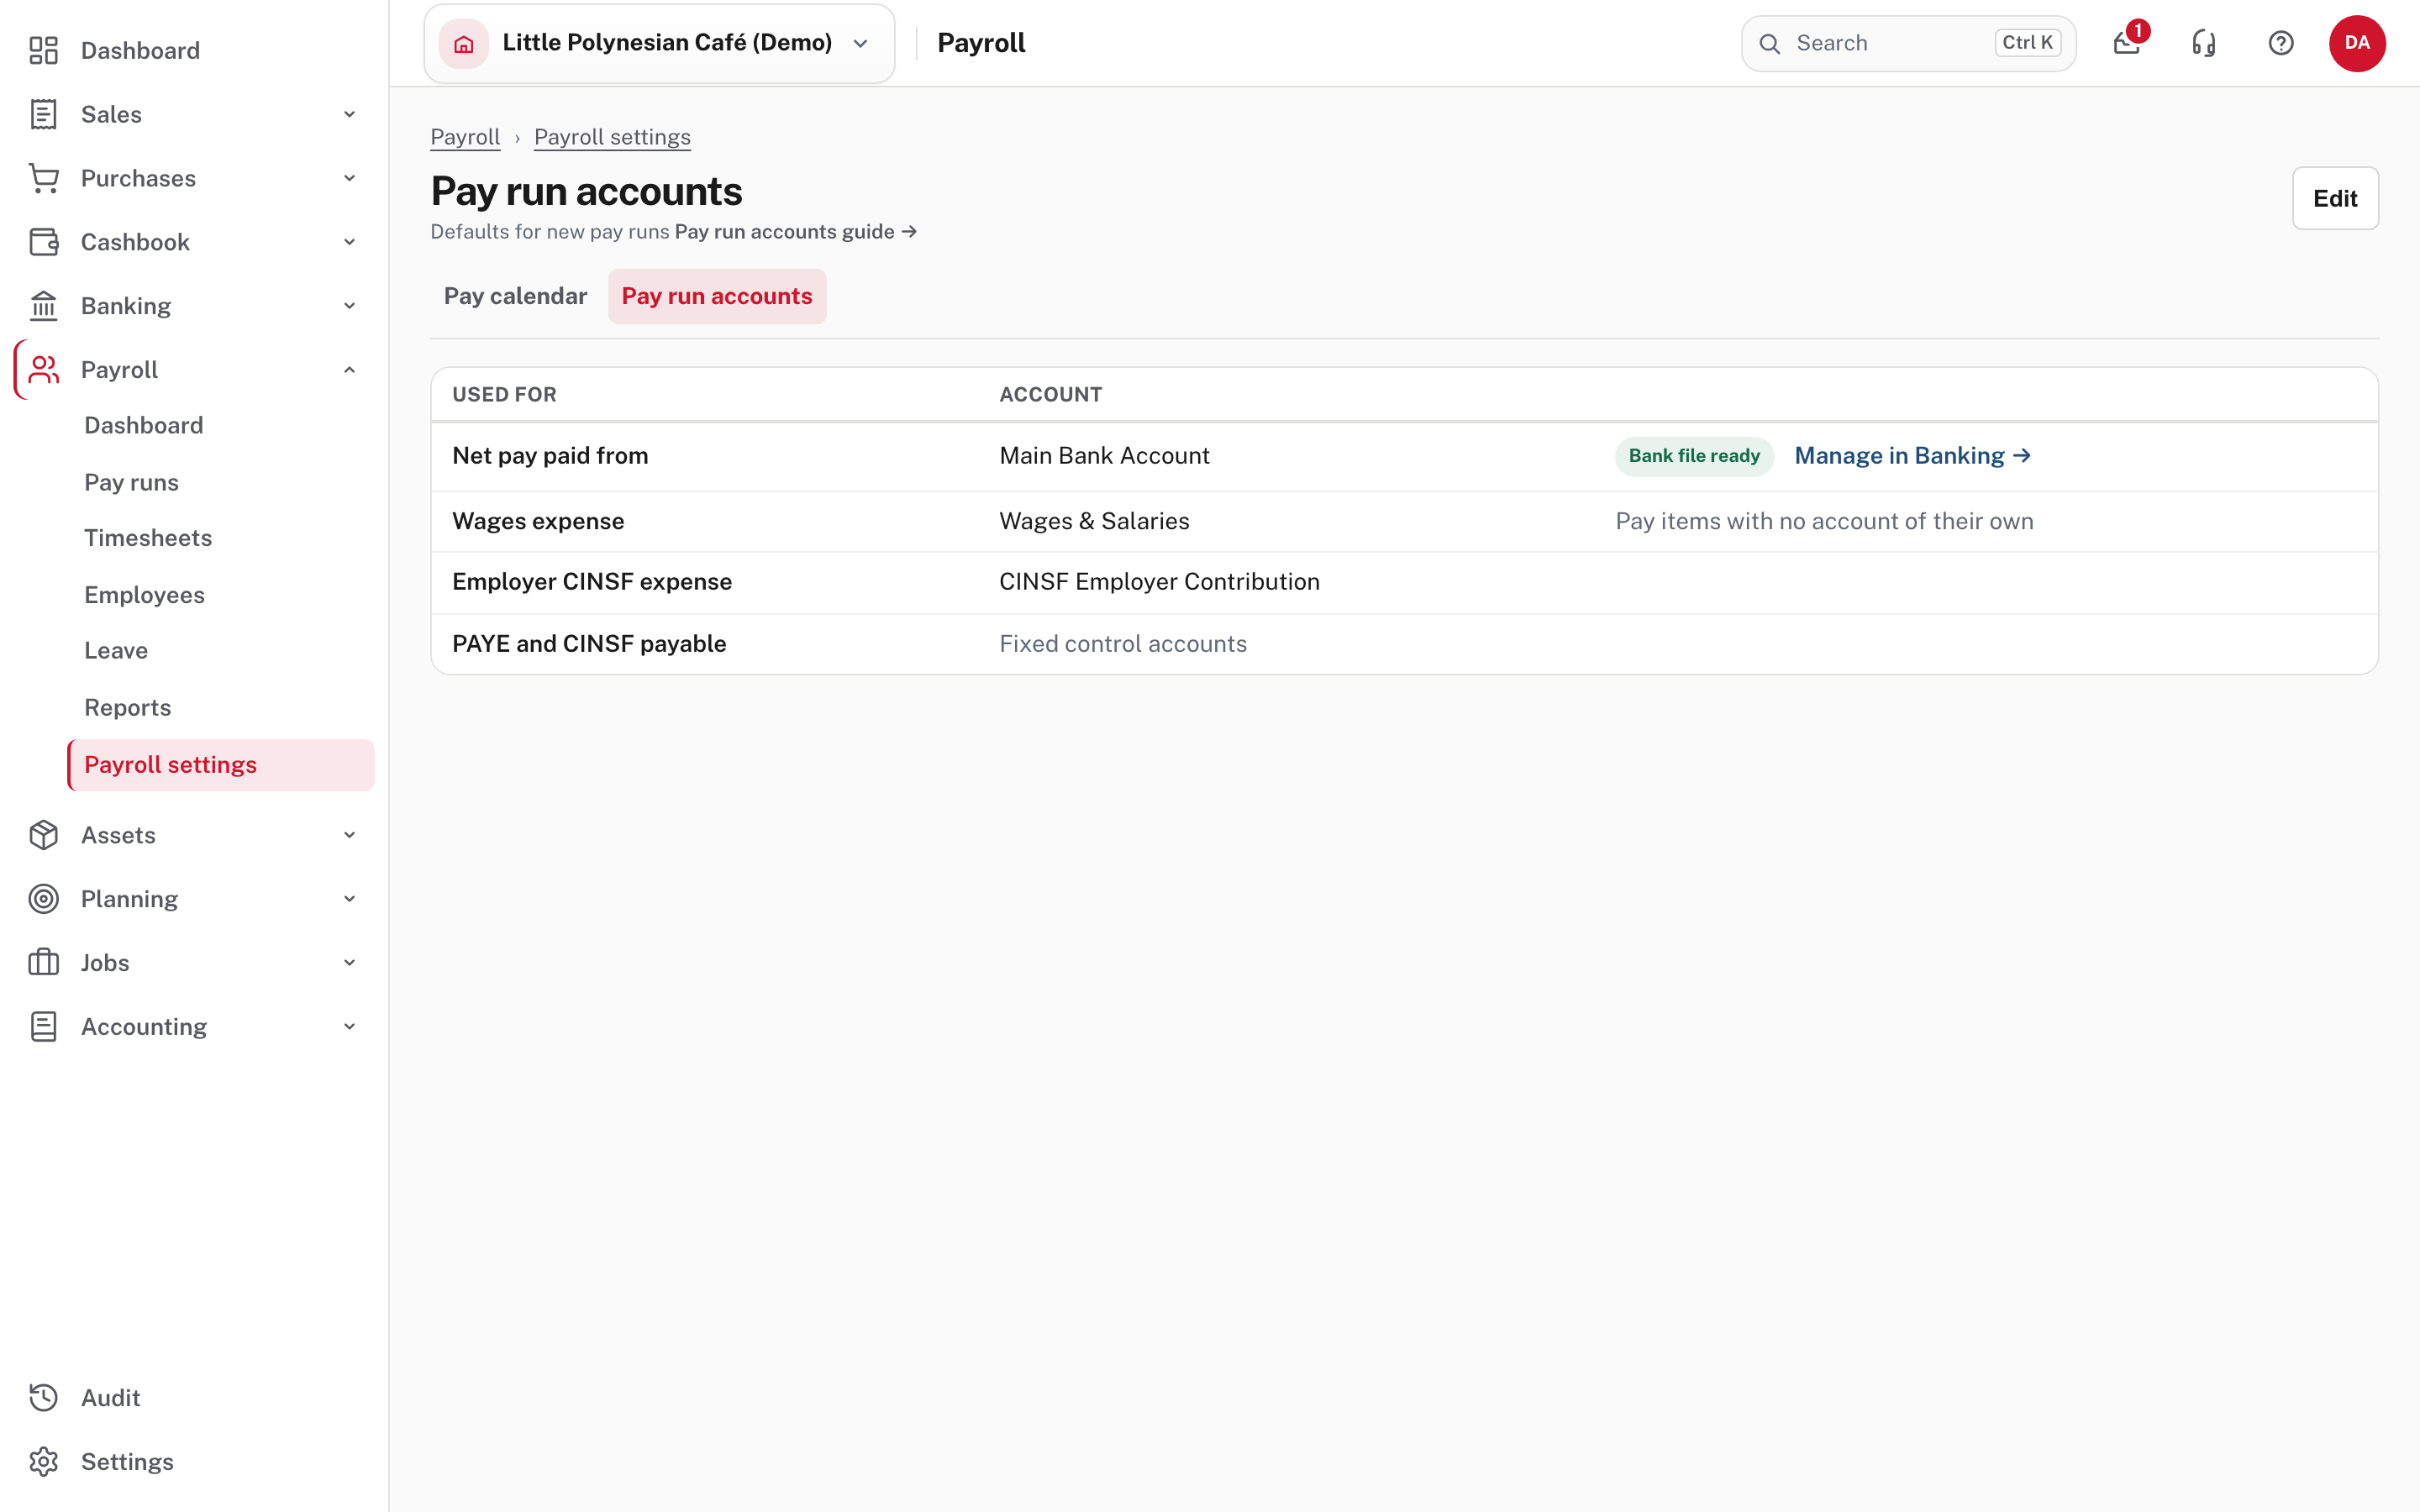
- Net pay paid from: the bank account the wages are paid from. A bank account shows whether its bank file is ready (Bank file ready), and Manage in Banking opens that account's bank file setup.
- Wages expense: where gross wages are recorded, for pay items with no account of their own.
- Employer CINSF expense: where your own CINSF contribution is recorded.
- PAYE and CINSF payable: fixed control accounts. They are not chosen here.
Easy picks these automatically (each list starts with Automatic, then the account it picked). Check that they are the accounts you expect. Choose Edit to pick another, then Save defaults. A change applies to runs built after it; runs that already exist keep their accounts, and a pay run can still be paid from another account, chosen on its Finish step.
Bank accounts are added, and their bank files set up, under Banking. On Easy Payroll (payroll only) Banking holds just those two things. Not shown in the demo: a payroll-only company, from Help.
Step 5. Enter the tax and CINSF rules
Payroll settings → Tax & contributions. There is one tab each for PAYE, CINSF and Minimum wage.
PAYE
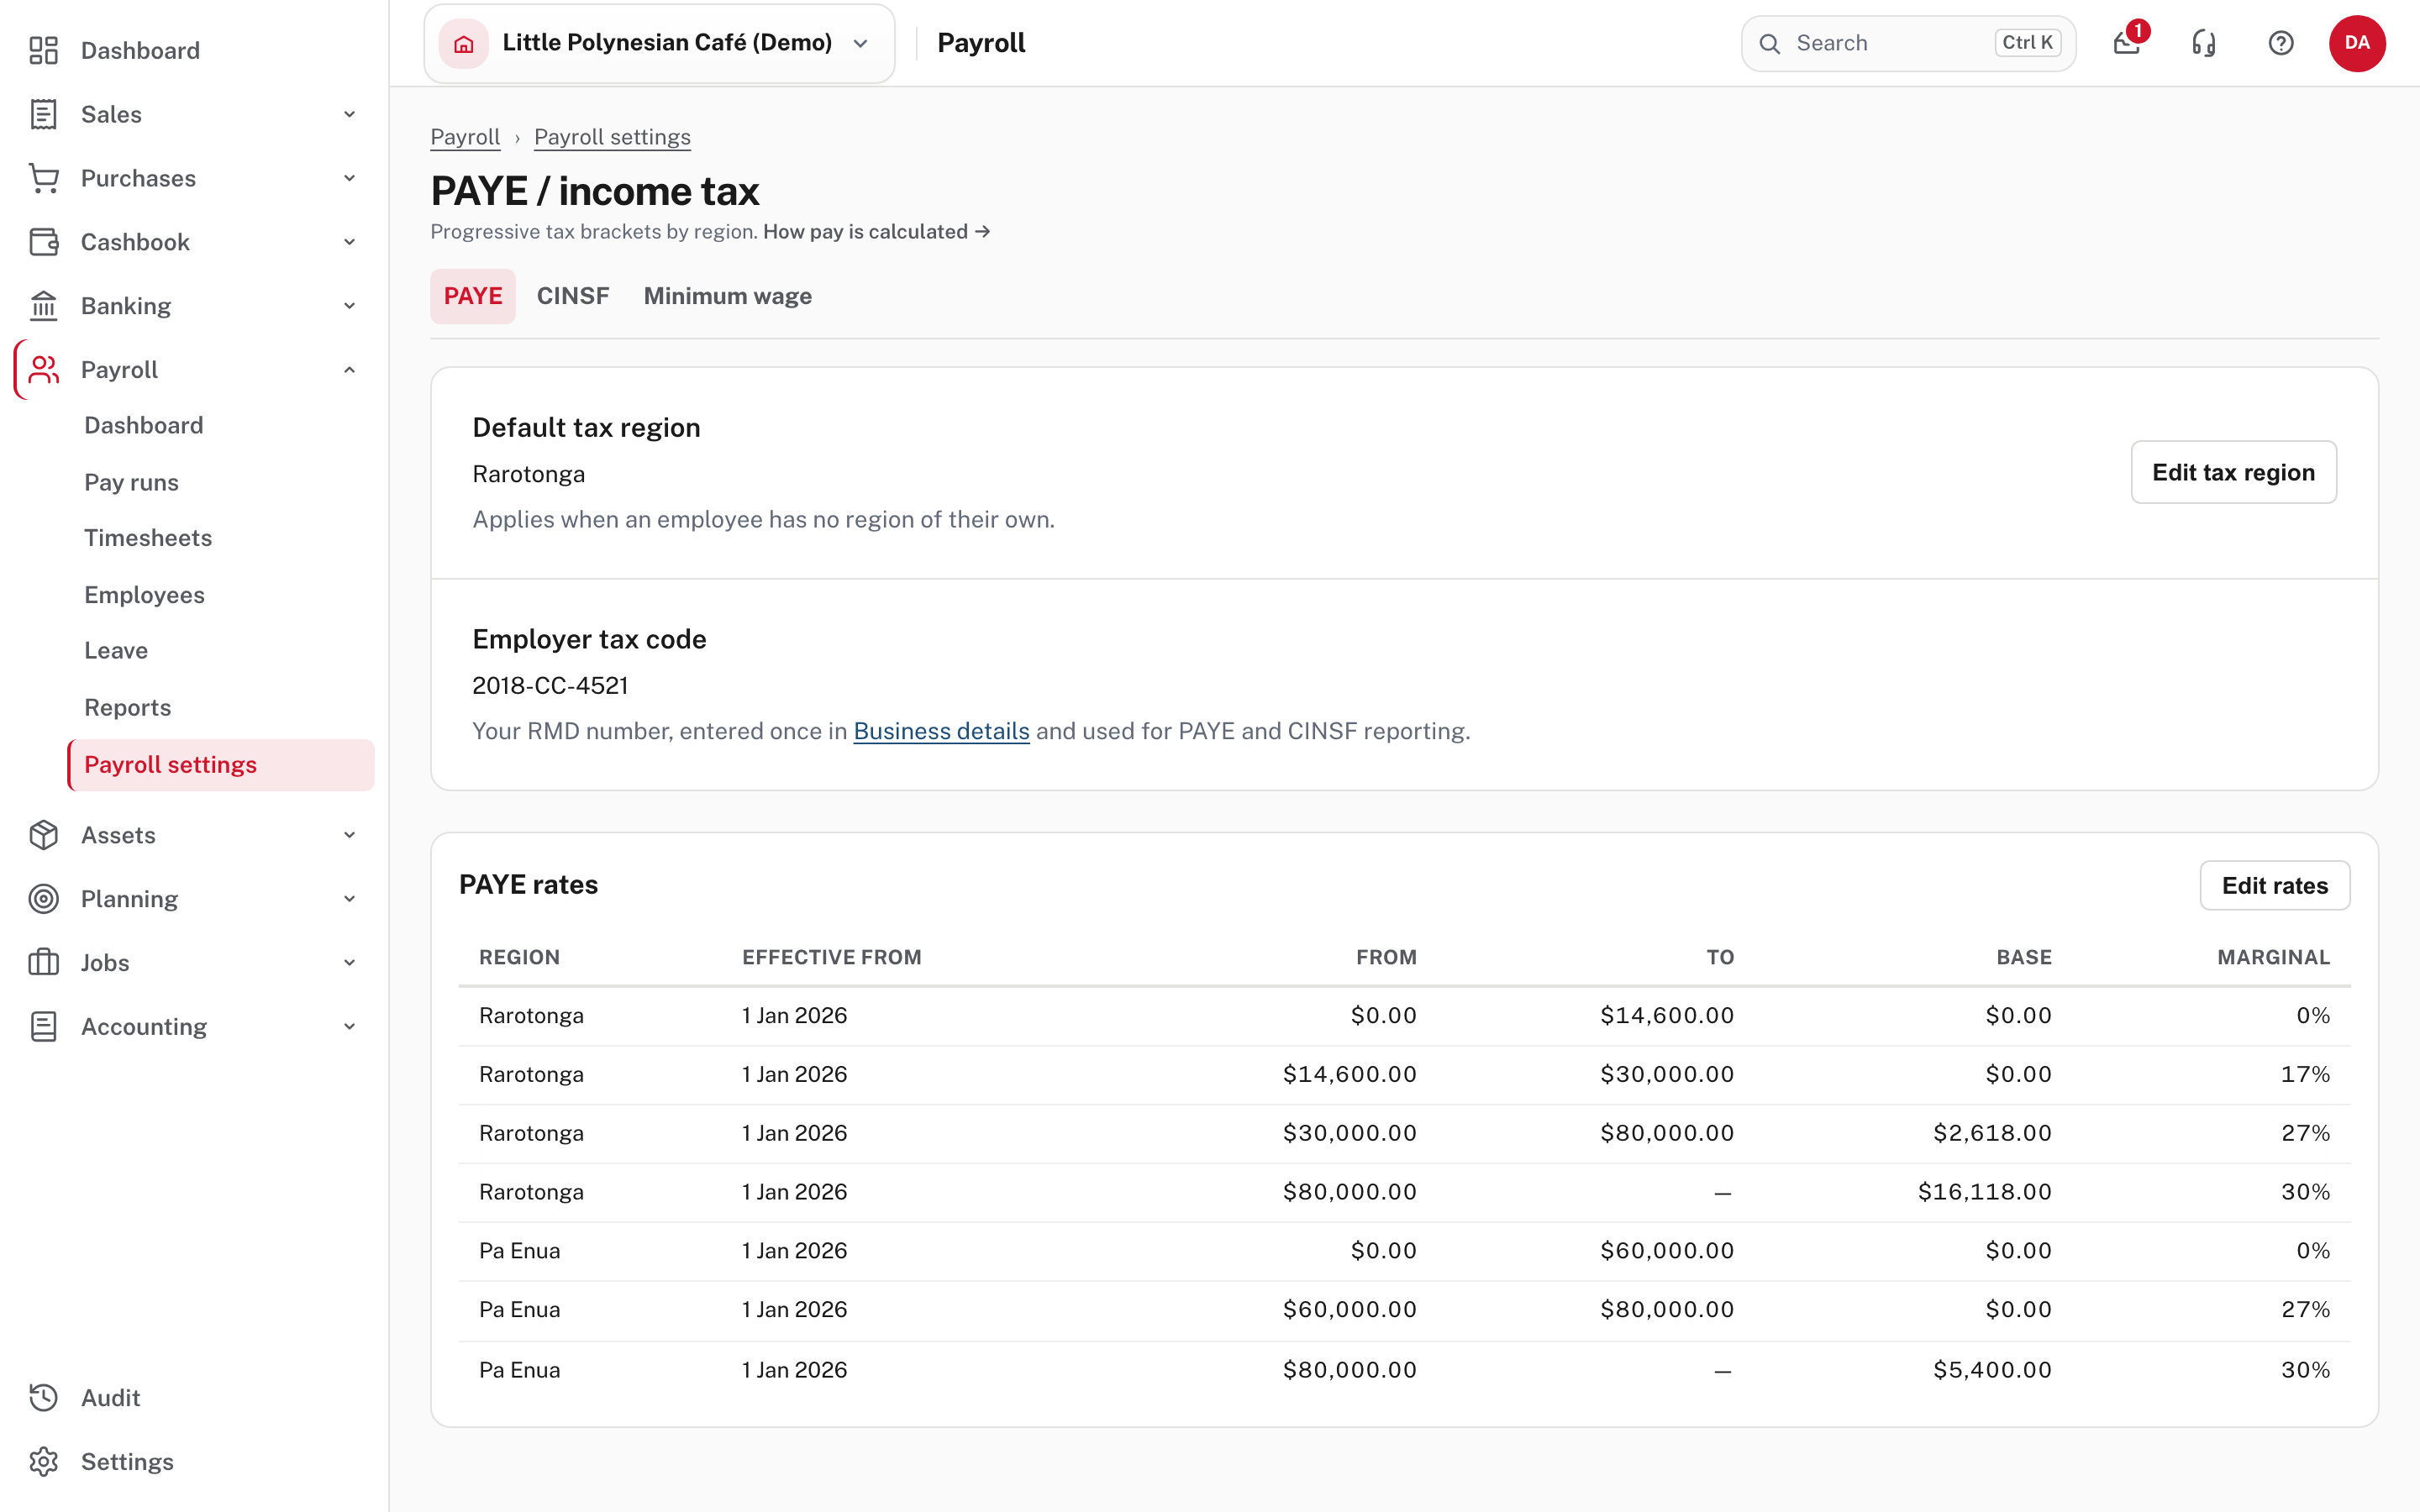
- Default tax region applies to any employee who has no region of their own (Rarotonga or Pa Enua). Edit tax region changes it.
- Employer tax code is your RMD number. It comes from Business details, so edit it there.
- PAYE rates is the table of brackets for each region, with the date each set takes effect. Use Edit rates to change it.
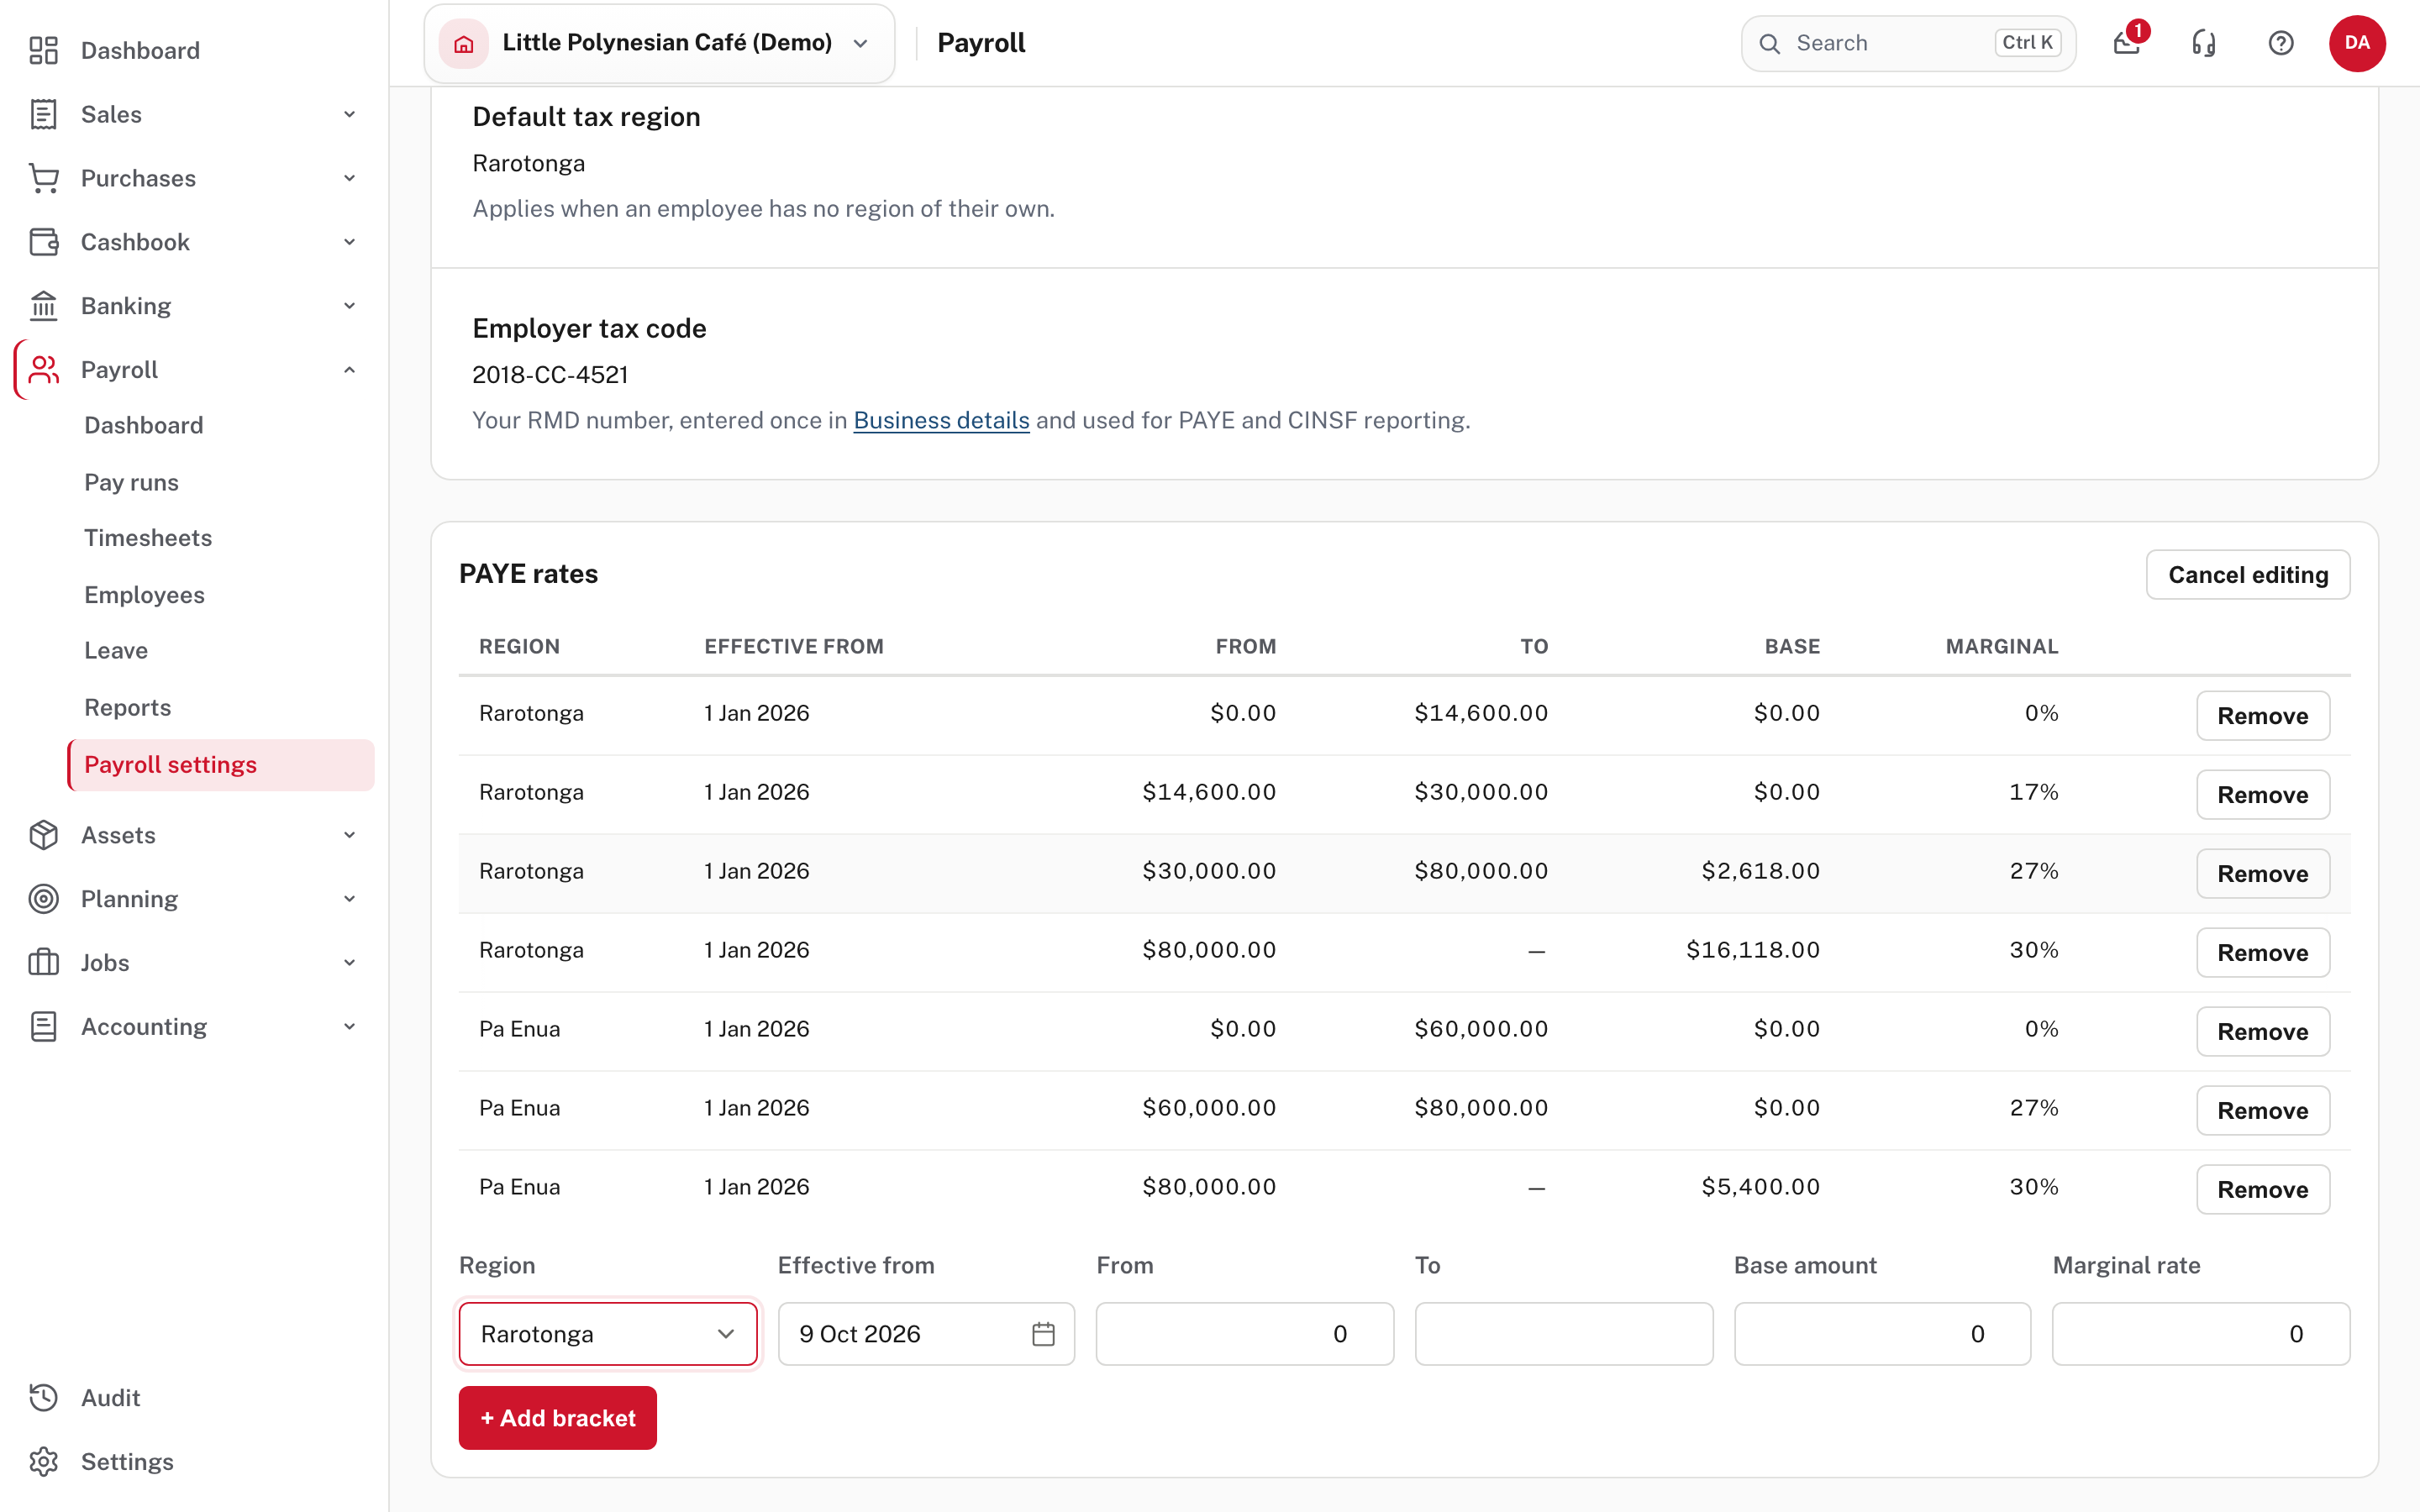
Each row has a Remove button. To add a bracket, fill in Region, Effective from, From, To (empty for the top bracket), Base amount and Marginal rate, then + Add bracket. Look at the table afterwards: the top bracket should show a dash under To.
Check the top bracket
The last bracket for each region must have no upper limit (the To column shows a dash). If it does, every level of earnings is taxed.
CINSF
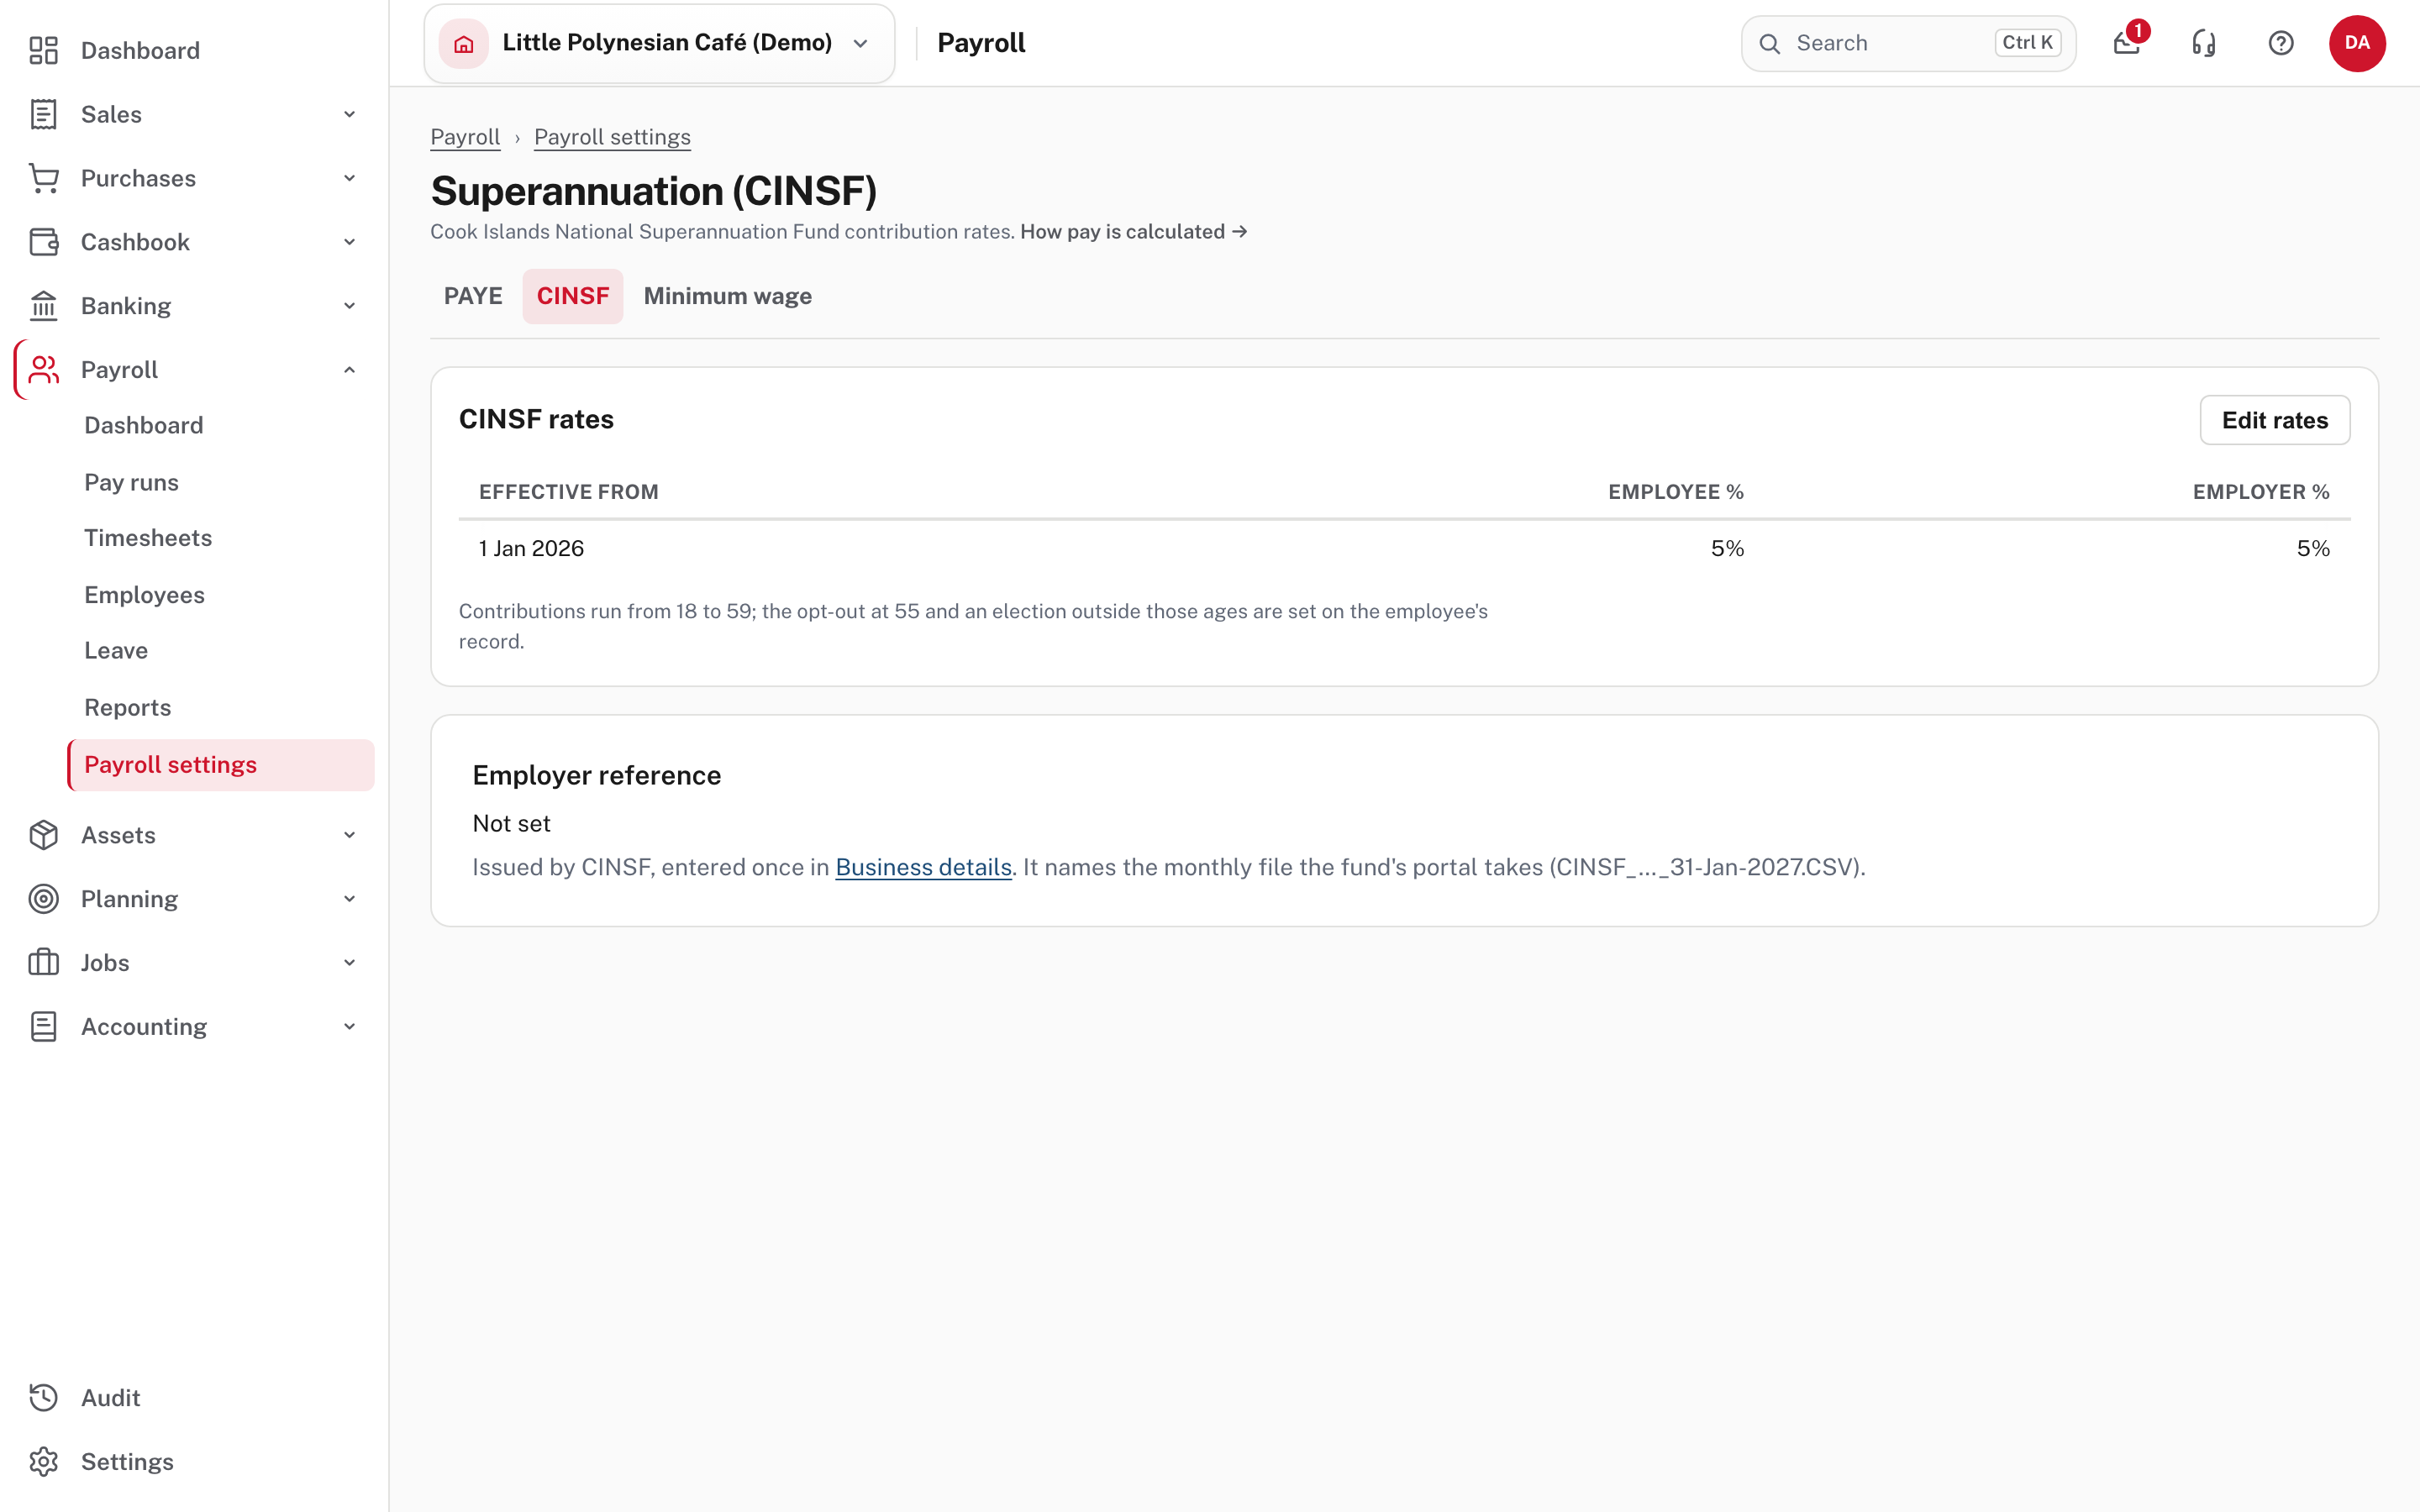
Enter the employee and employer rates and the date they take effect (Edit rates, then + Add rate). The Employer reference under the table reads Not set until you enter it in Business details.
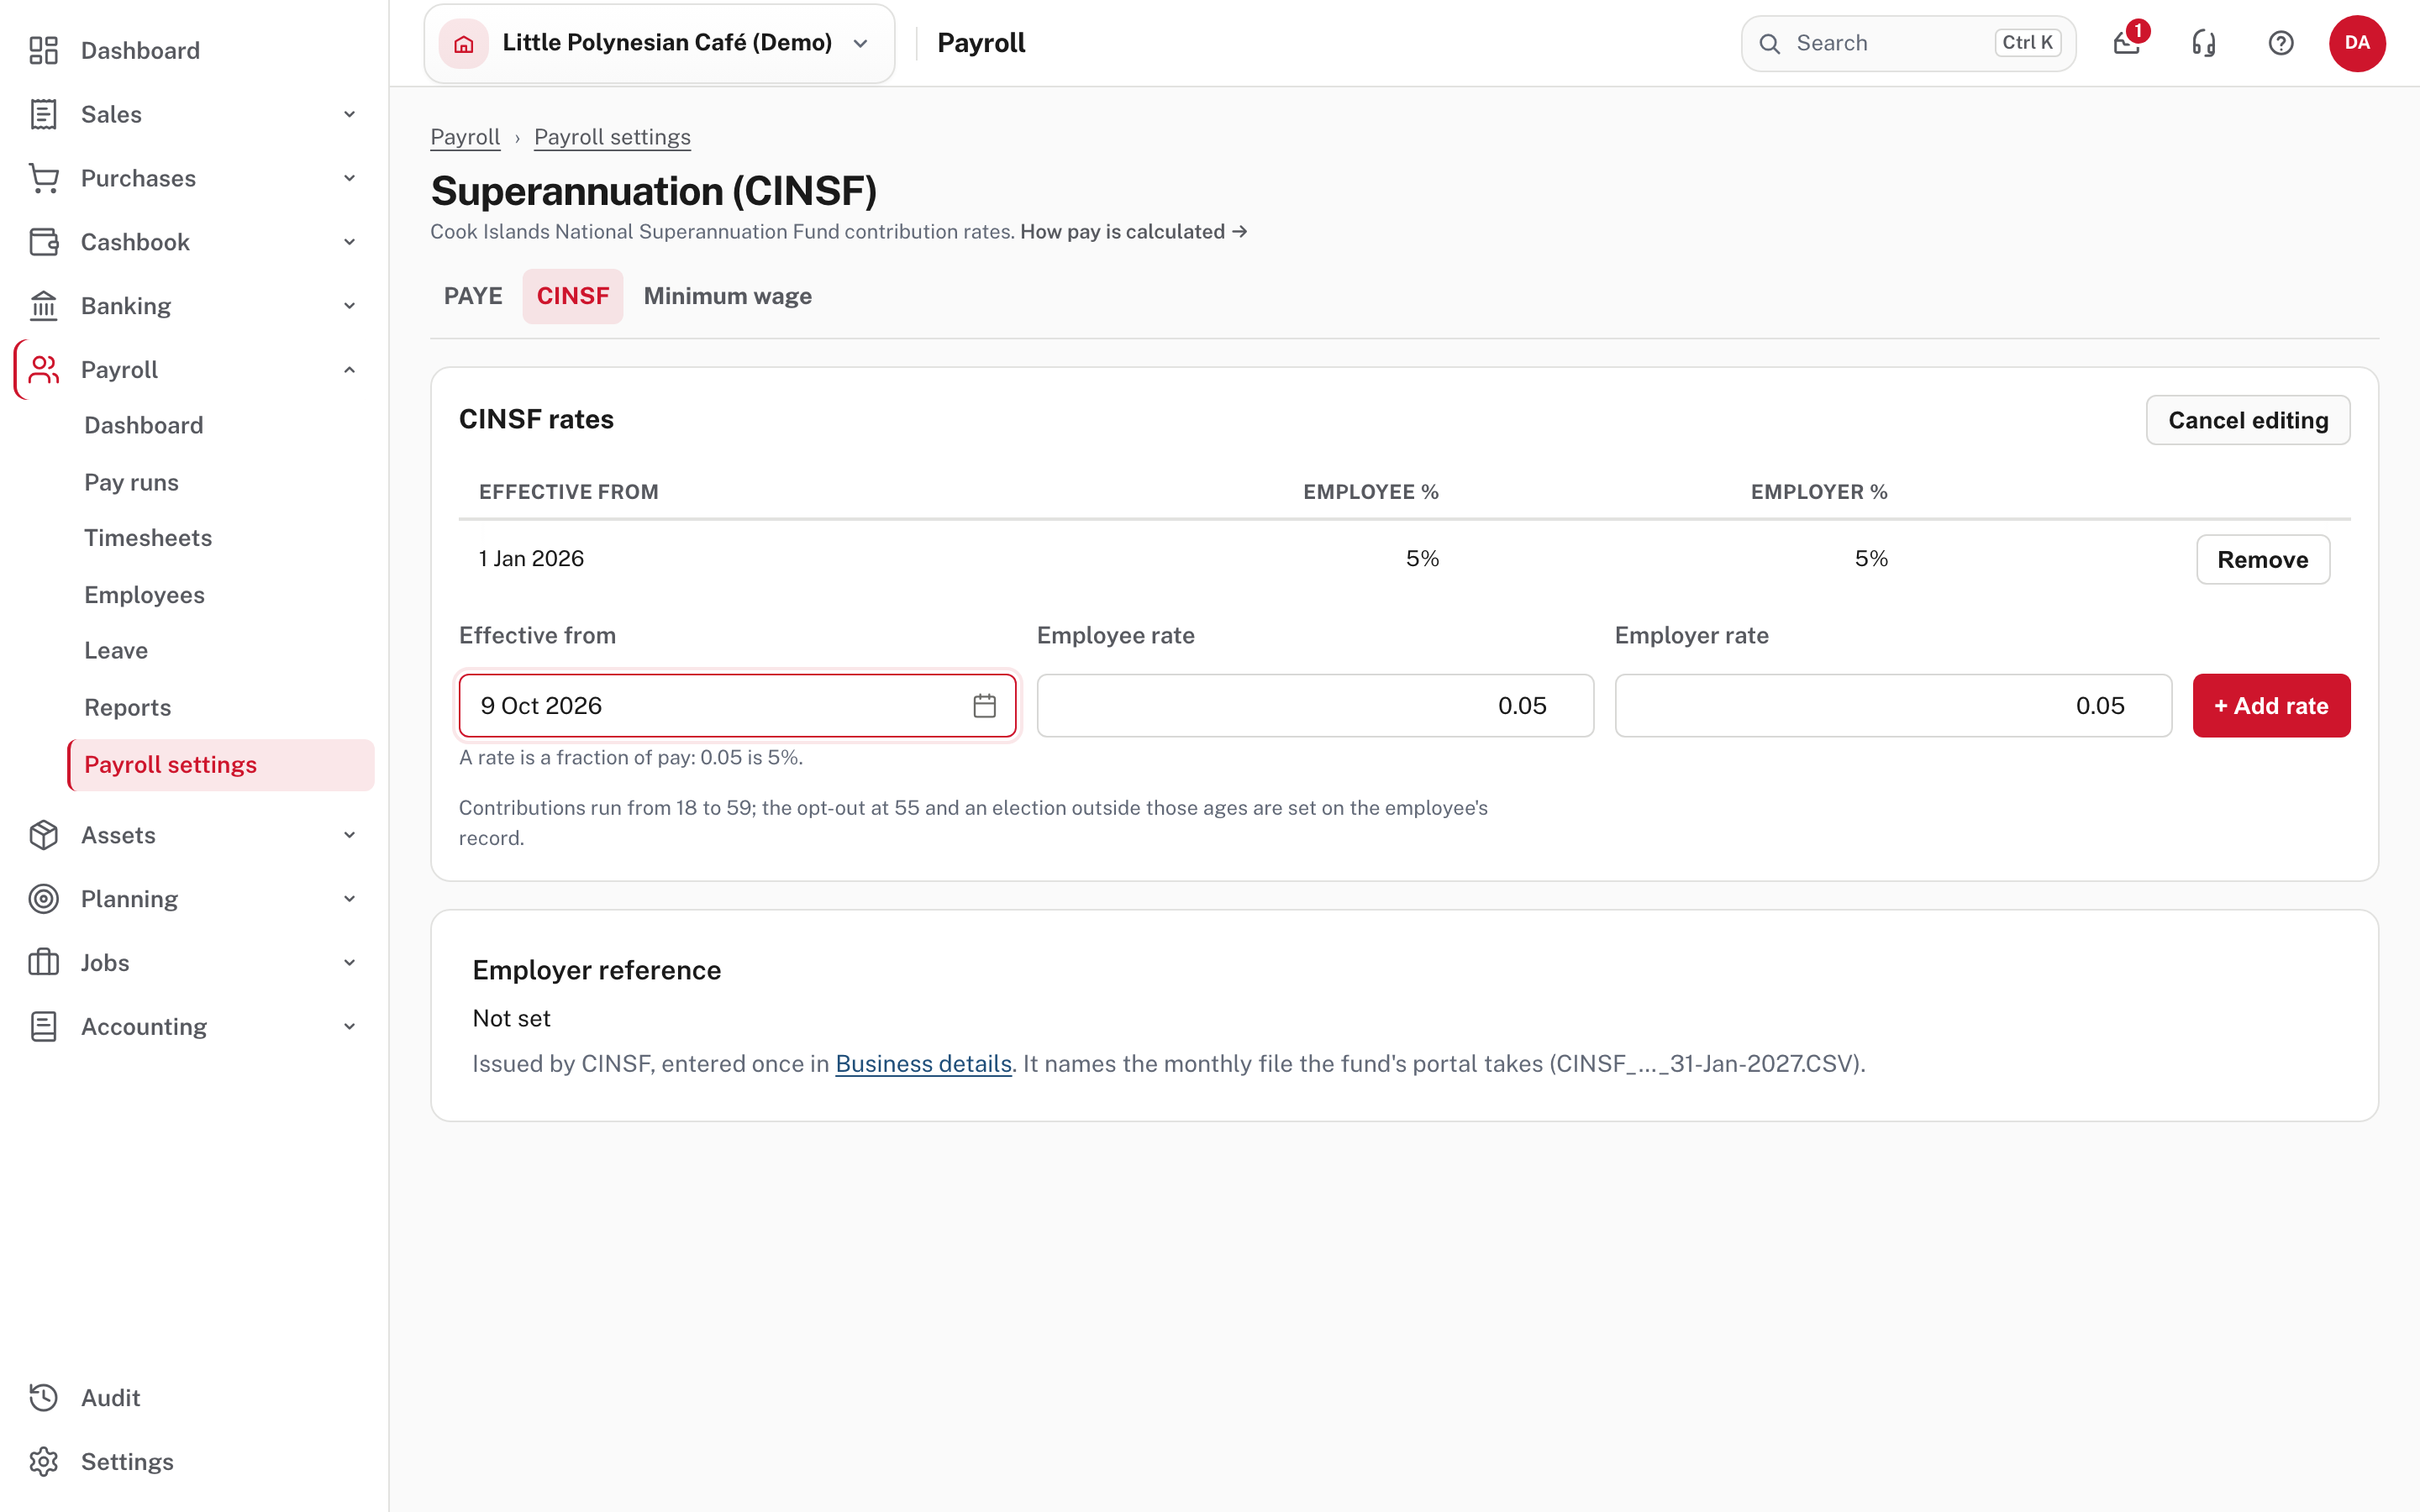
Type a rate as a fraction of pay. The line under the boxes says so: 0.05 is 5%, and the boxes are pre-filled with 0.05.
Look at the table afterwards: it shows the percentage you meant. Contributions run from age 18
to 59; an opt-out at 55, or an election outside those ages, is set on the employee's own record.
Minimum wage holds the minimum hourly rate, by the date it takes effect. A pay run will not process anyone paid below the rate in force, and a salary is tested over its ordinary hours.
More detail: How an employee's pay is calculated.
Step 6. Leave and public holidays
Payroll settings → Leave & holidays.
Leave rules
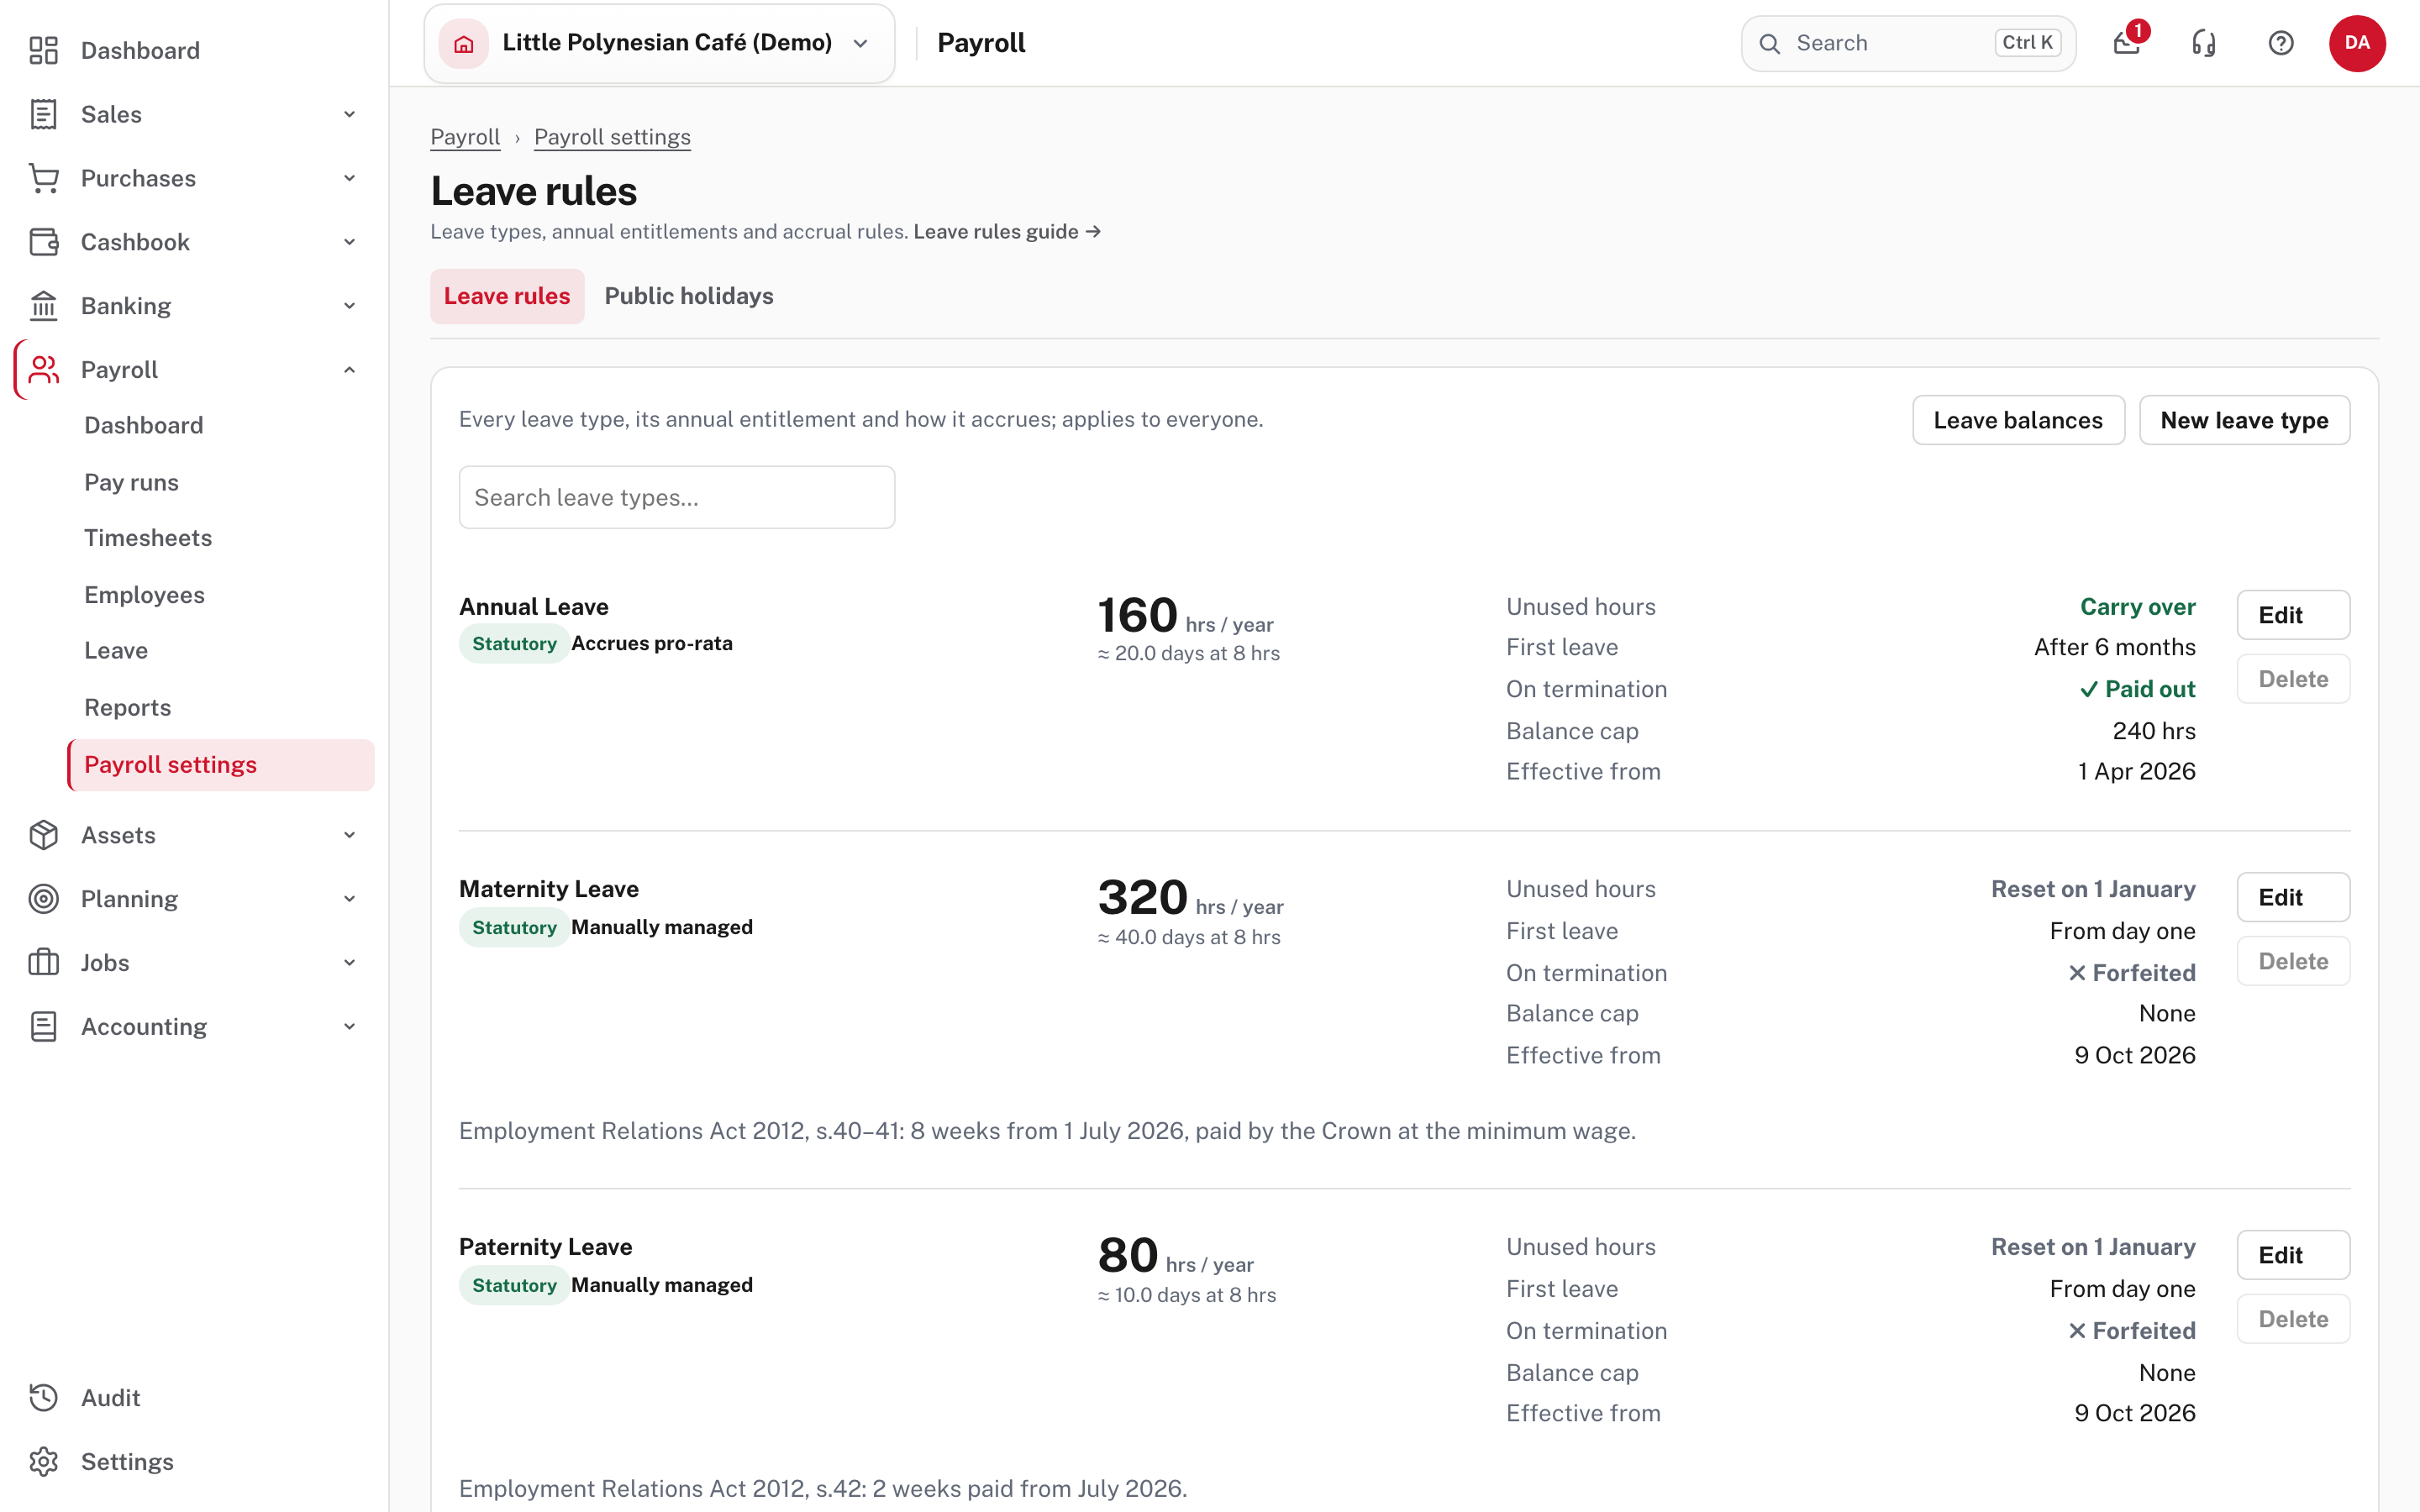
Each leave type shows its yearly entitlement in hours (with the days that makes), how it accrues, whether unused hours carry over, when the first leave can be taken, what happens on termination, any balance cap, and the date it takes effect. Statutory types are marked Statutory and carry a note naming the section of the Employment Relations Act; their Delete button is greyed out. Check the entitlements, then use New leave type if you offer something extra. Leave balances (beside it) opens everyone's balances.
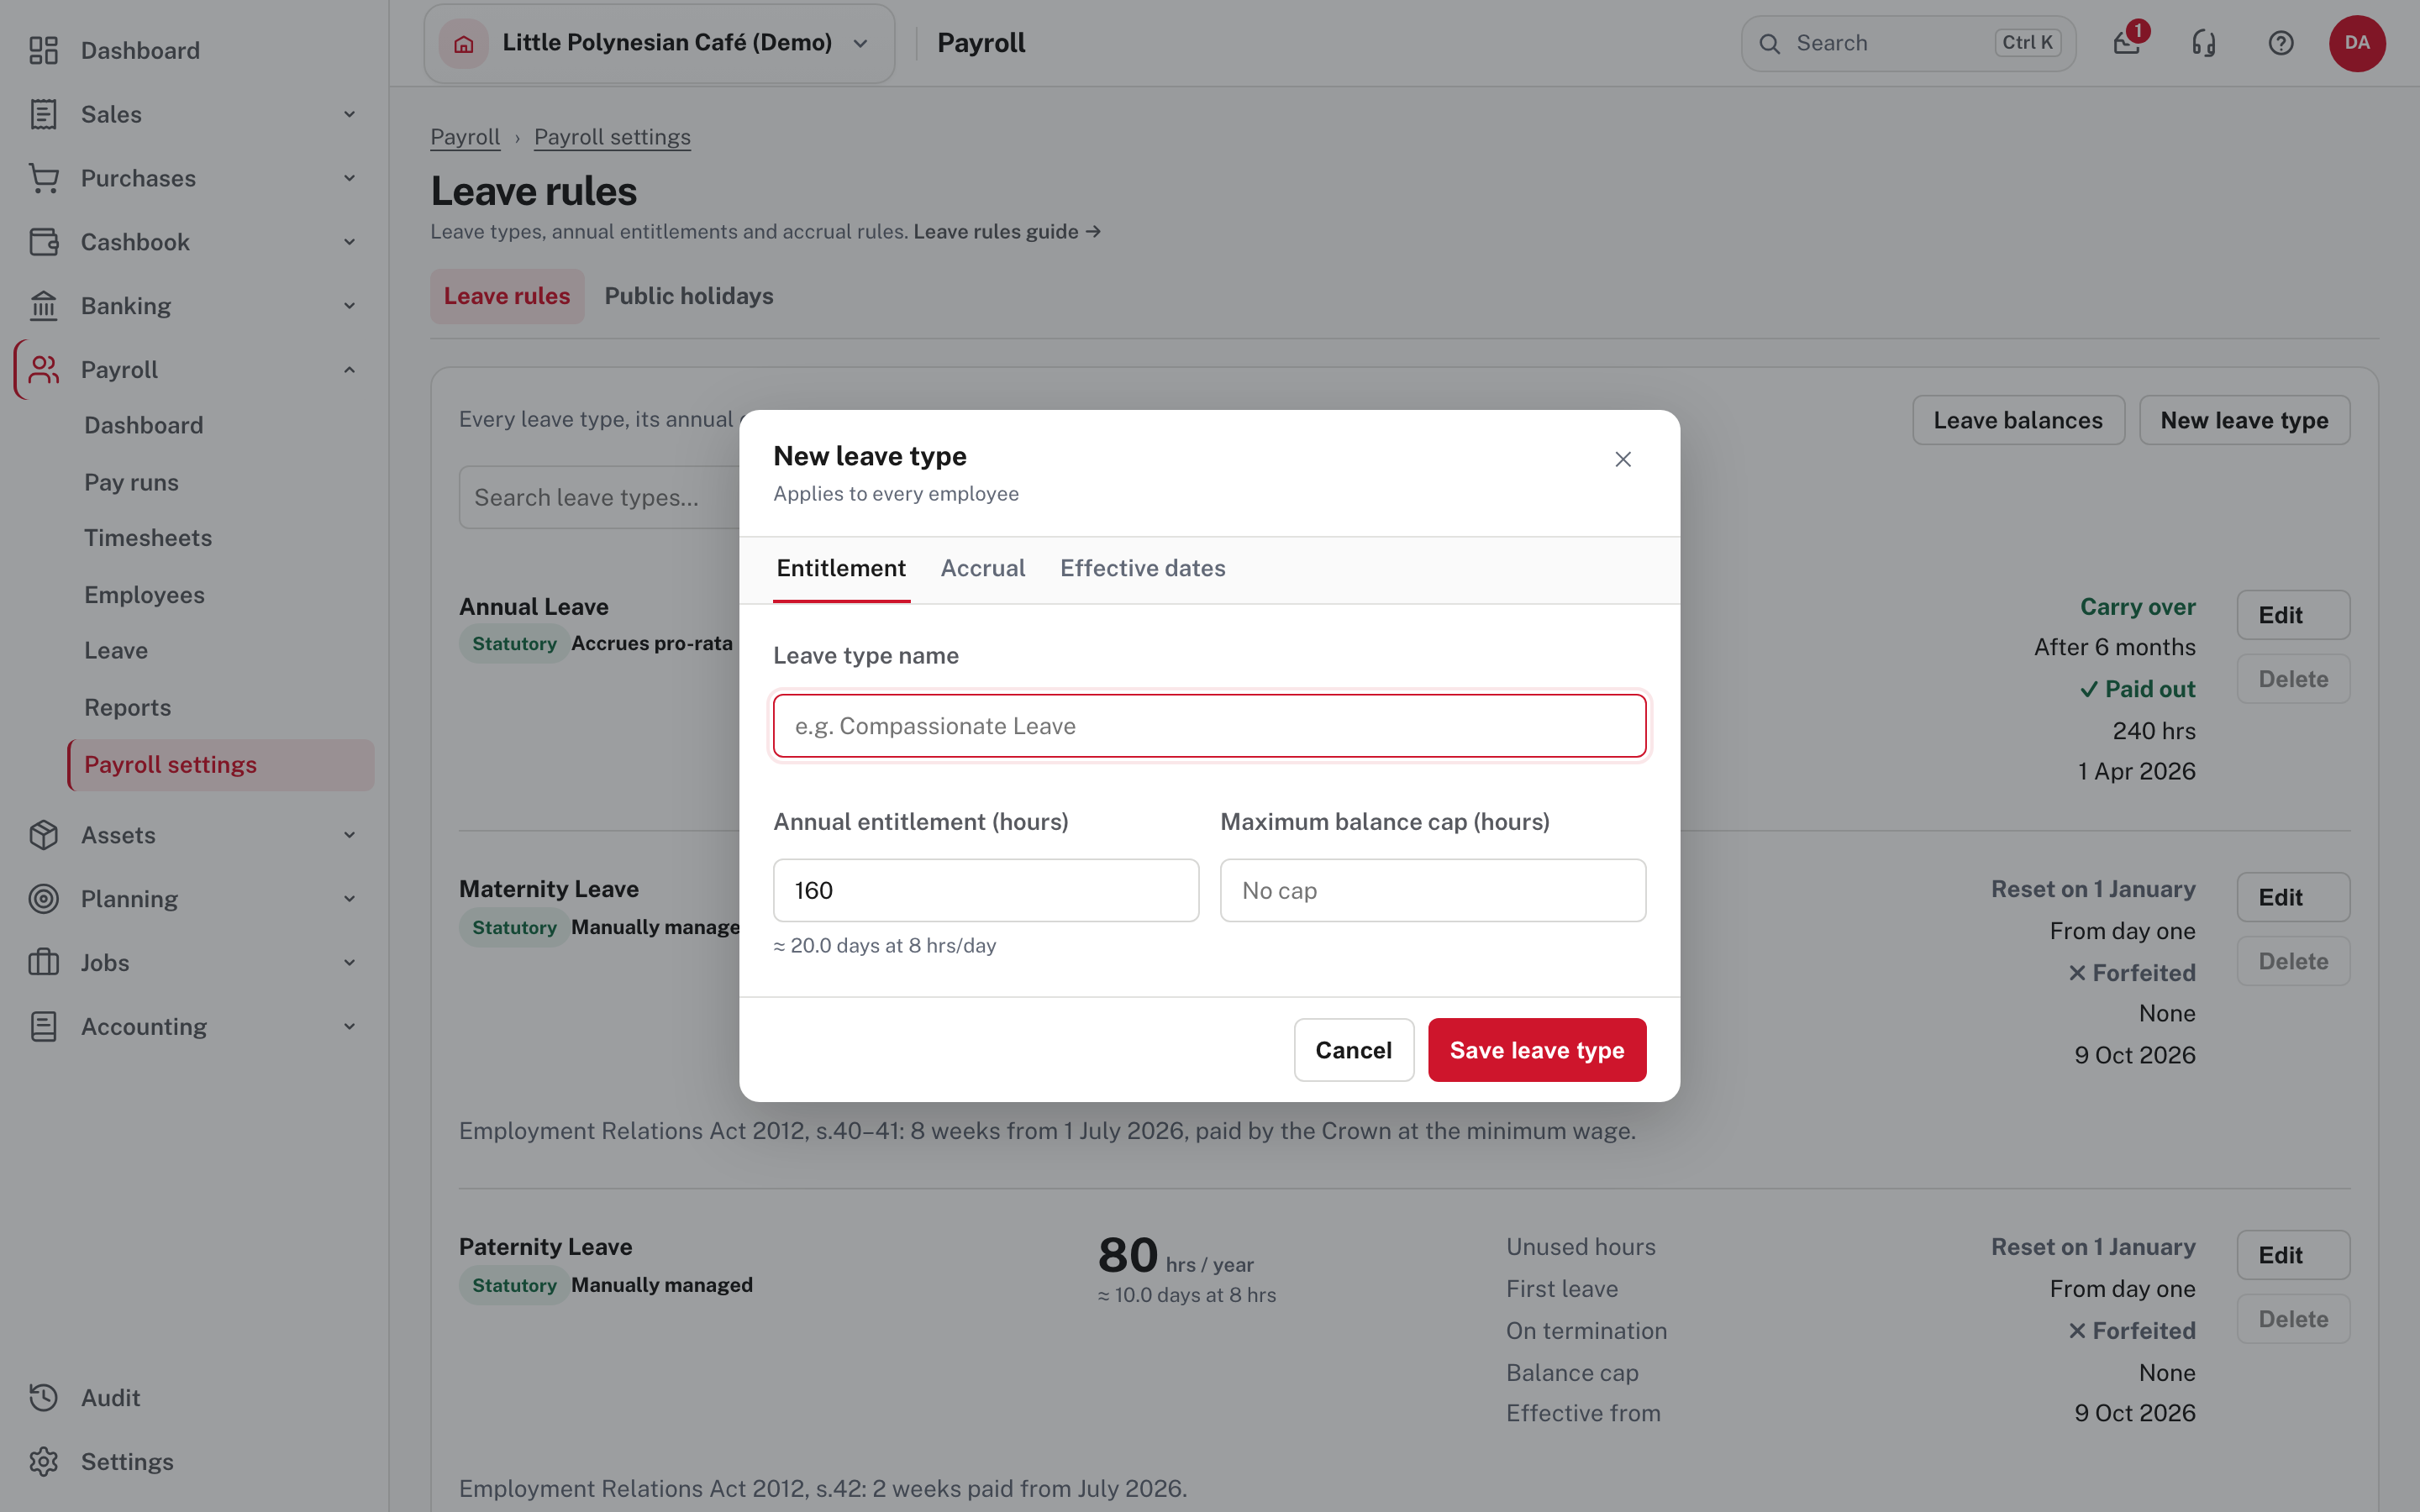
The form has three tabs, and a leave type applies to every employee:
| Tab | What it holds |
|---|---|
| Entitlement | The name, the annual entitlement in hours and an optional maximum balance |
| Accrual | Whether it accrues automatically (off means someone manages the balance by hand), pro rata or in full on each work anniversary, whether unused hours carry over, part-time scaling, whether casual employees are included, and whether the balance is paid out on termination |
| Effective dates | Whether leave may be taken without a balance, Statutory entitlement or Employer policy (not statutory), the months of service before first leave, whether the Crown pays, the date the rule starts, and notes |
For hours you grant by hand, such as time in lieu or special leave, create the type with accrual off and Employer policy, then grant the hours on the employee's Leave & entitlements section (step 9). Not shown in the demo: creating the type and granting hours, from Leave balances and accrual.
Public holidays
Easy pays and marks public holidays from the list you keep here, so it must be filled in every year. Choose the year at the top right.
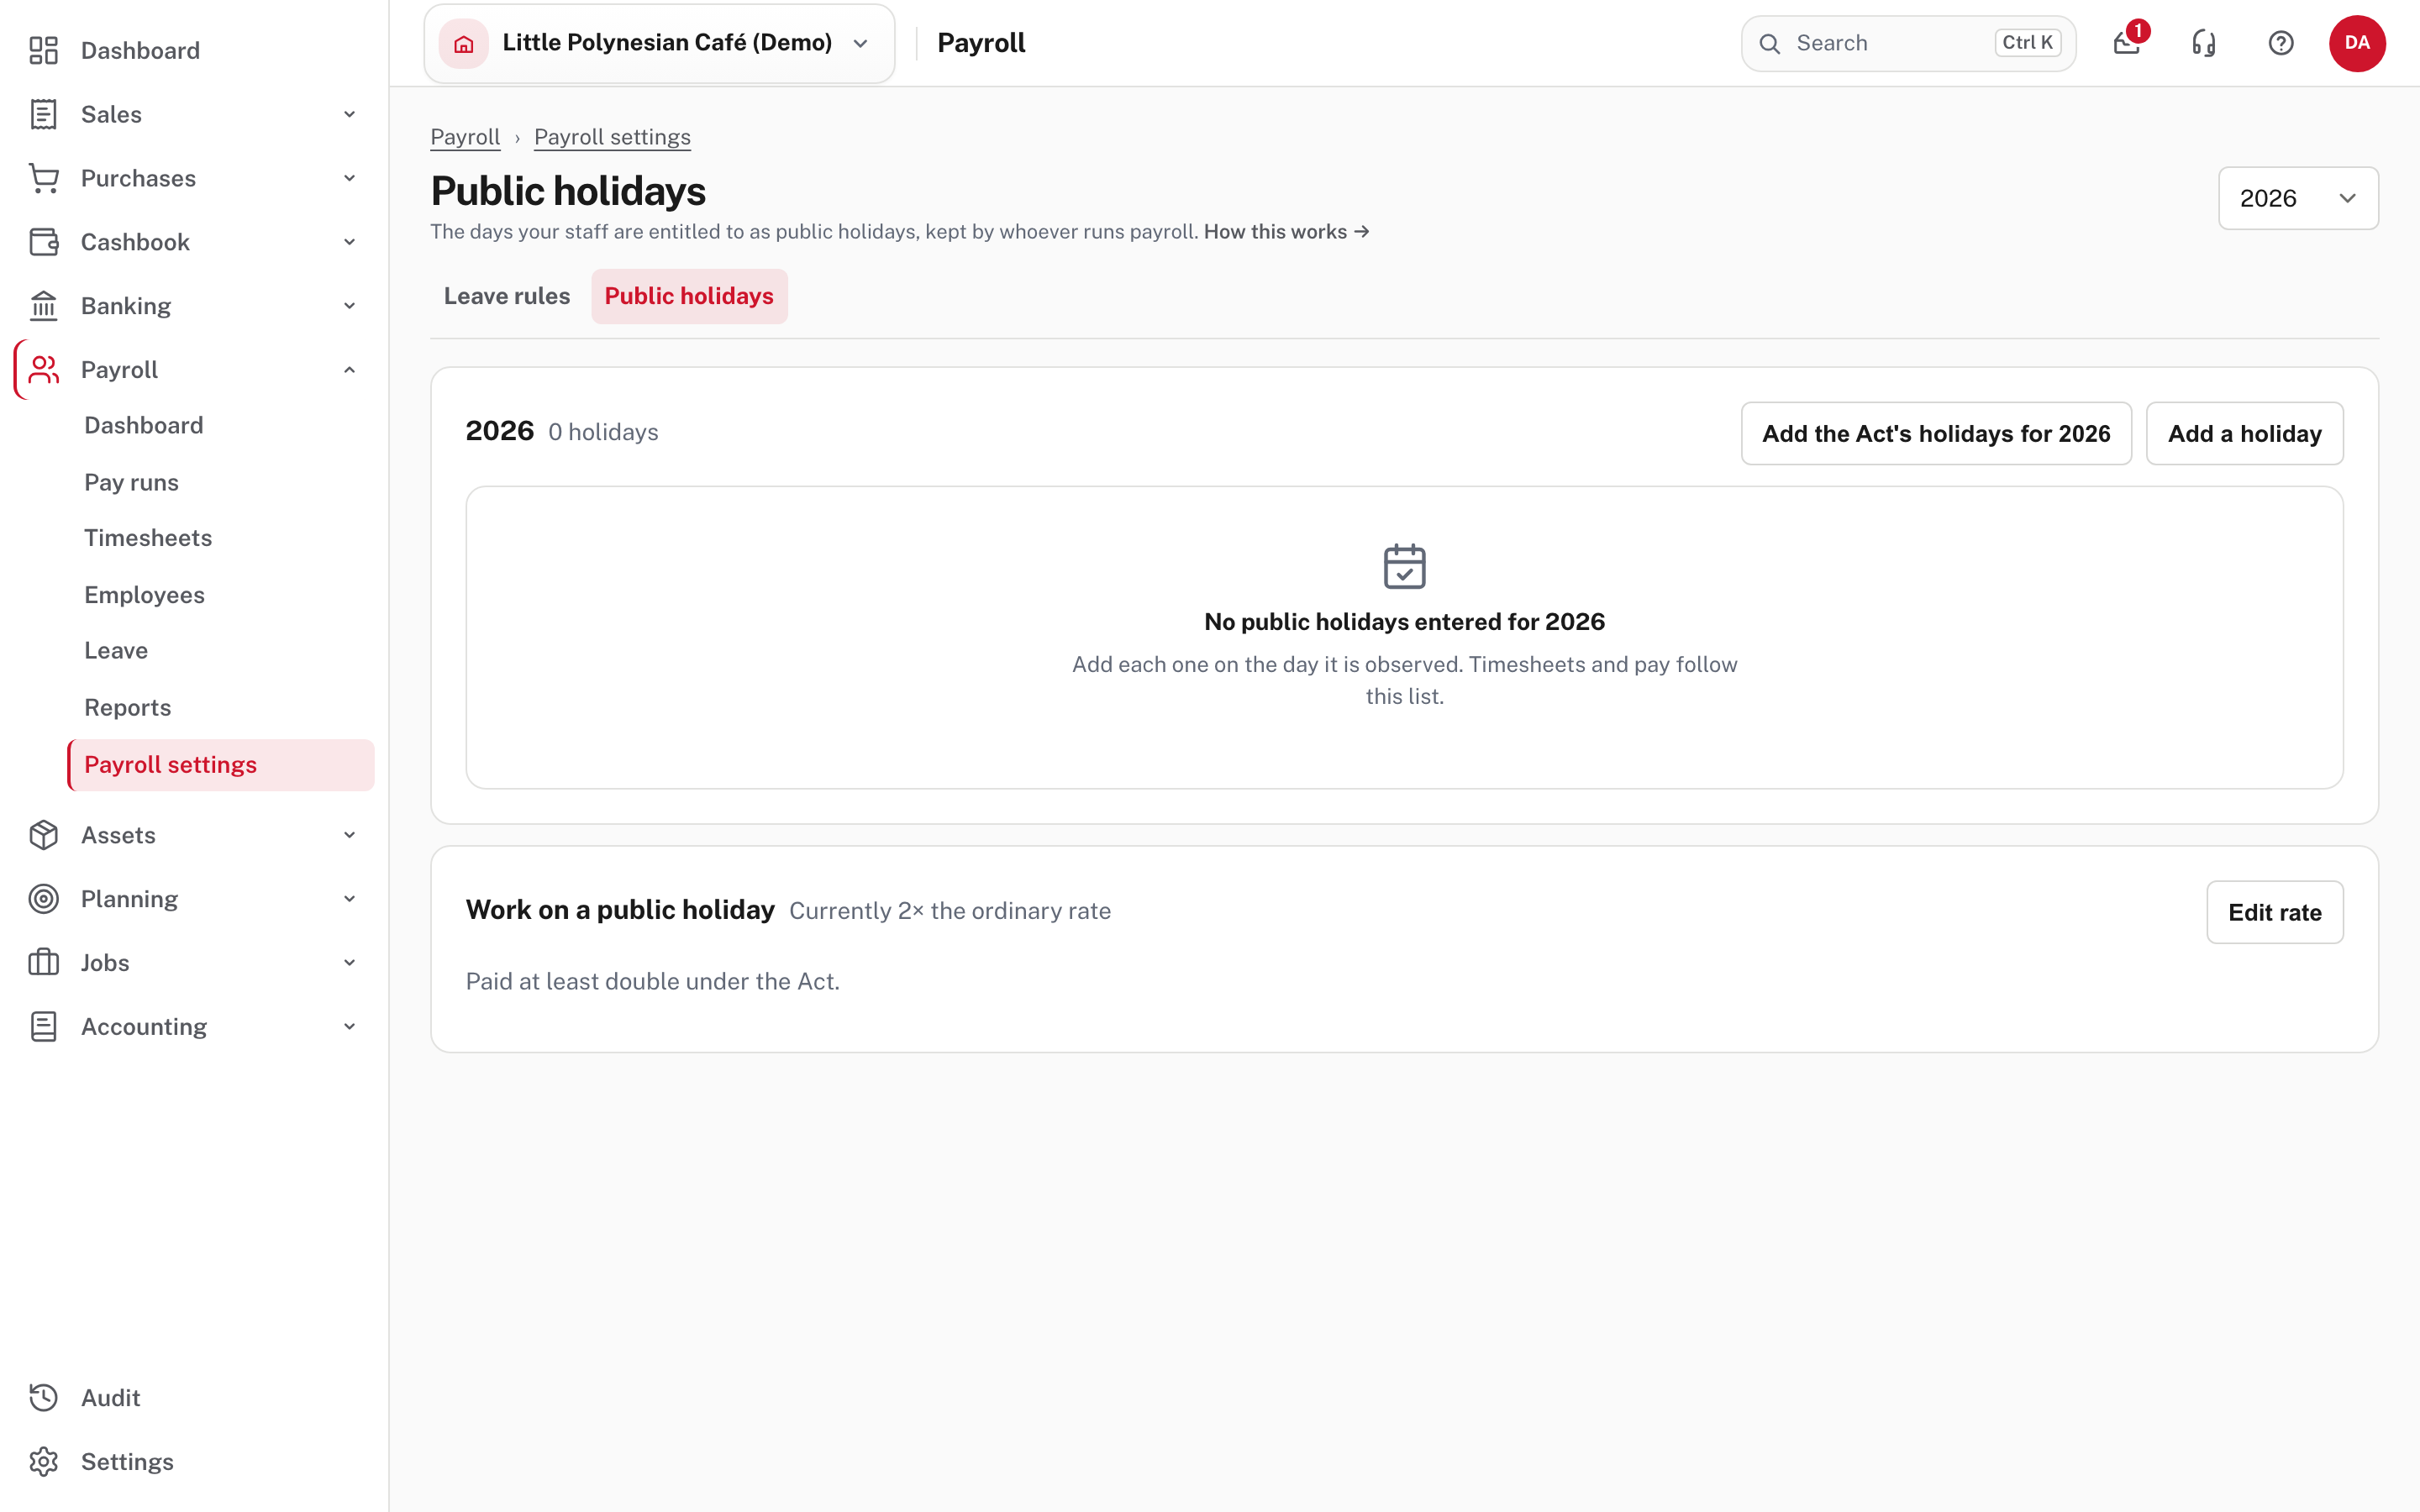
Add the Act's holidays for the year puts the Public Holidays Act's national days on the list in one go.
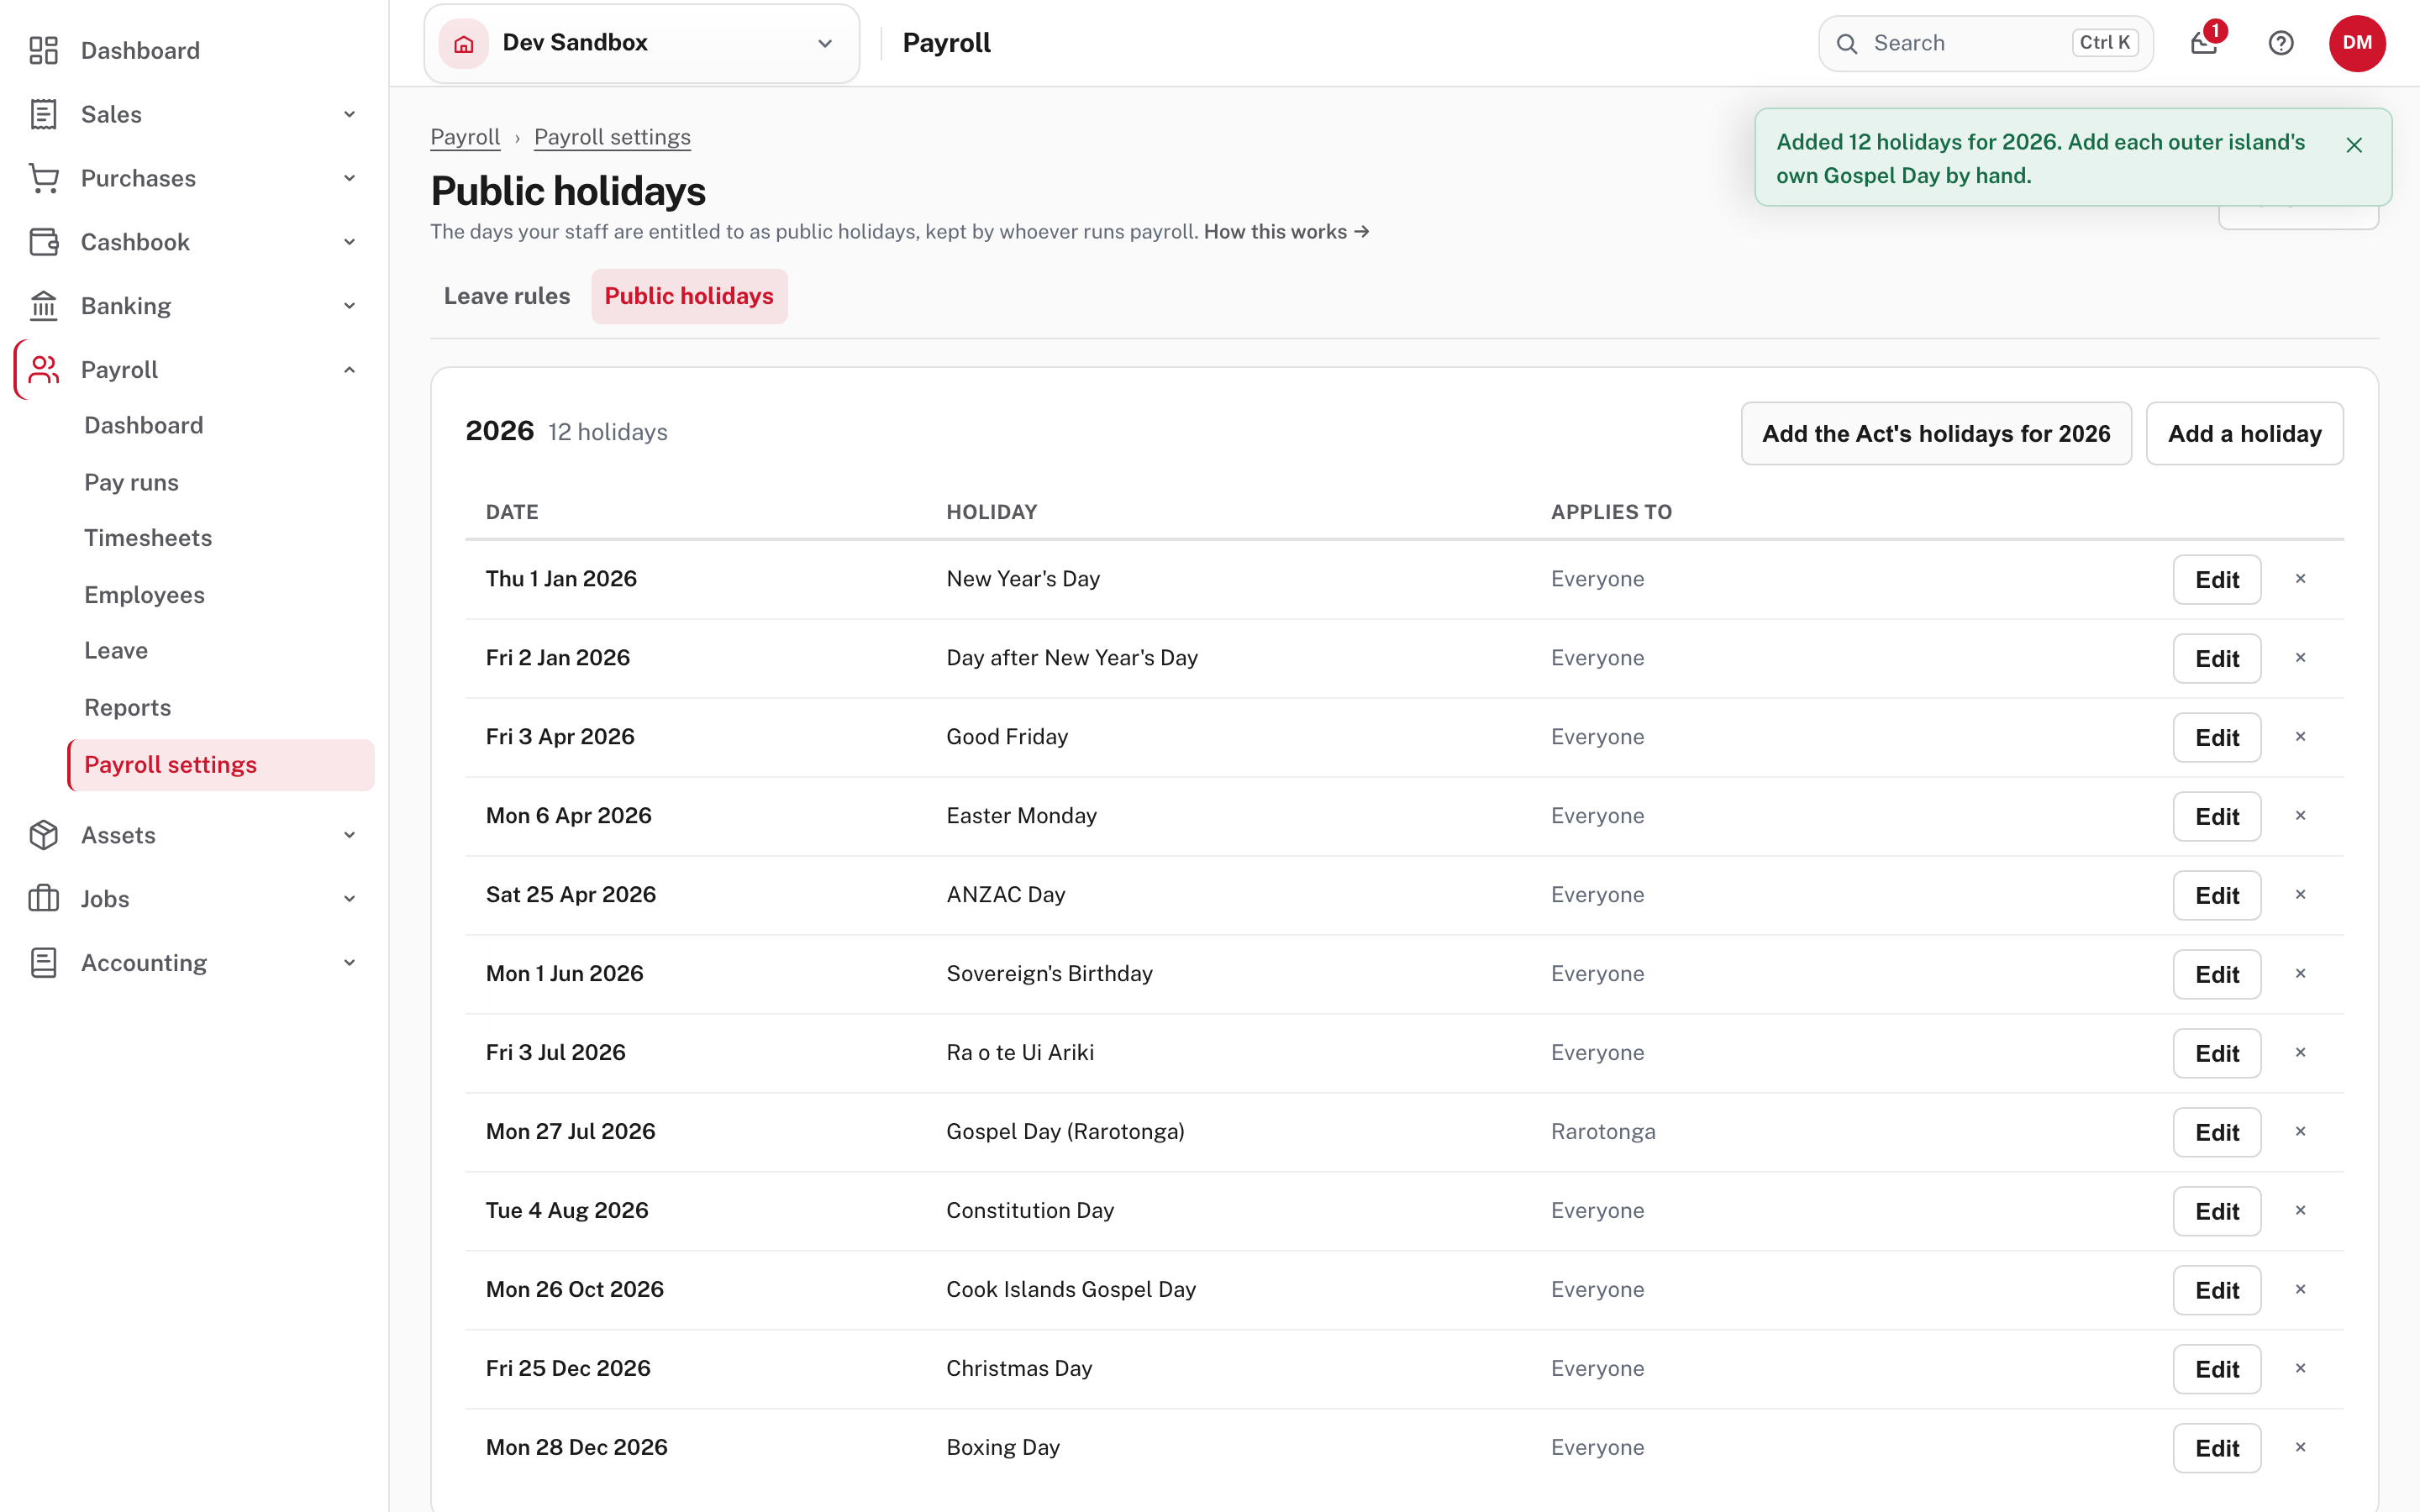
- Gospel Day for Rarotonga is added for Rarotonga only; the rest apply to Everyone.
- Some weekend holidays are listed on the day they are observed (in the picture Boxing Day, a Saturday in 2026, is on Monday 28 Dec) and others stay on their own date (ANZAC Day is on Saturday 25 Apr). Check every generated date against the current notice, and Edit one that is wrong.
- Days already on the list are kept, so your own additions and corrections survive a second run.
- Each outer island's own Gospel Day is not added. Enter it yourself with Add a holiday, as a Pa Enua holiday. The green notice after the button says the same.
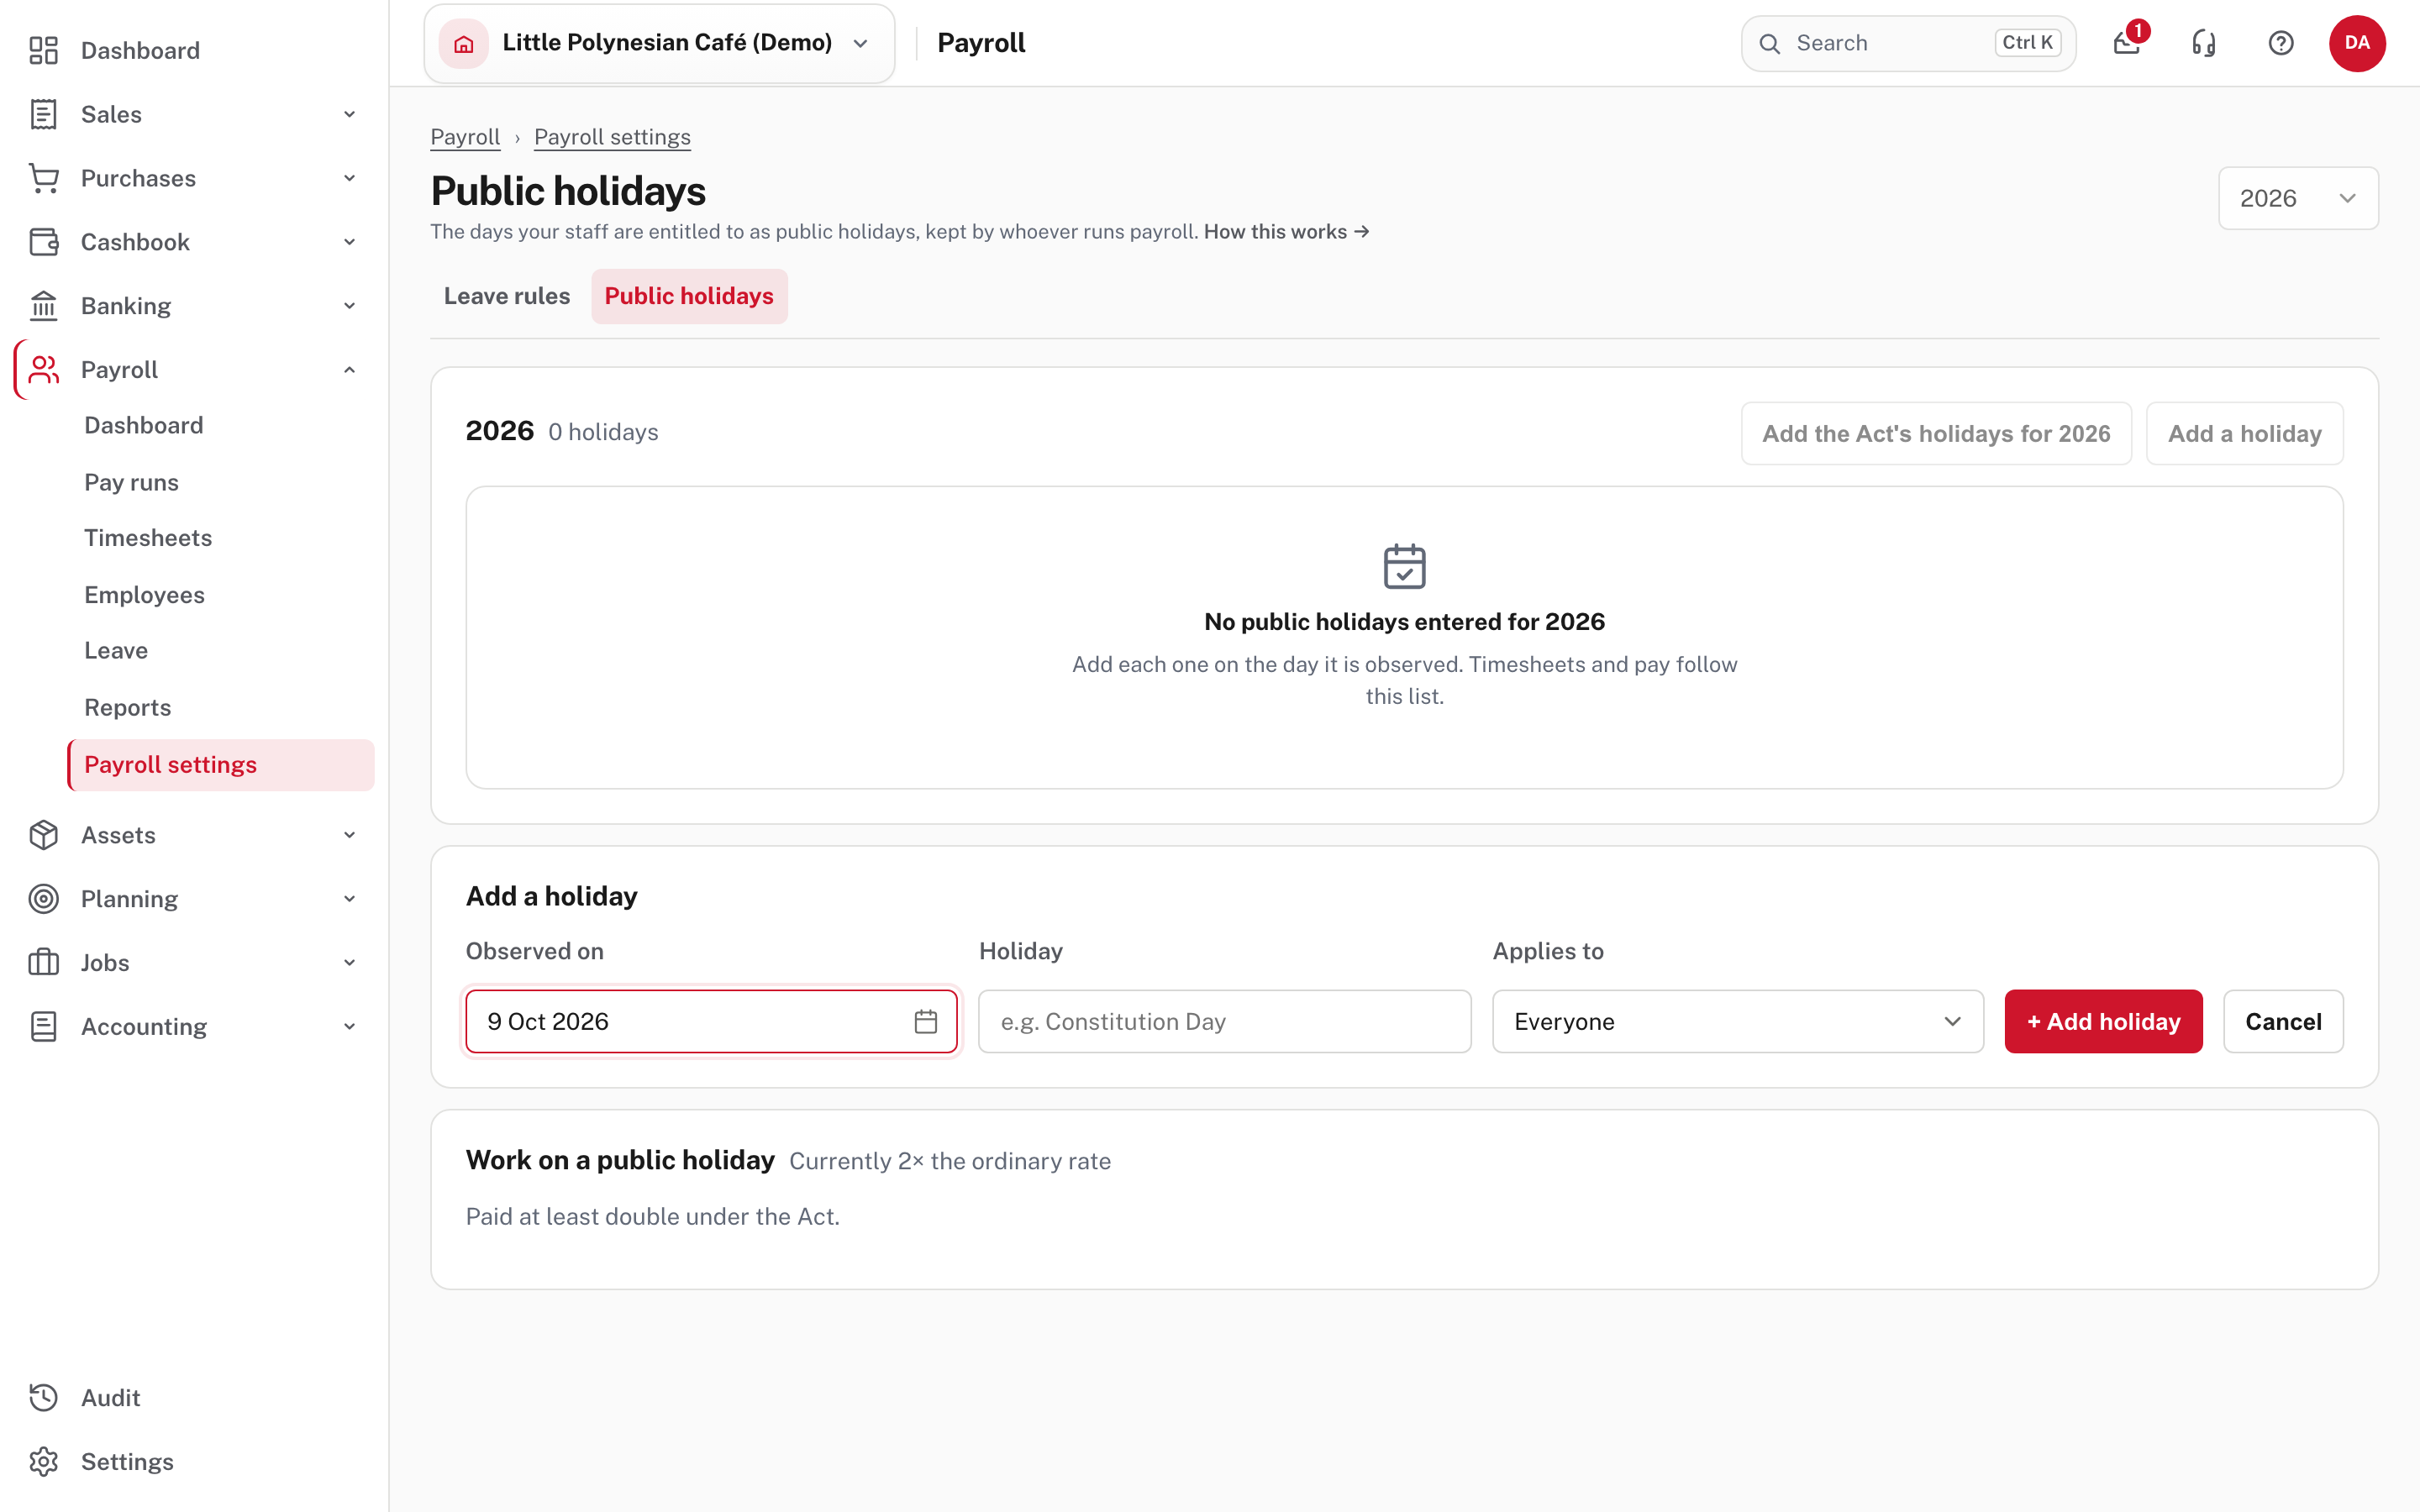
Add a holiday asks for the day it is observed, its name, and who it applies to (everyone, Rarotonga or the Pa Enua).
Work on a public holiday sets the multiplier for people who work the day (the page says it is currently 2×). It can't go below 2×.
More detail: Public holidays.
Step 7. Decide who approves what
Payroll settings → Approvals → Approval policies.
Each kind of request has a row: pay runs, bank-detail changes, leave requests, timesheets, expense claims, new employees, pay-rate changes and terminations. Choose Edit to set who decides, who it is routed to, and who is emailed. Below the rows, Finishing a pay run has one switch: The person who prepares a pay run cannot finish it (off by default).
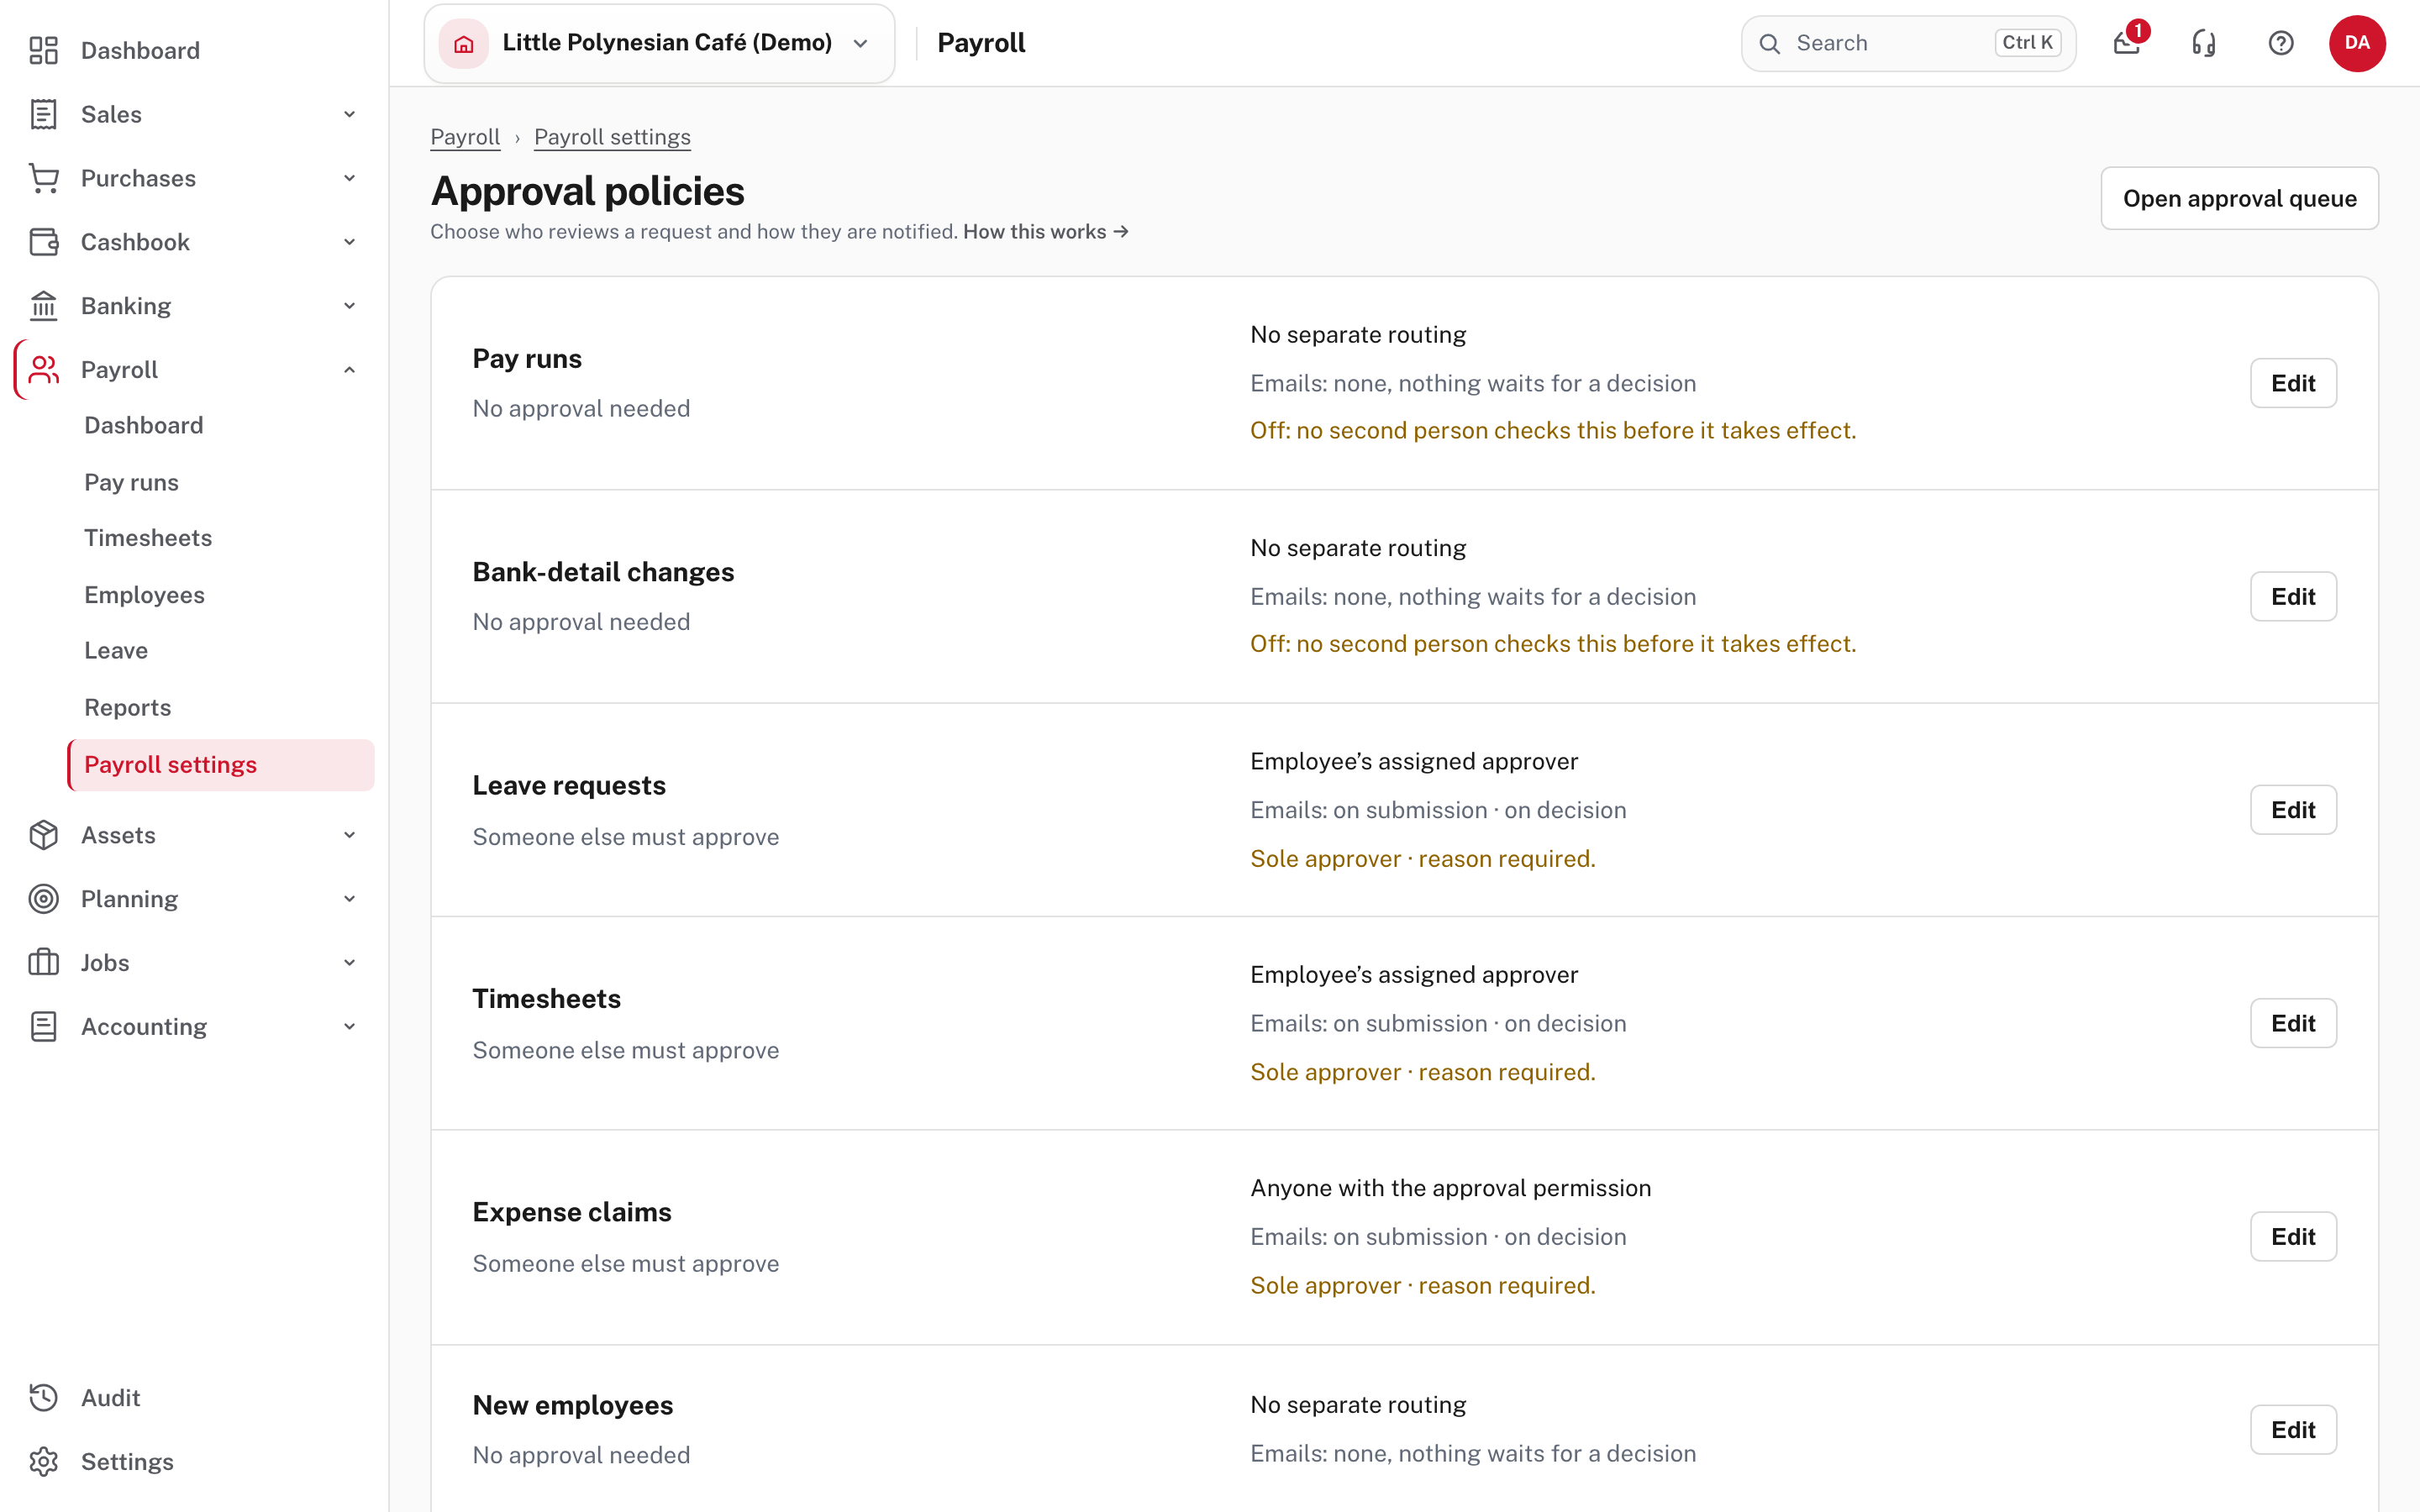
Two settings that matter most
A bank-detail change and a pay run are the two ways payroll fraud usually happens: a changed bank account, and a pay run nobody else looks at. Easy lets you set them to No approval needed (and warns you on the page, as in the picture), but if more than one person works on payroll, ask for a second person on both.
Leave and timesheet requests go to each employee's assigned approver, which you choose on the employee's record in step 9. If a person is the only approver in the company, Easy lets them approve their own entries and records why (the row says Sole approver · reason required). The Open approval queue button at the top is the list of what is waiting.
Two places show these policies at work. On a timesheet, the button reads Approve when the company's rules let you decide hours you keyed (for example you are the only person who can approve) and Send for approval when someone else must (Run a pay period, step 1). A pay run goes through four steps across the top, Review, Approve, Finish and Pay & payslips, and the pay-run policy here decides what happens at Approve.
More detail: Payroll approvals and controls and How leave approval works.
Step 8. Employee access and emails
Two more sections of Payroll settings affect how a pay run behaves. Neither blocks setup, but decide them before the first run.
- Employee access & records has three cards. Employee timesheet entry says whether payroll staff enter the hours or employees with a self-service login enter their own (choose Edit and tick Employees enter their own timesheets, as in For employees). Employee data retention says how long a former employee's personal data is kept (forever, or a number of months); pay history and your accounts are not affected. Review employee access opens Payroll → Employees → Access, where invitations and approvers are managed.
- Emails & notifications shows whether outgoing email is set up, who replies go to, and any email that failed in the last 30 days. Below that each payroll email has Edit wording, and the automatic ones have an on/off switch: decision emails (leave, timesheet, bank change, expense claim) are on in the demo, and the updates and reminders (pay run built, pay run finished, payslip ready, timesheet reminder) are off. Outgoing email reads Not set up on the local demo, which means payslip and approval emails will not be sent until the platform operator sets it up.
More detail: Payroll emails.
Step 9. Add your employees
Payroll → Employees → + New employee. (The dashboard's Add employee button opens the same form.)
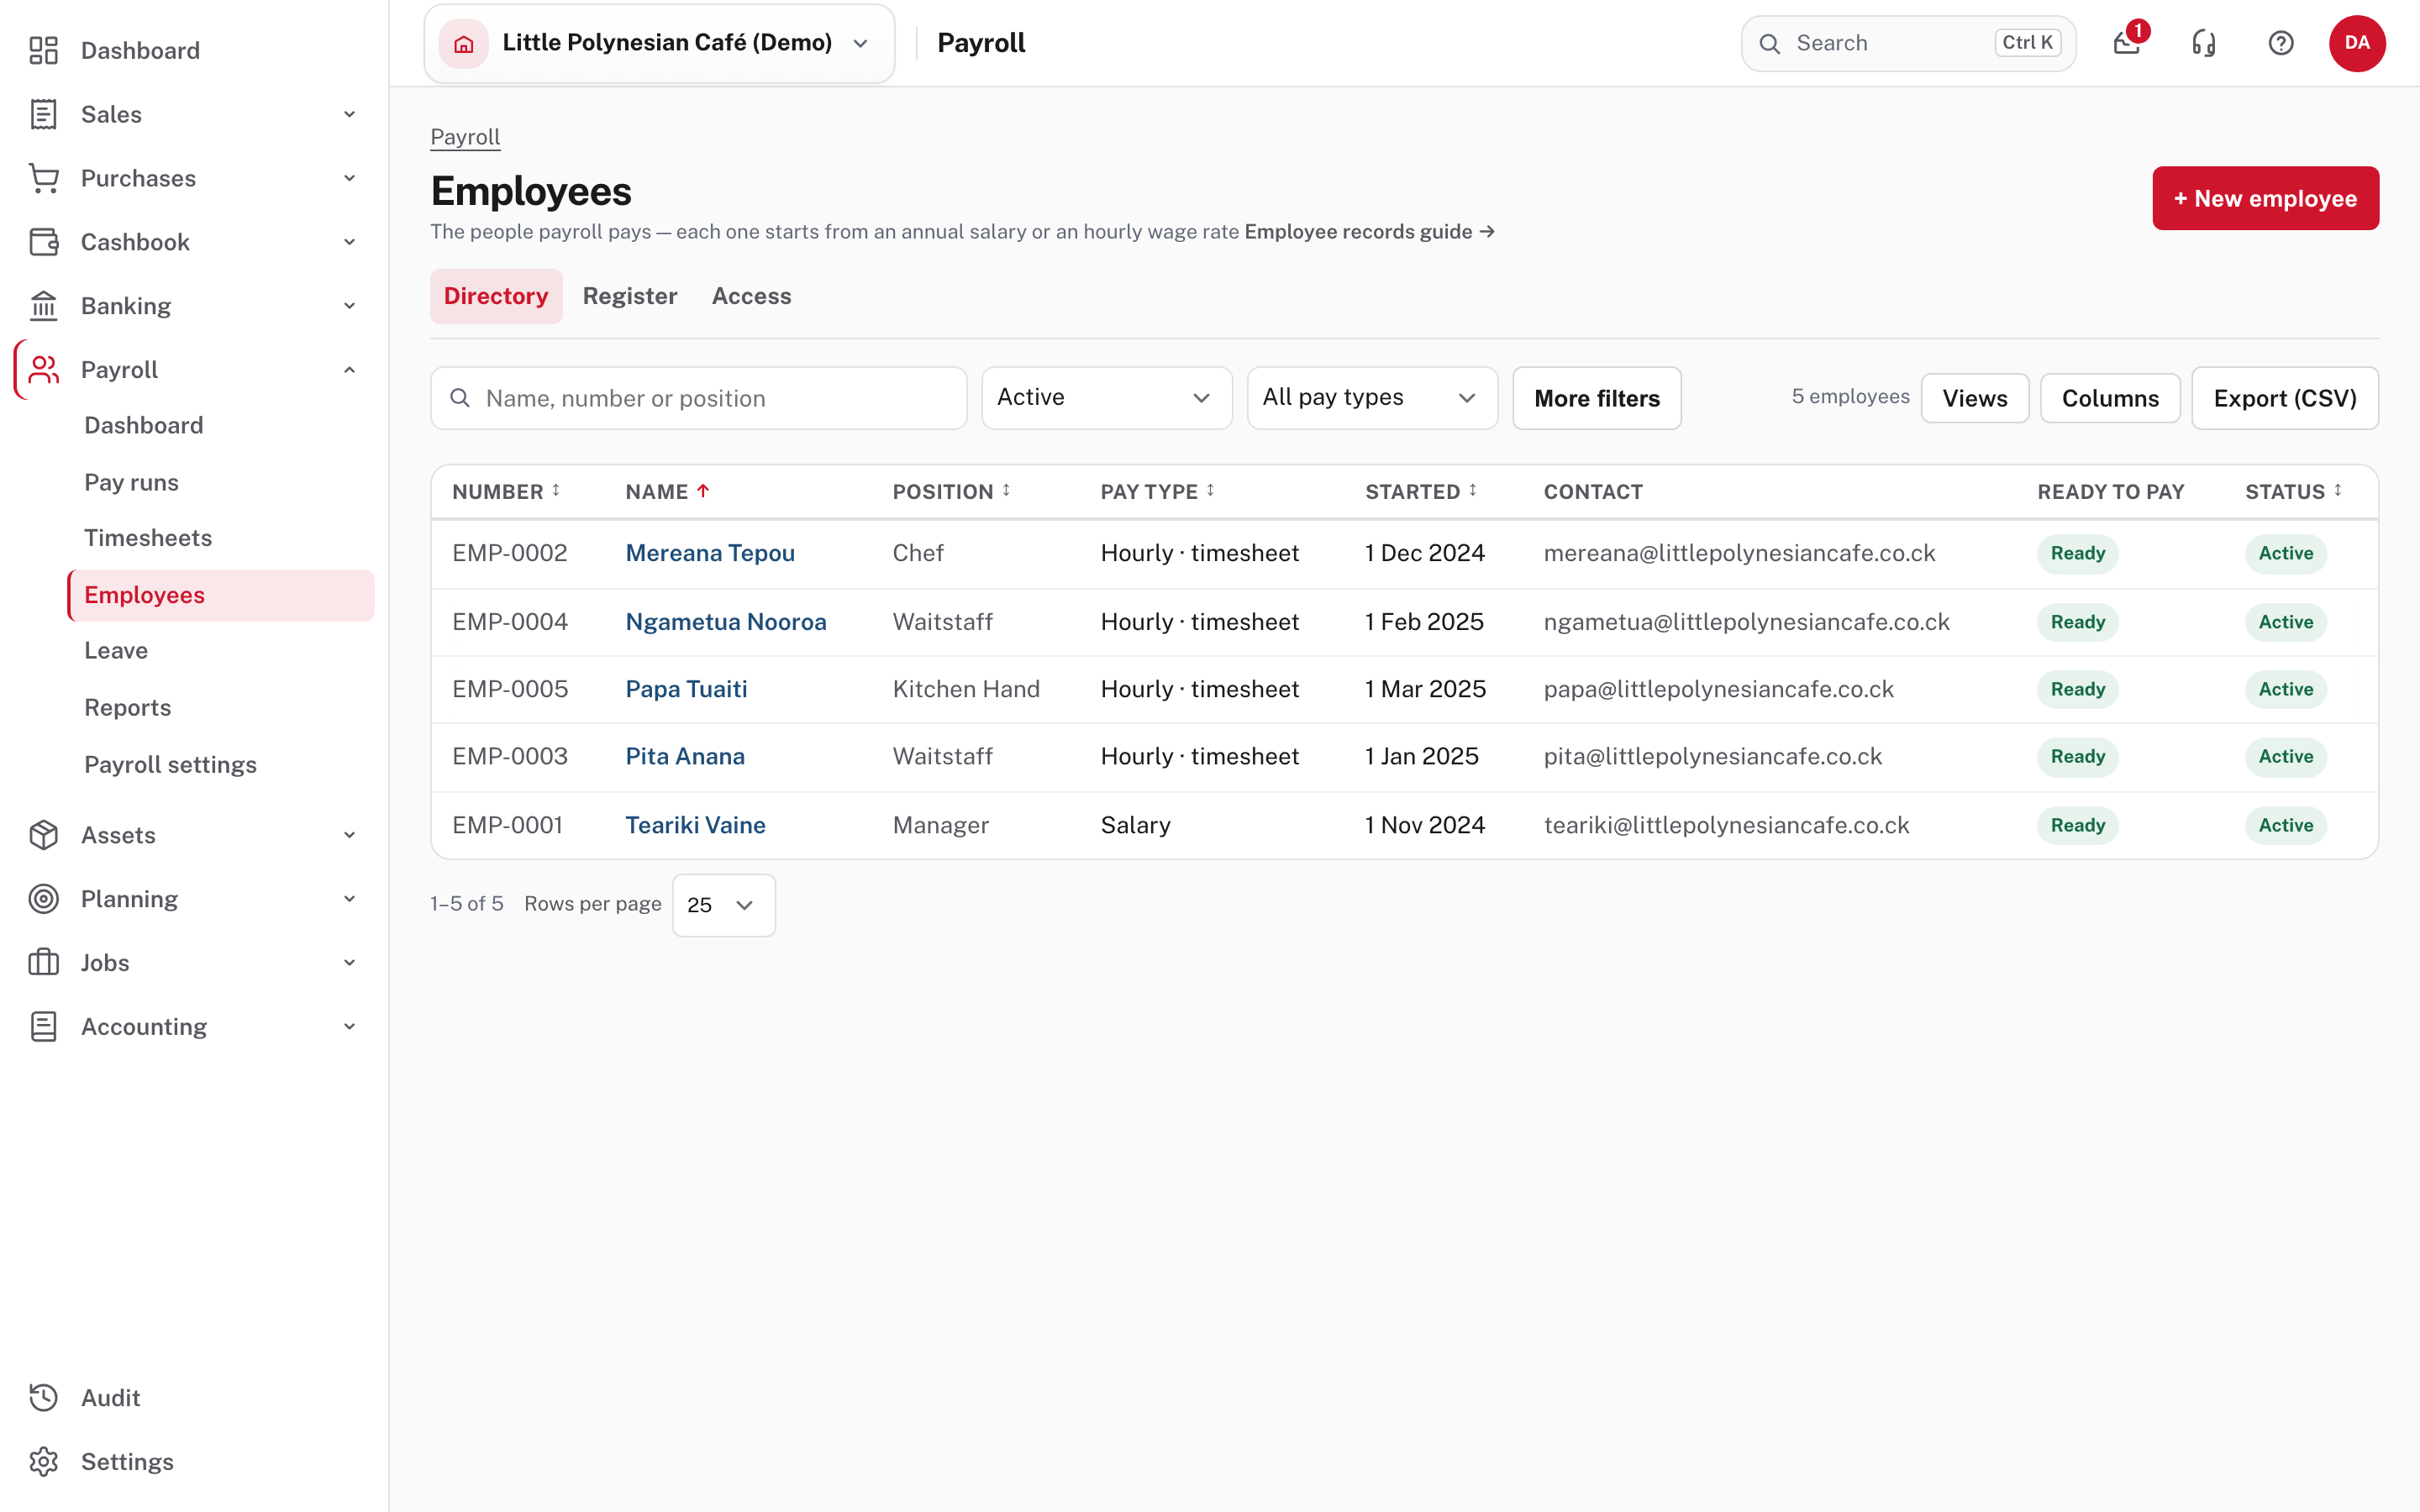
The directory lists employees with their number, position, pay type, start date, contact, Ready to pay and status. Filter it, choose Columns or Views, or Export (CSV). Register and Access beside Directory list everyone the business has employed, active or not, and who has a self-service login.
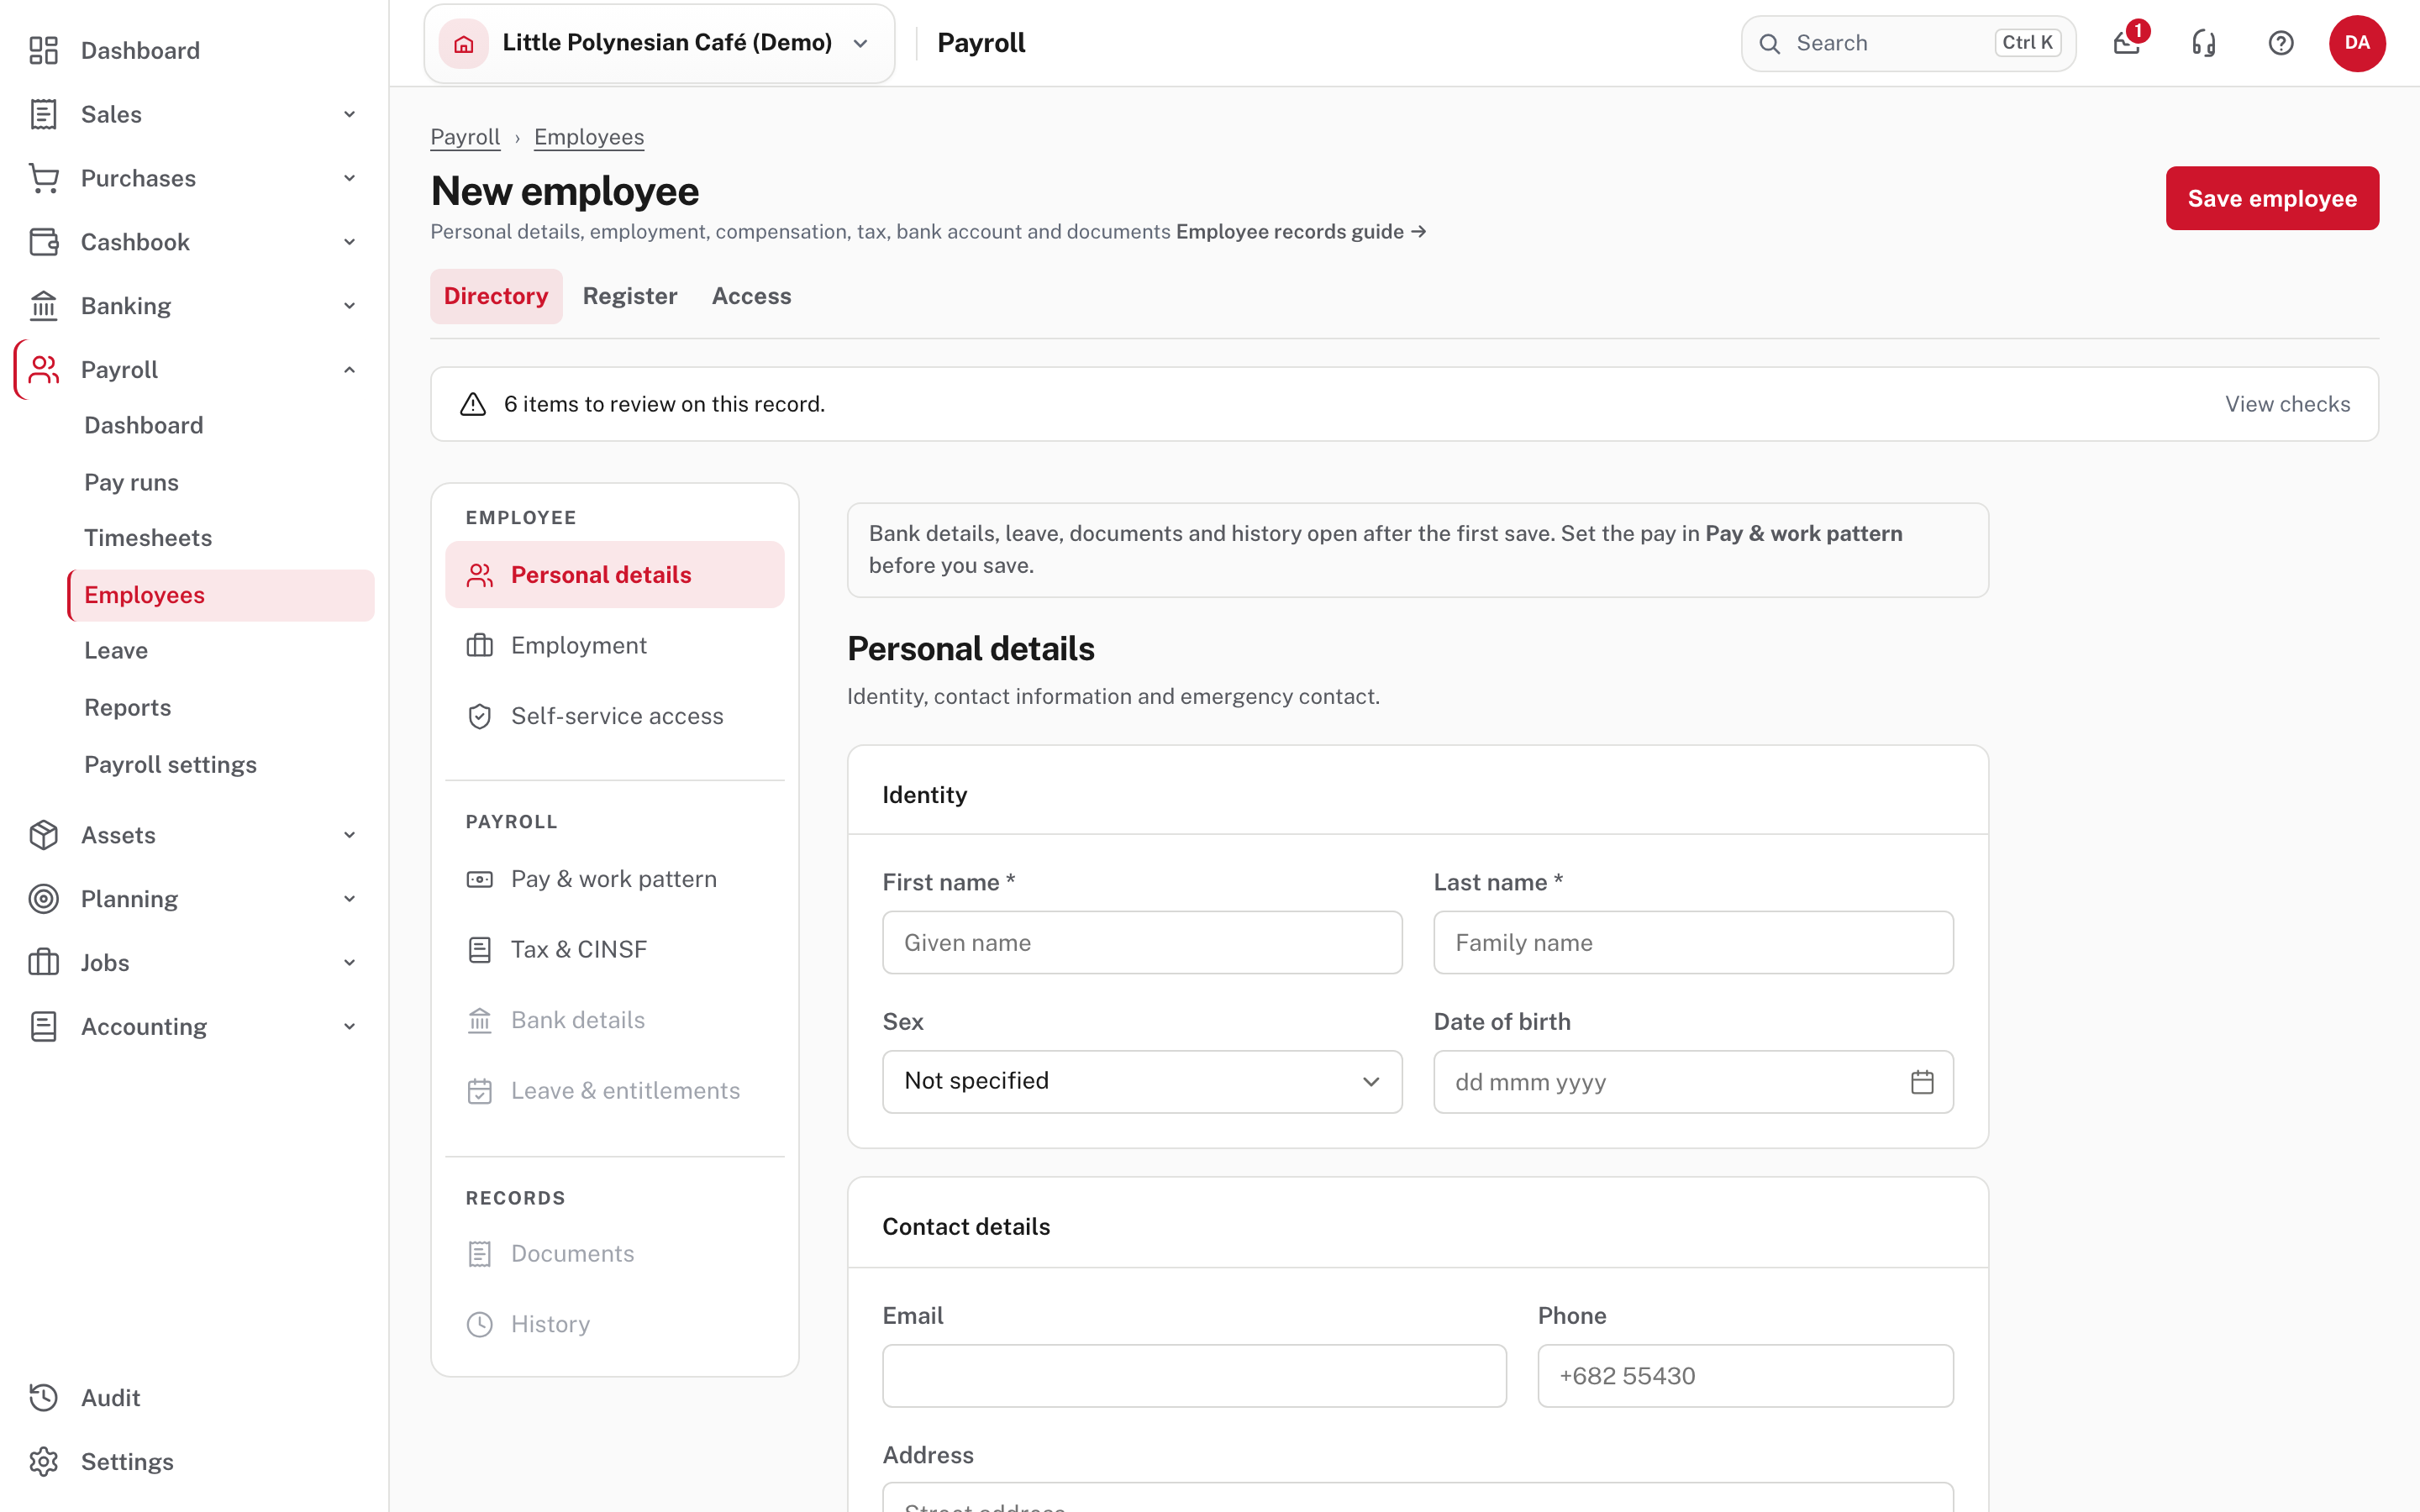
The form is the whole employee record, with a section menu on the left. A note at the top says that Bank details, leave, documents and history open after the first save, so set the pay on Pay & work pattern before you save. Choose Save employee: Easy's Help says it then opens the full record. Not shown in the demo: saving a new employee. Work down the sections:
- Personal details and Employment: name, contact details, start date, position, Approver (who decides this person's leave, timesheets and expense claims), a clock or badge number for time files, work permit, and Include in payroll. Reporting dimensions the company uses, such as outlet or project, appear here too.
- Self-service access: whether they have a login. See For employees.
- Pay & work pattern: how they are paid (annual salary or hourly rate), the date the rate takes effect, the wages account, recurring allowances and deductions, and their work pattern.
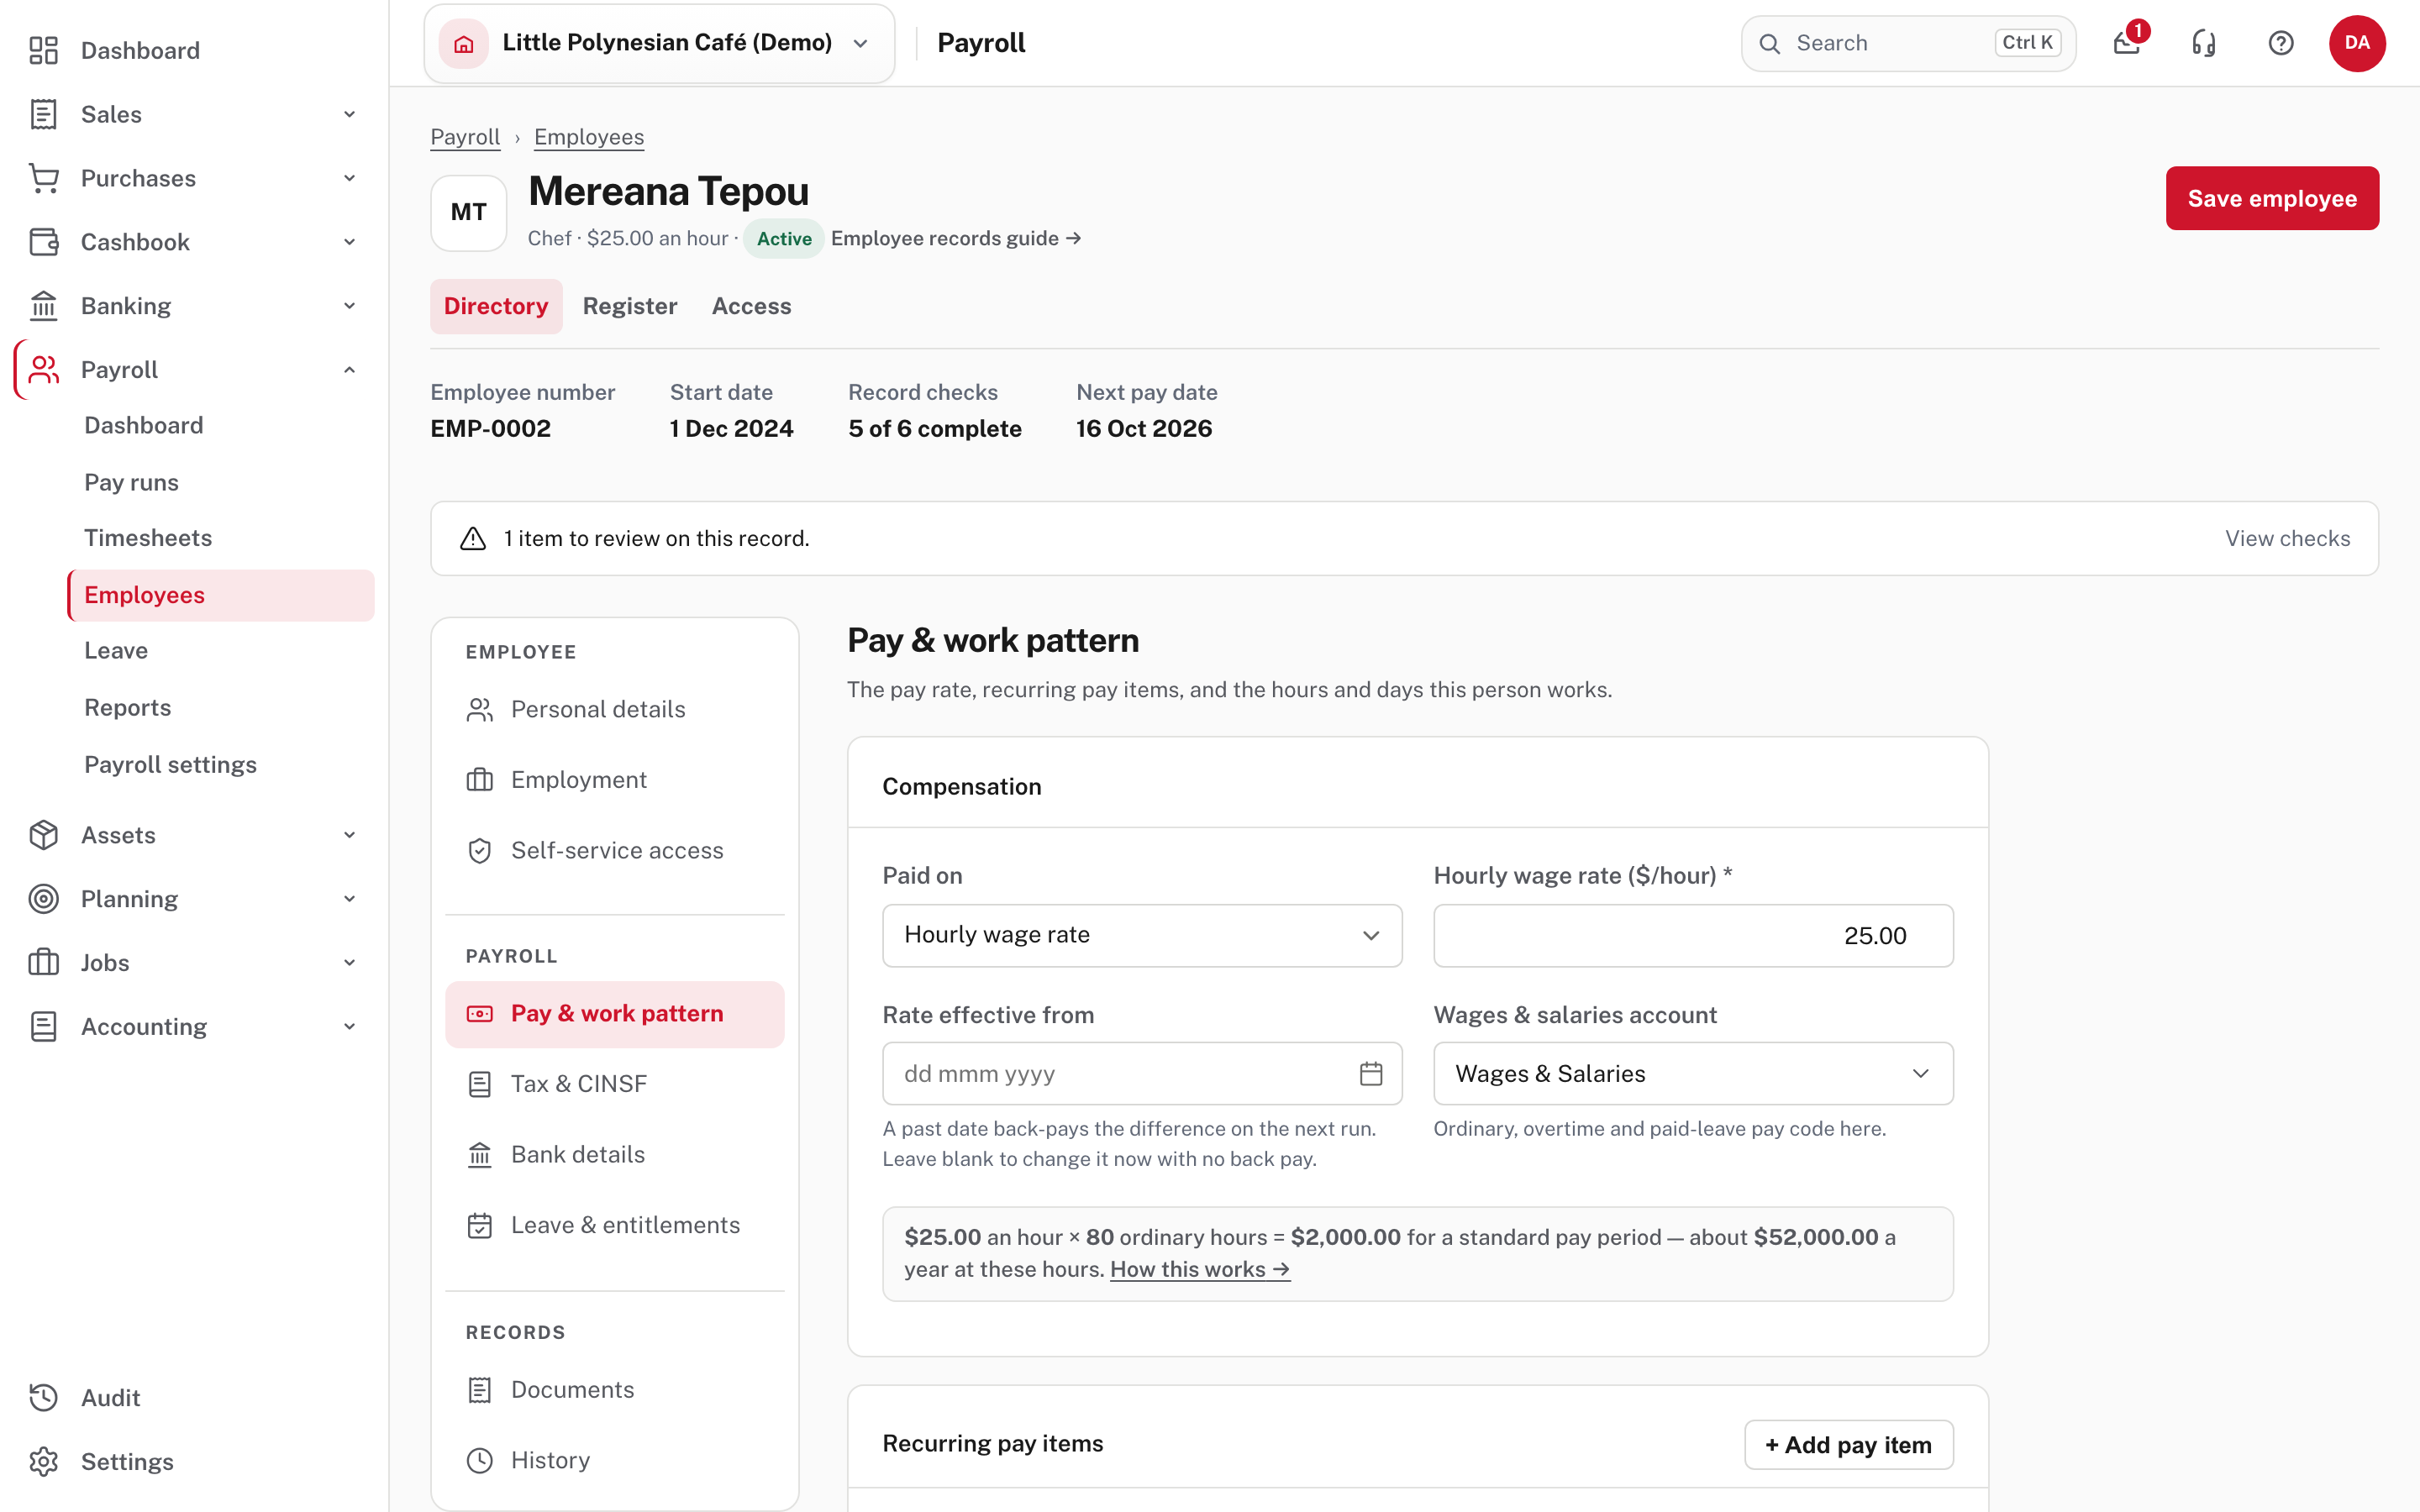
Rate effective from matters when a rate changes: a date in the past back-pays the difference on the next pay run, and leaving it blank changes the rate from now with no back pay (Extra pay and back pay).
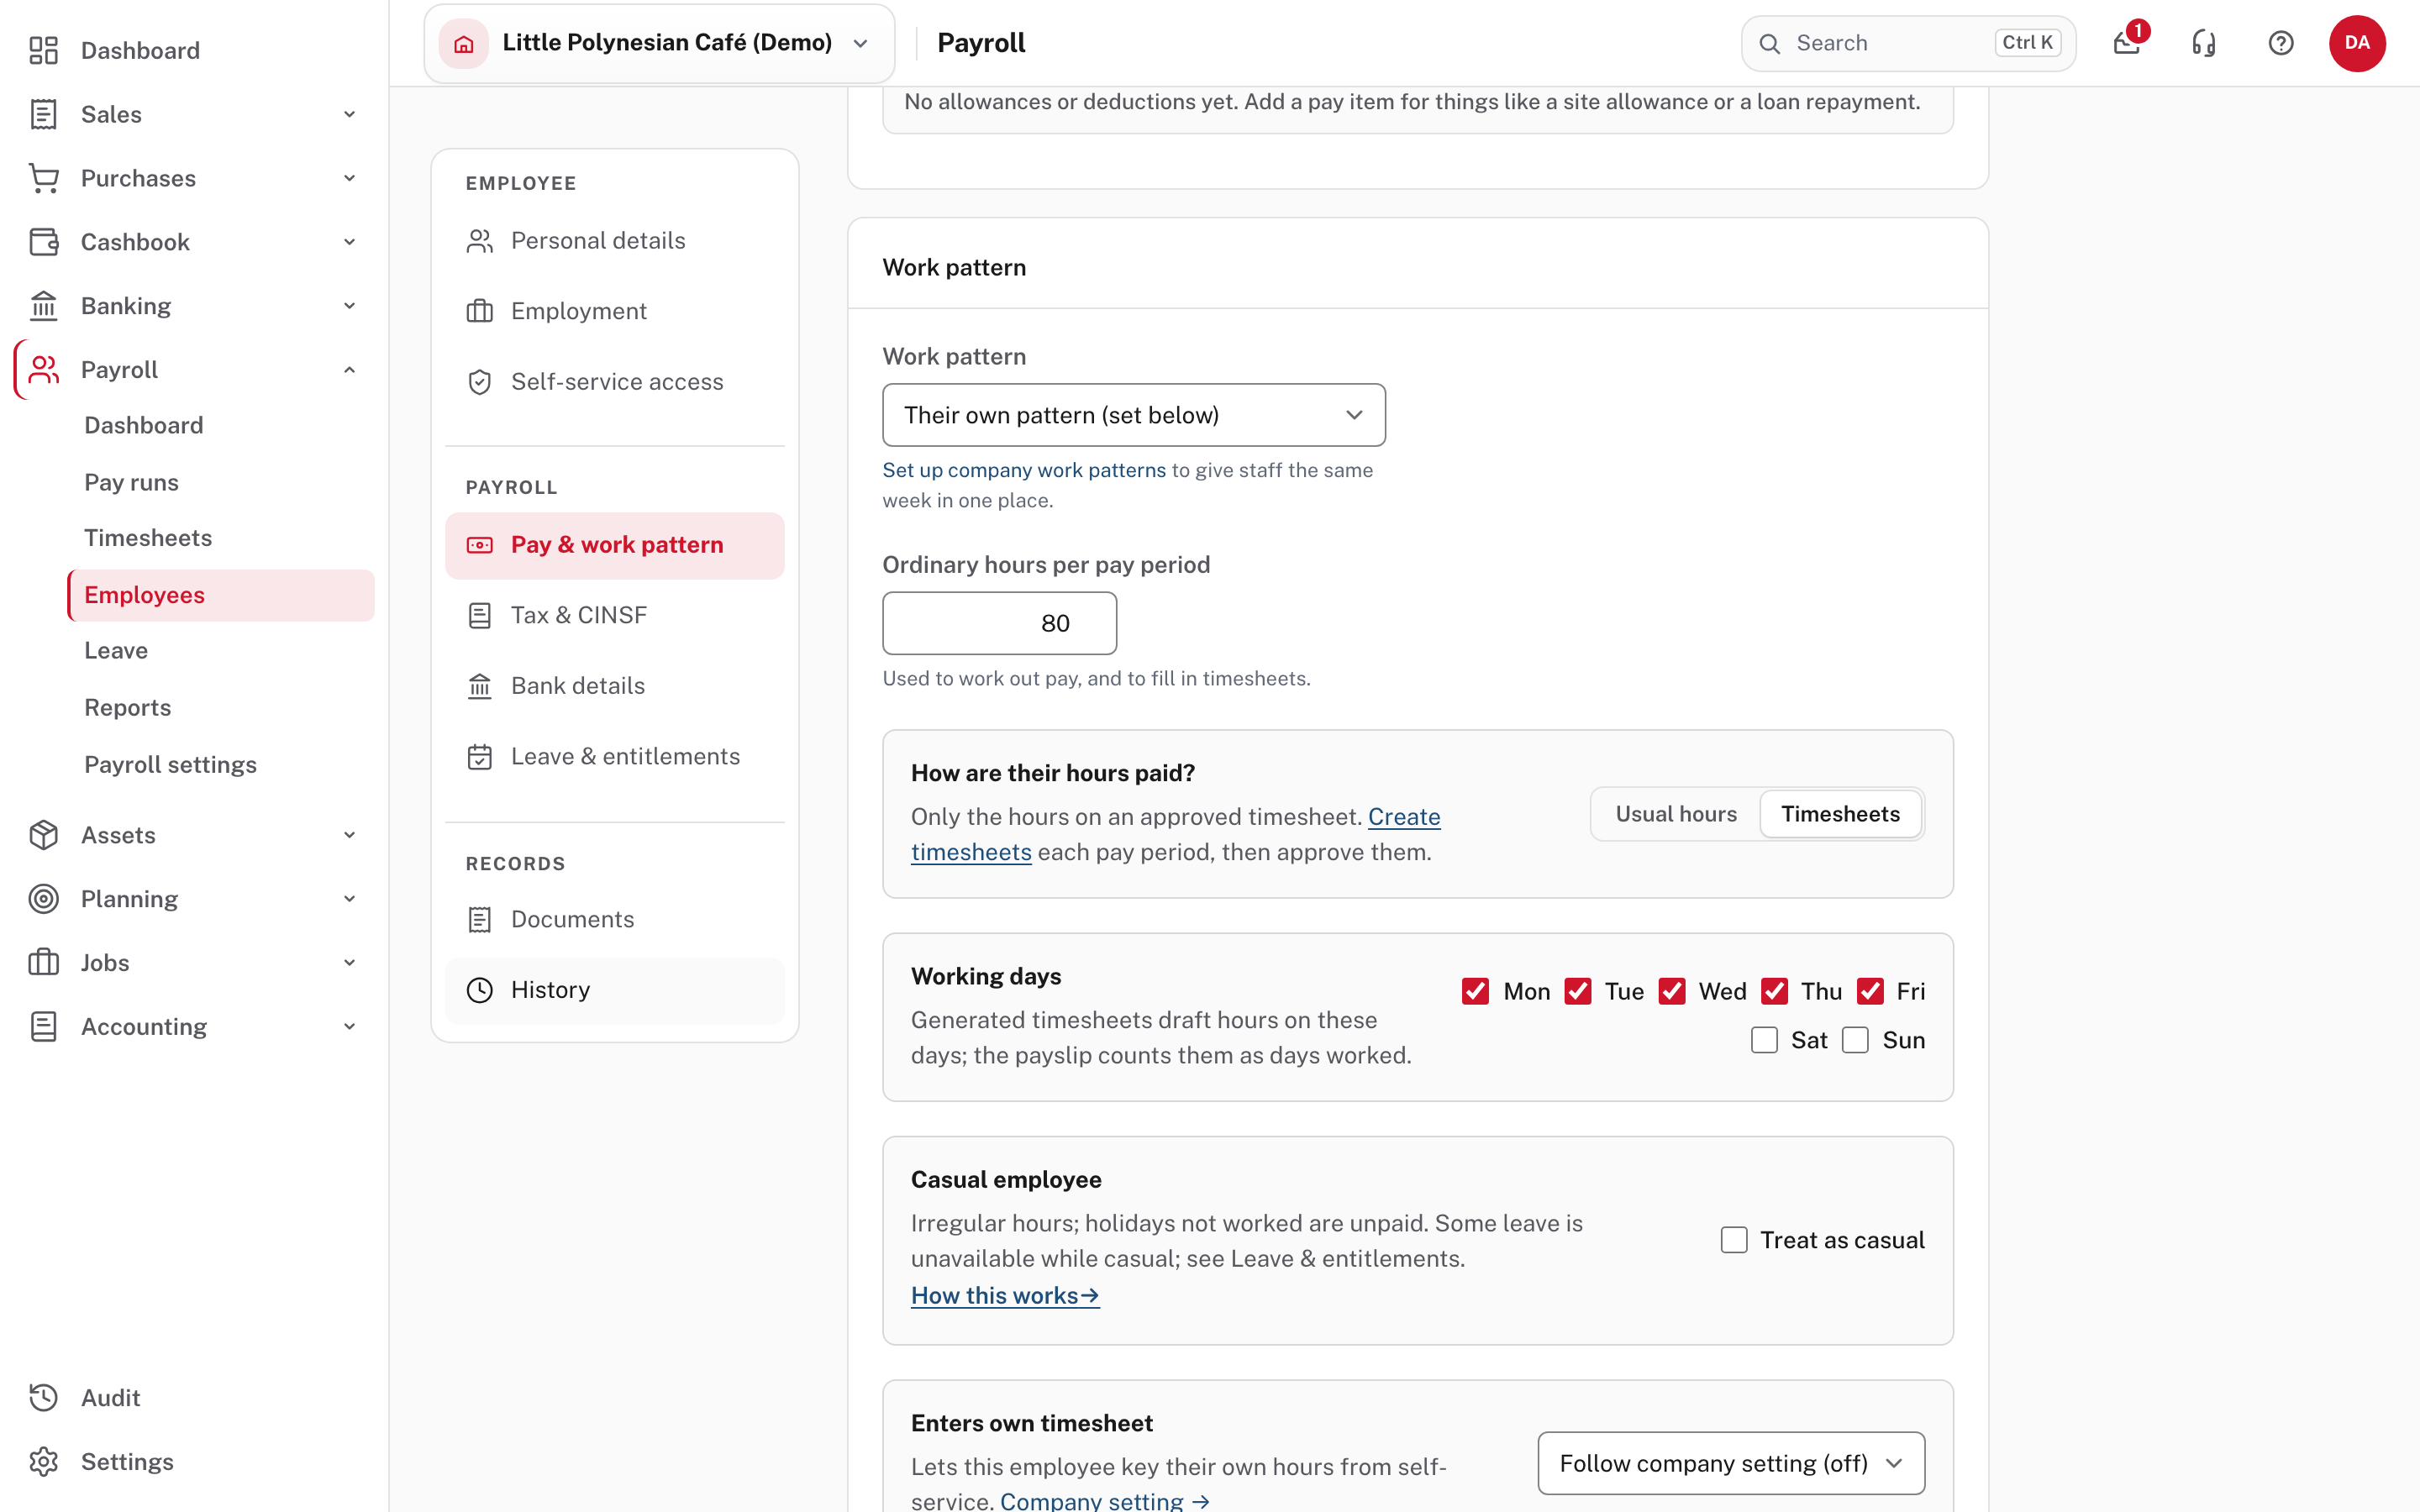
Lower down, Work pattern chooses a company pattern (step 3) or Their own pattern (set below); with a pattern chosen, the hours and days come from it. How are their hours paid? chooses Usual hours (the hours above, every pay, with no timesheet; a different week is changed on the payslip) or Timesheets (only the hours on an approved timesheet). Casual employee marks irregular hours: holidays not worked are unpaid, and some leave is unavailable while casual. Enters own timesheet follows the company setting from step 8 or overrides it for this person.
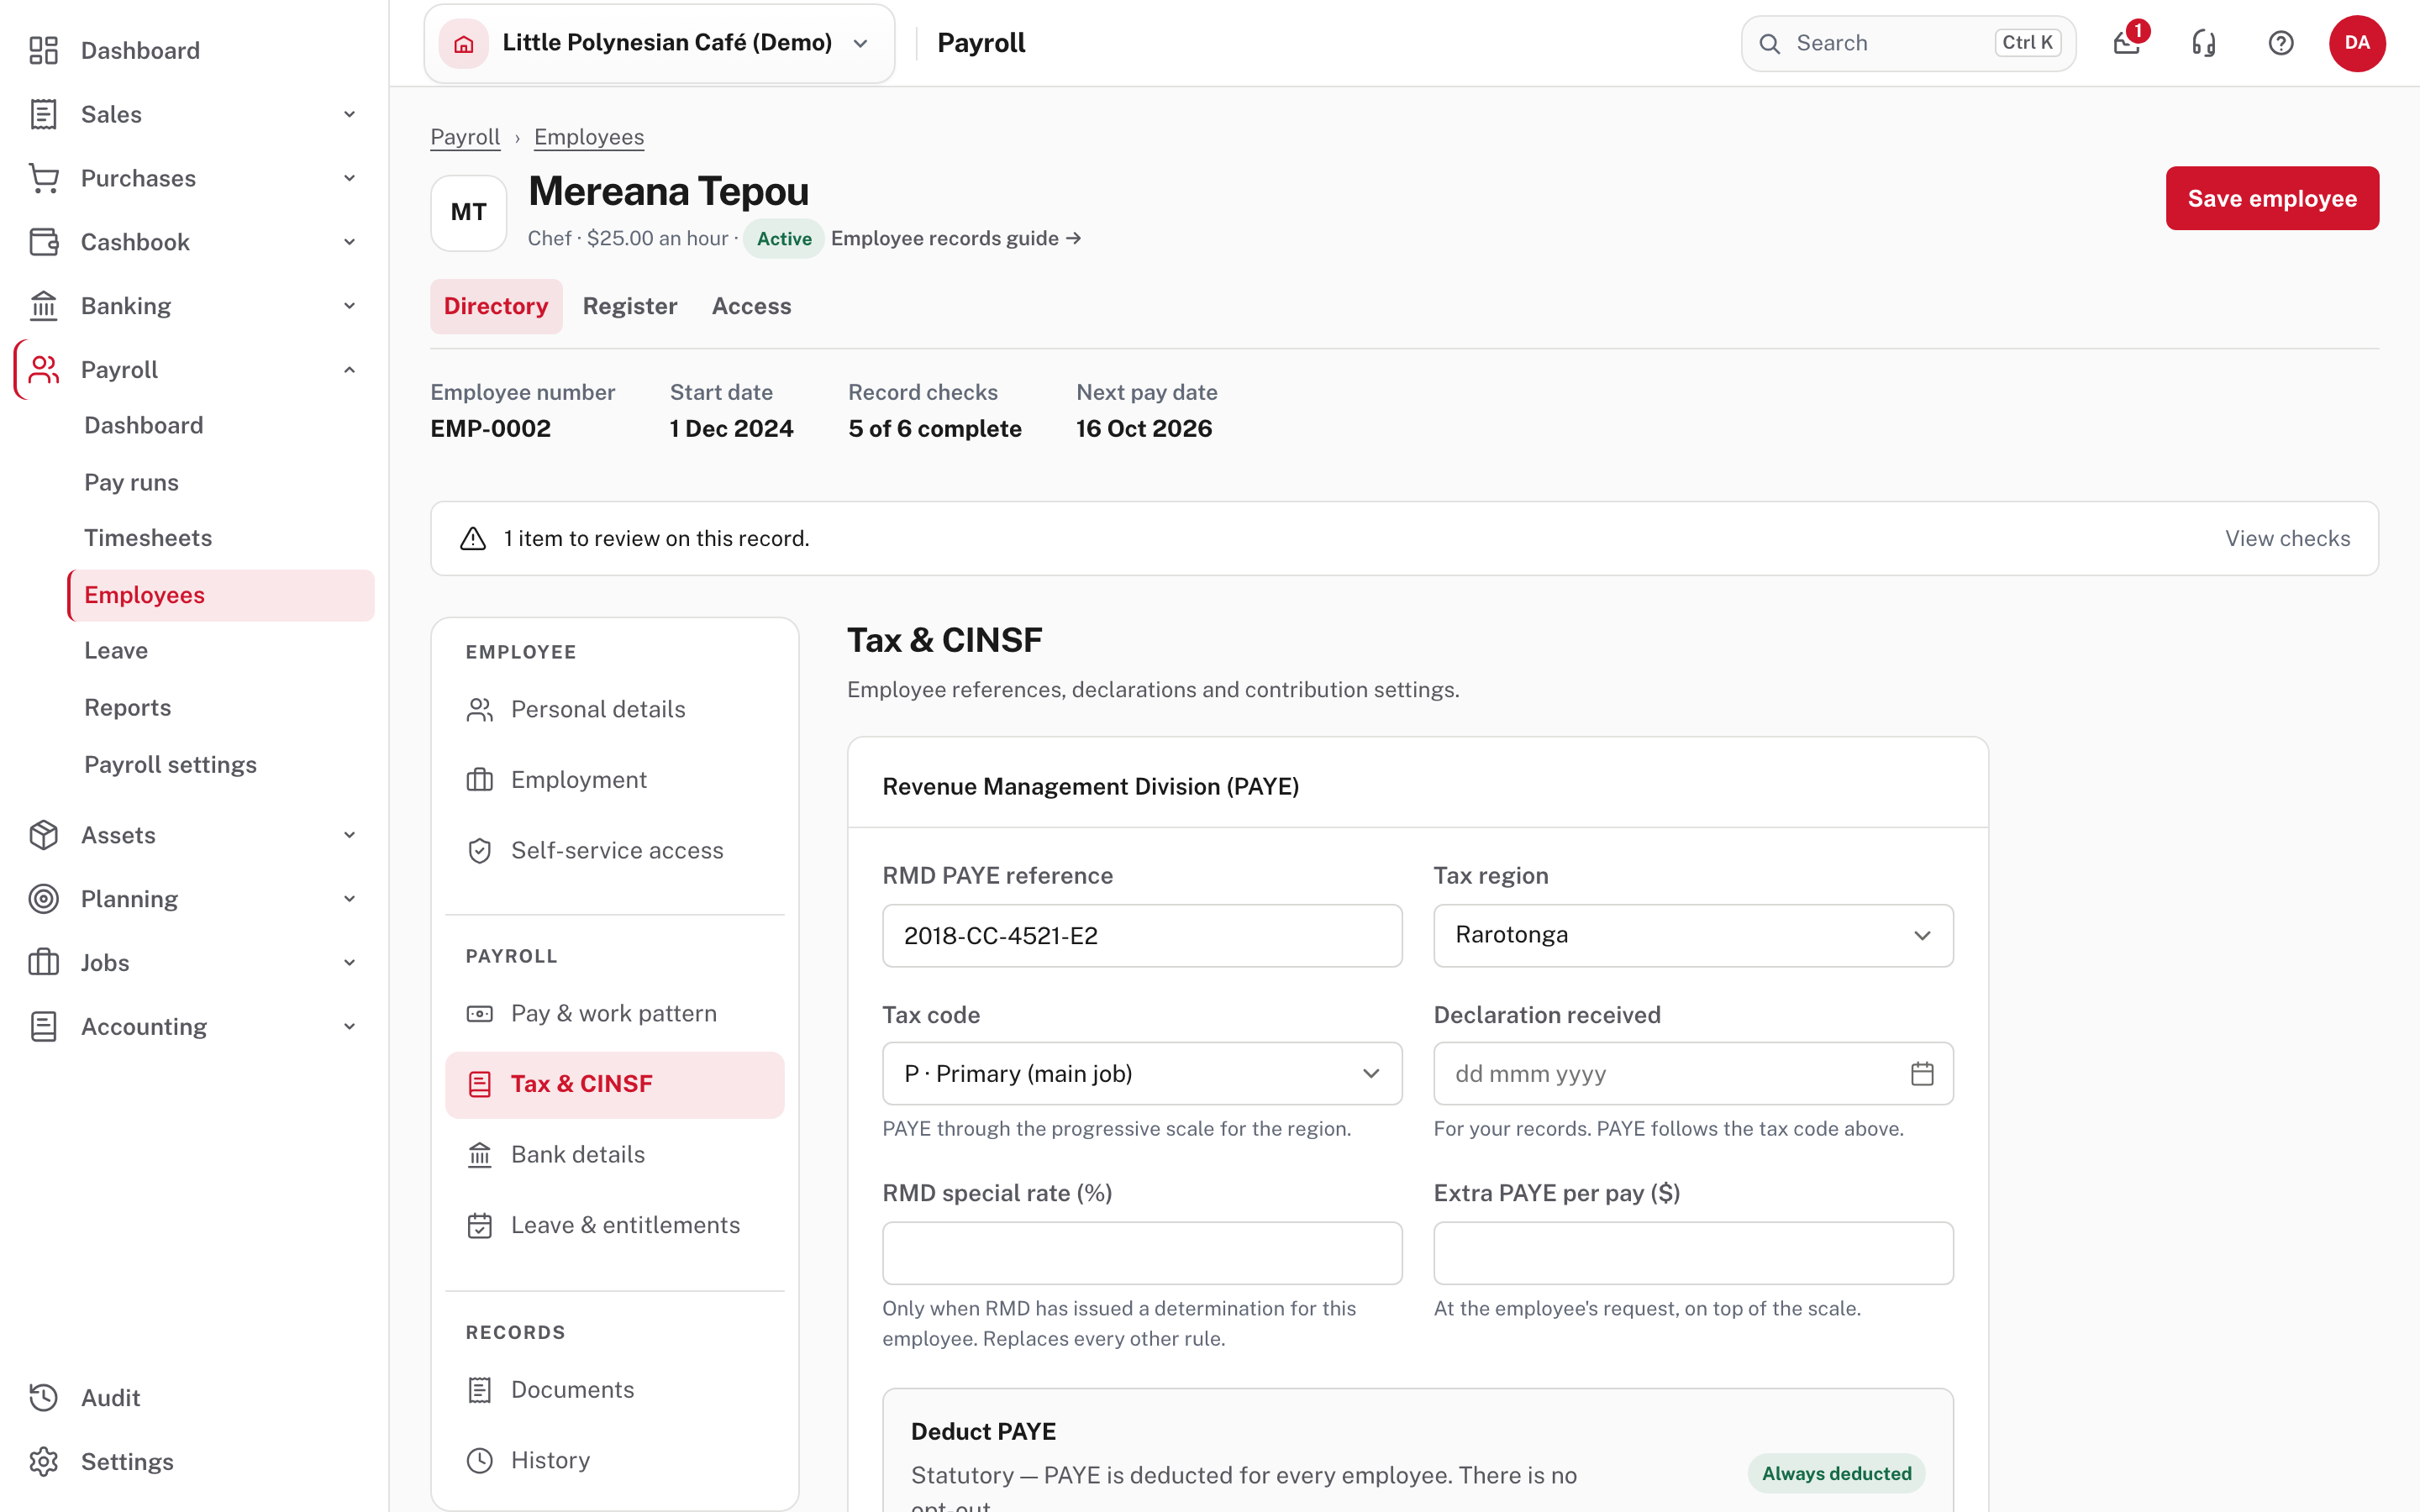
- Tax & CINSF: RMD PAYE reference, tax region, tax code, declaration date, and the CINSF settings.
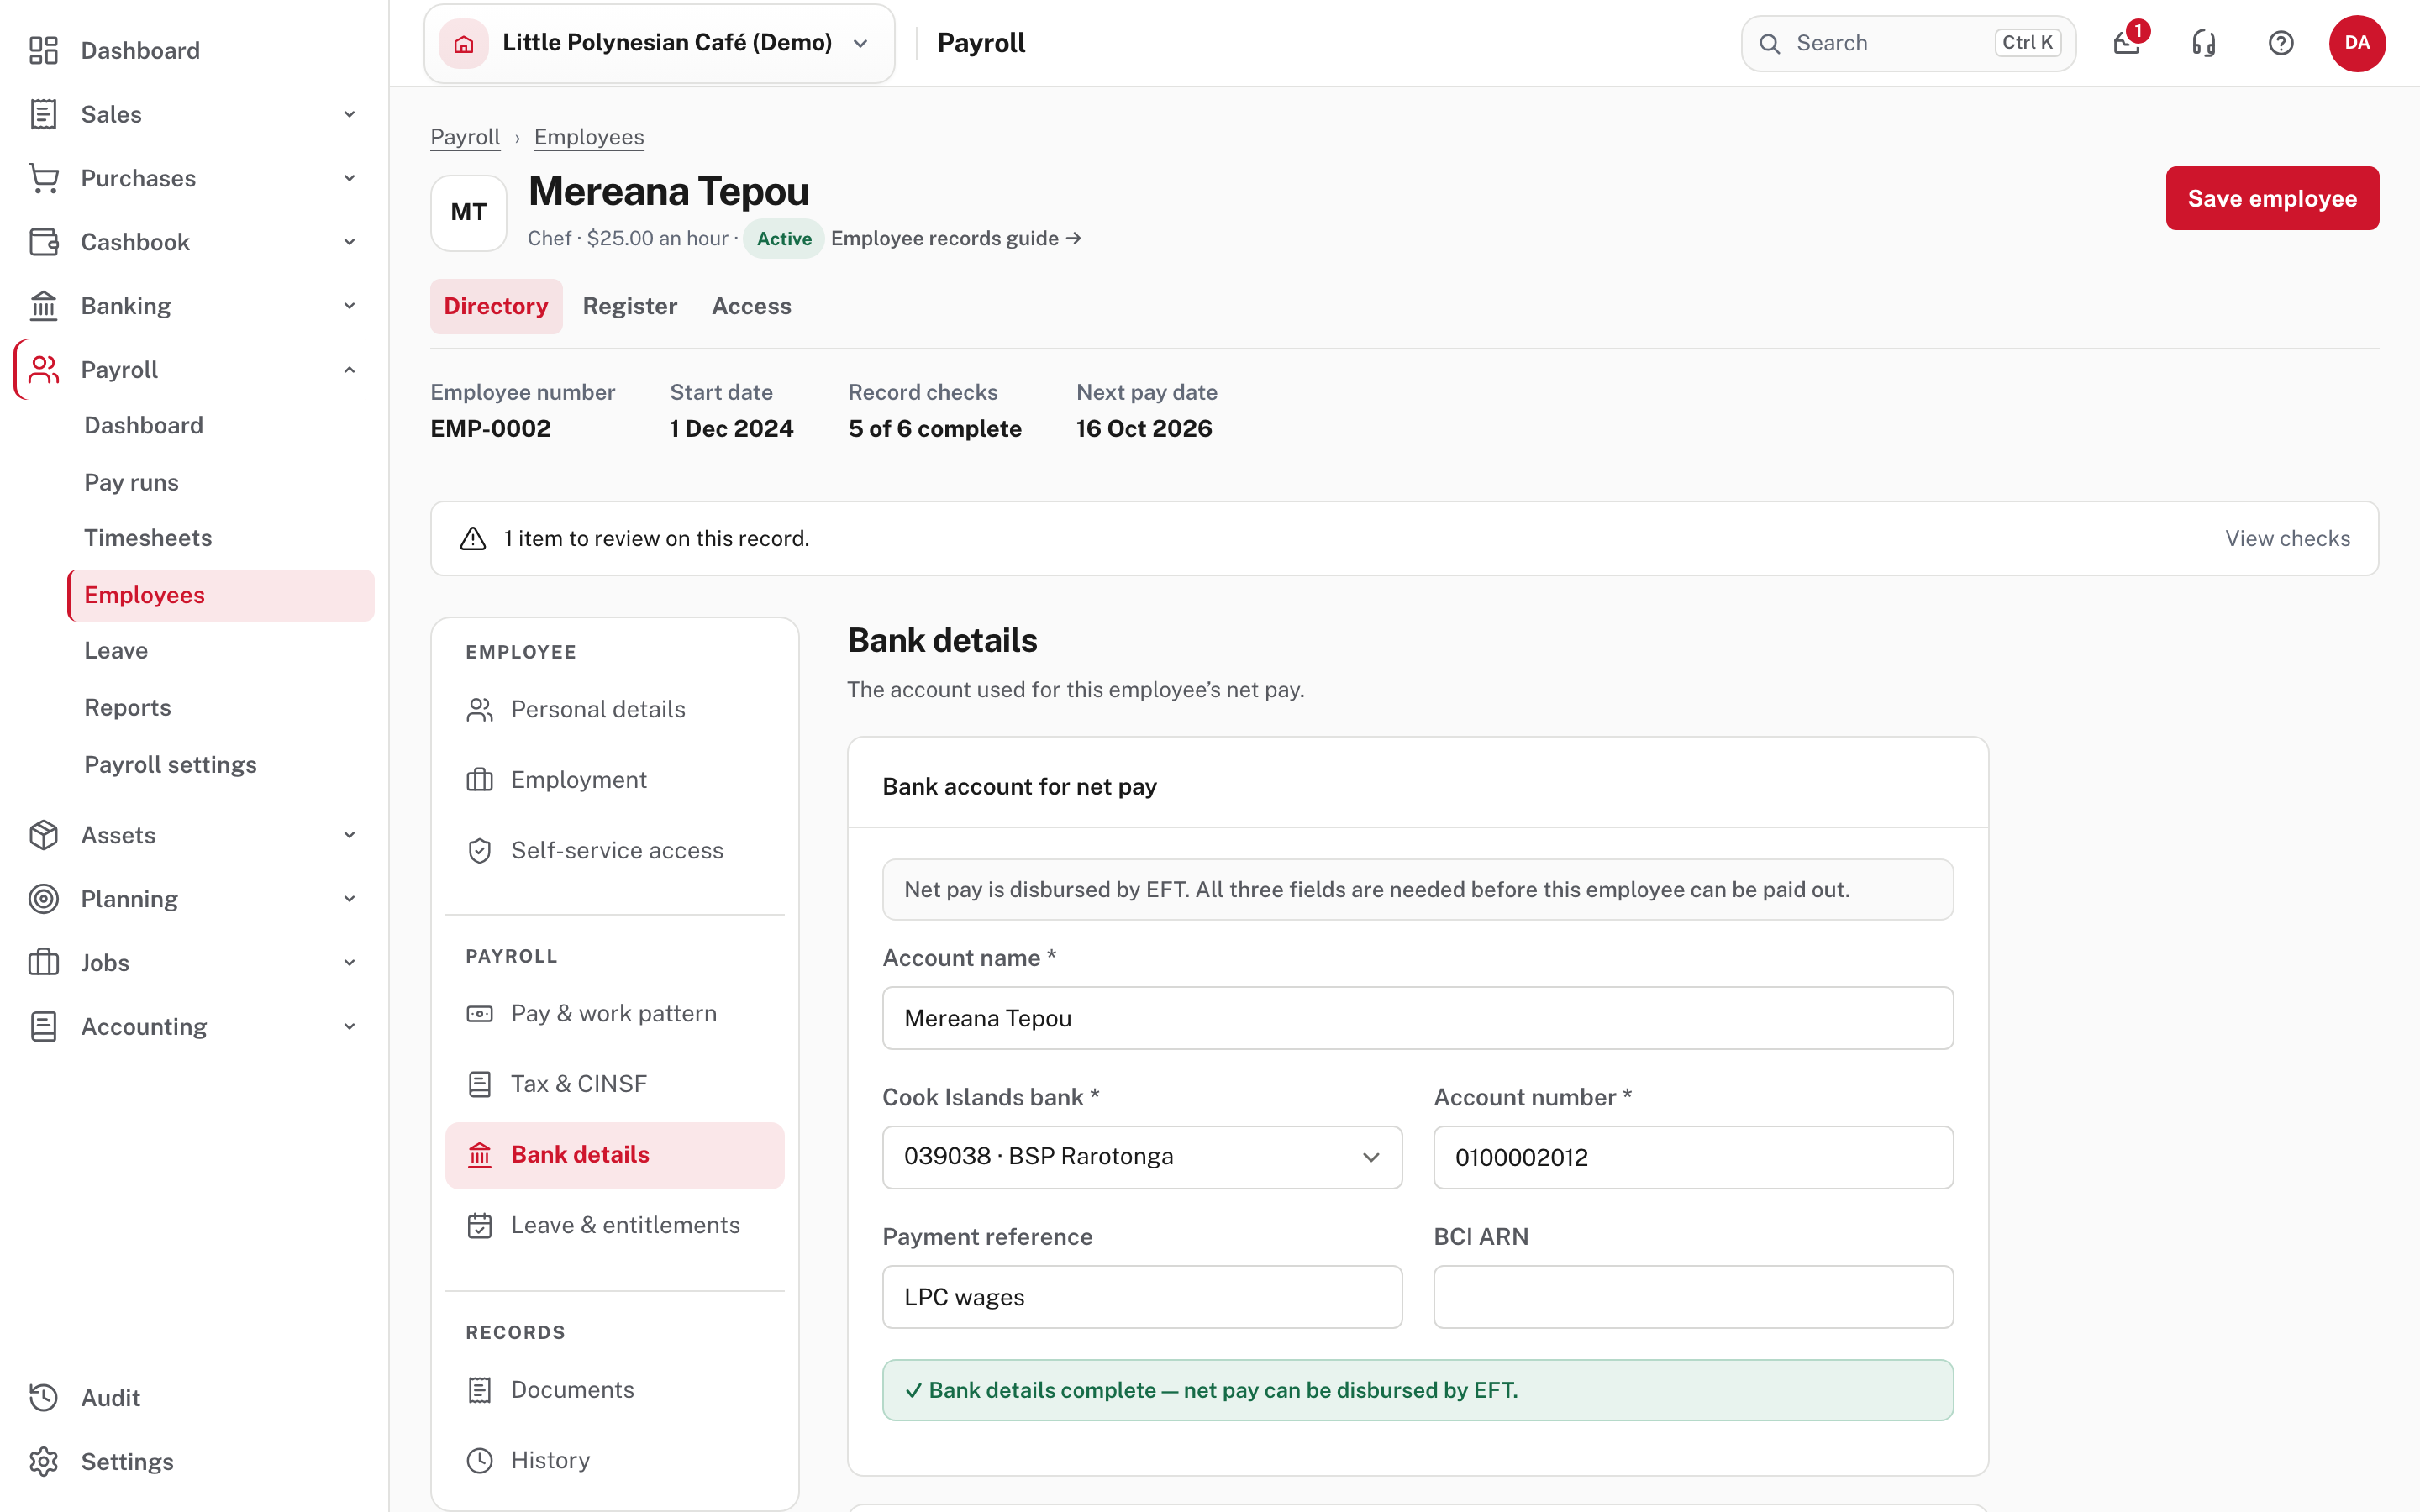
- Bank details: account name, Cook Islands bank and account number. All three are needed before the person can be paid by bank transfer. A green line says when they are complete. Payment reference (it shows on their bank statement) and BCI ARN (for an account at BCI) are also here, and Split pay into other accounts sends part of the net pay elsewhere.
- Leave & entitlements: their leave balances for the year in hours (opening, accrued or granted, used and balance), with Opening balance to set where they start if they are not starting from zero. Below it, Additional leave has Add leave entitlement and Grant hours for time in lieu and special leave. Leave actions save by themselves; Save employee keeps changes to the other sections.
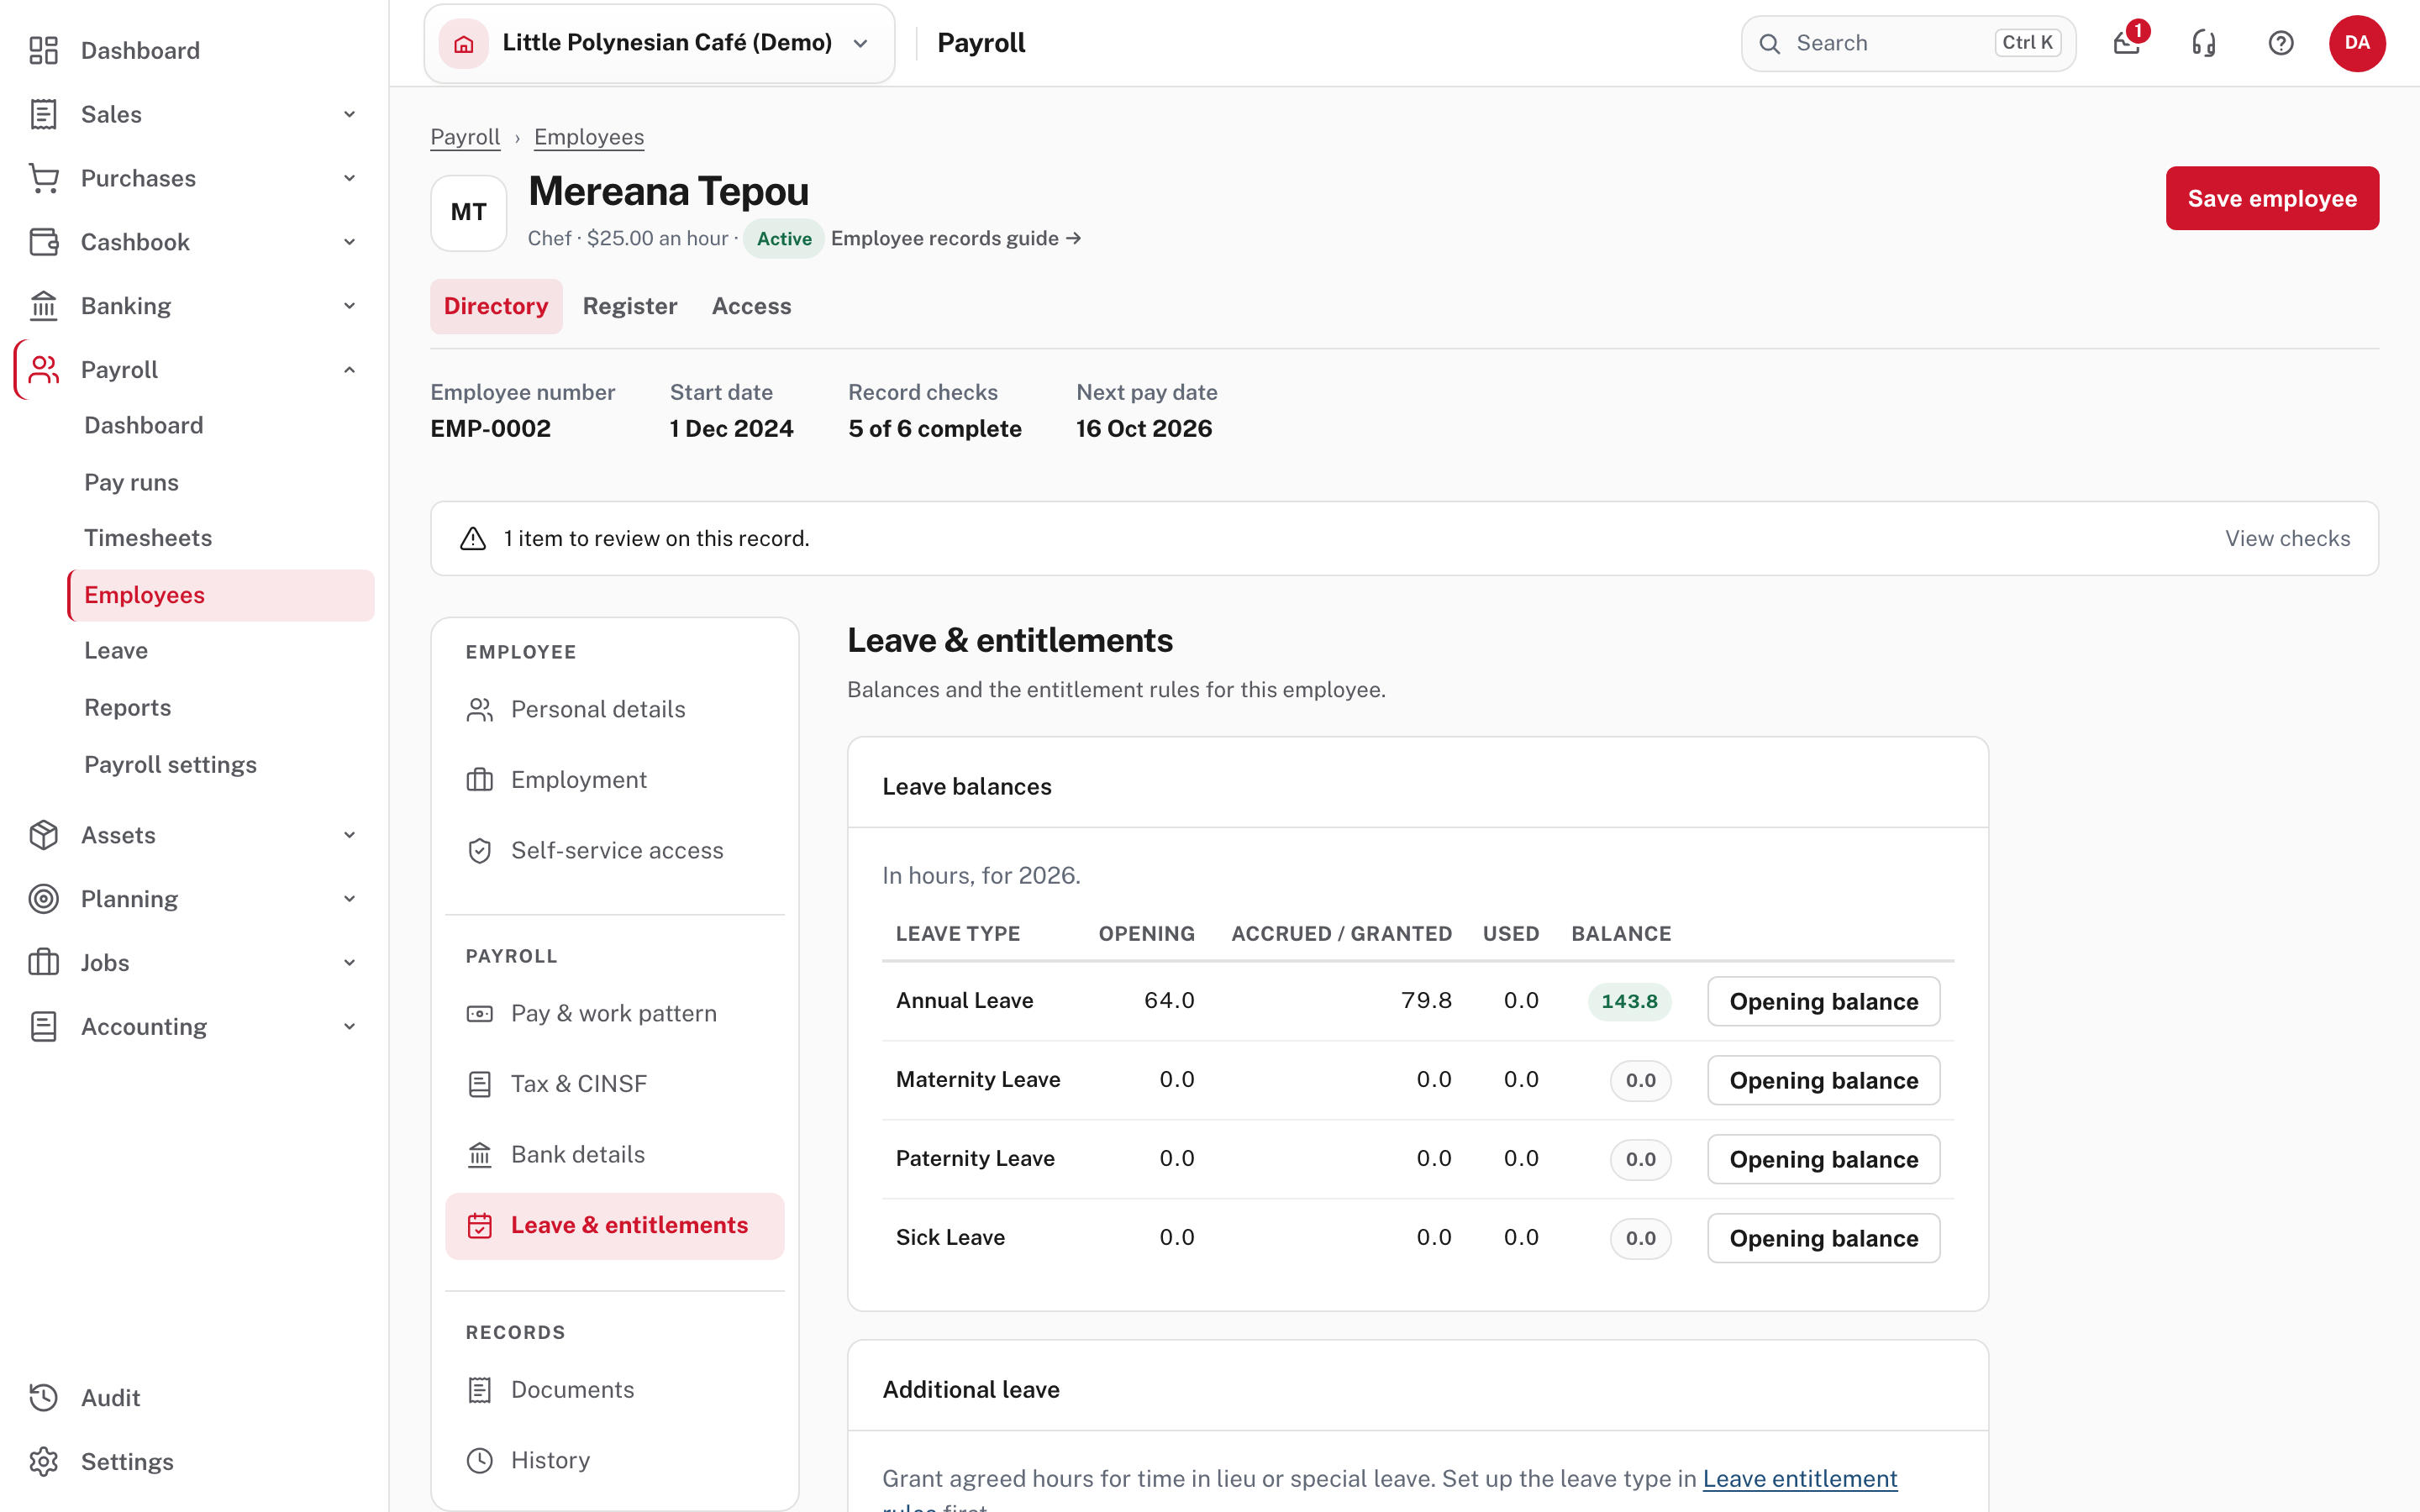
- Documents and History: the paperwork on file (an ID is listed as Required, and shows Missing until attached), and every change to the record.
At the top of every saved record, Record checks counts how many of six checks are complete (for example 5 of 6), and View checks lists them: Personal details, Compensation, Employment dates, Tax identifiers, Bank details and Documents. In the picture the open one is Documents, because no ID is attached; the directory still shows that person as Ready to pay. What stops someone being paid is missing compensation or bank details (Help).
Changing a bank account later
When bank-detail approval is on, a different person has to confirm any change to an employee's bank account before that employee can be paid by bank transfer. Until then, the old account is used.
More detail: Employee records.
Step 10. Check nothing is missing
Payroll → Payroll settings → Check readiness. Until nothing stops a pay run the page is called Get ready to pay. The setup checklist's payroll step and the Payroll dashboard's first-run card lead to the same page.
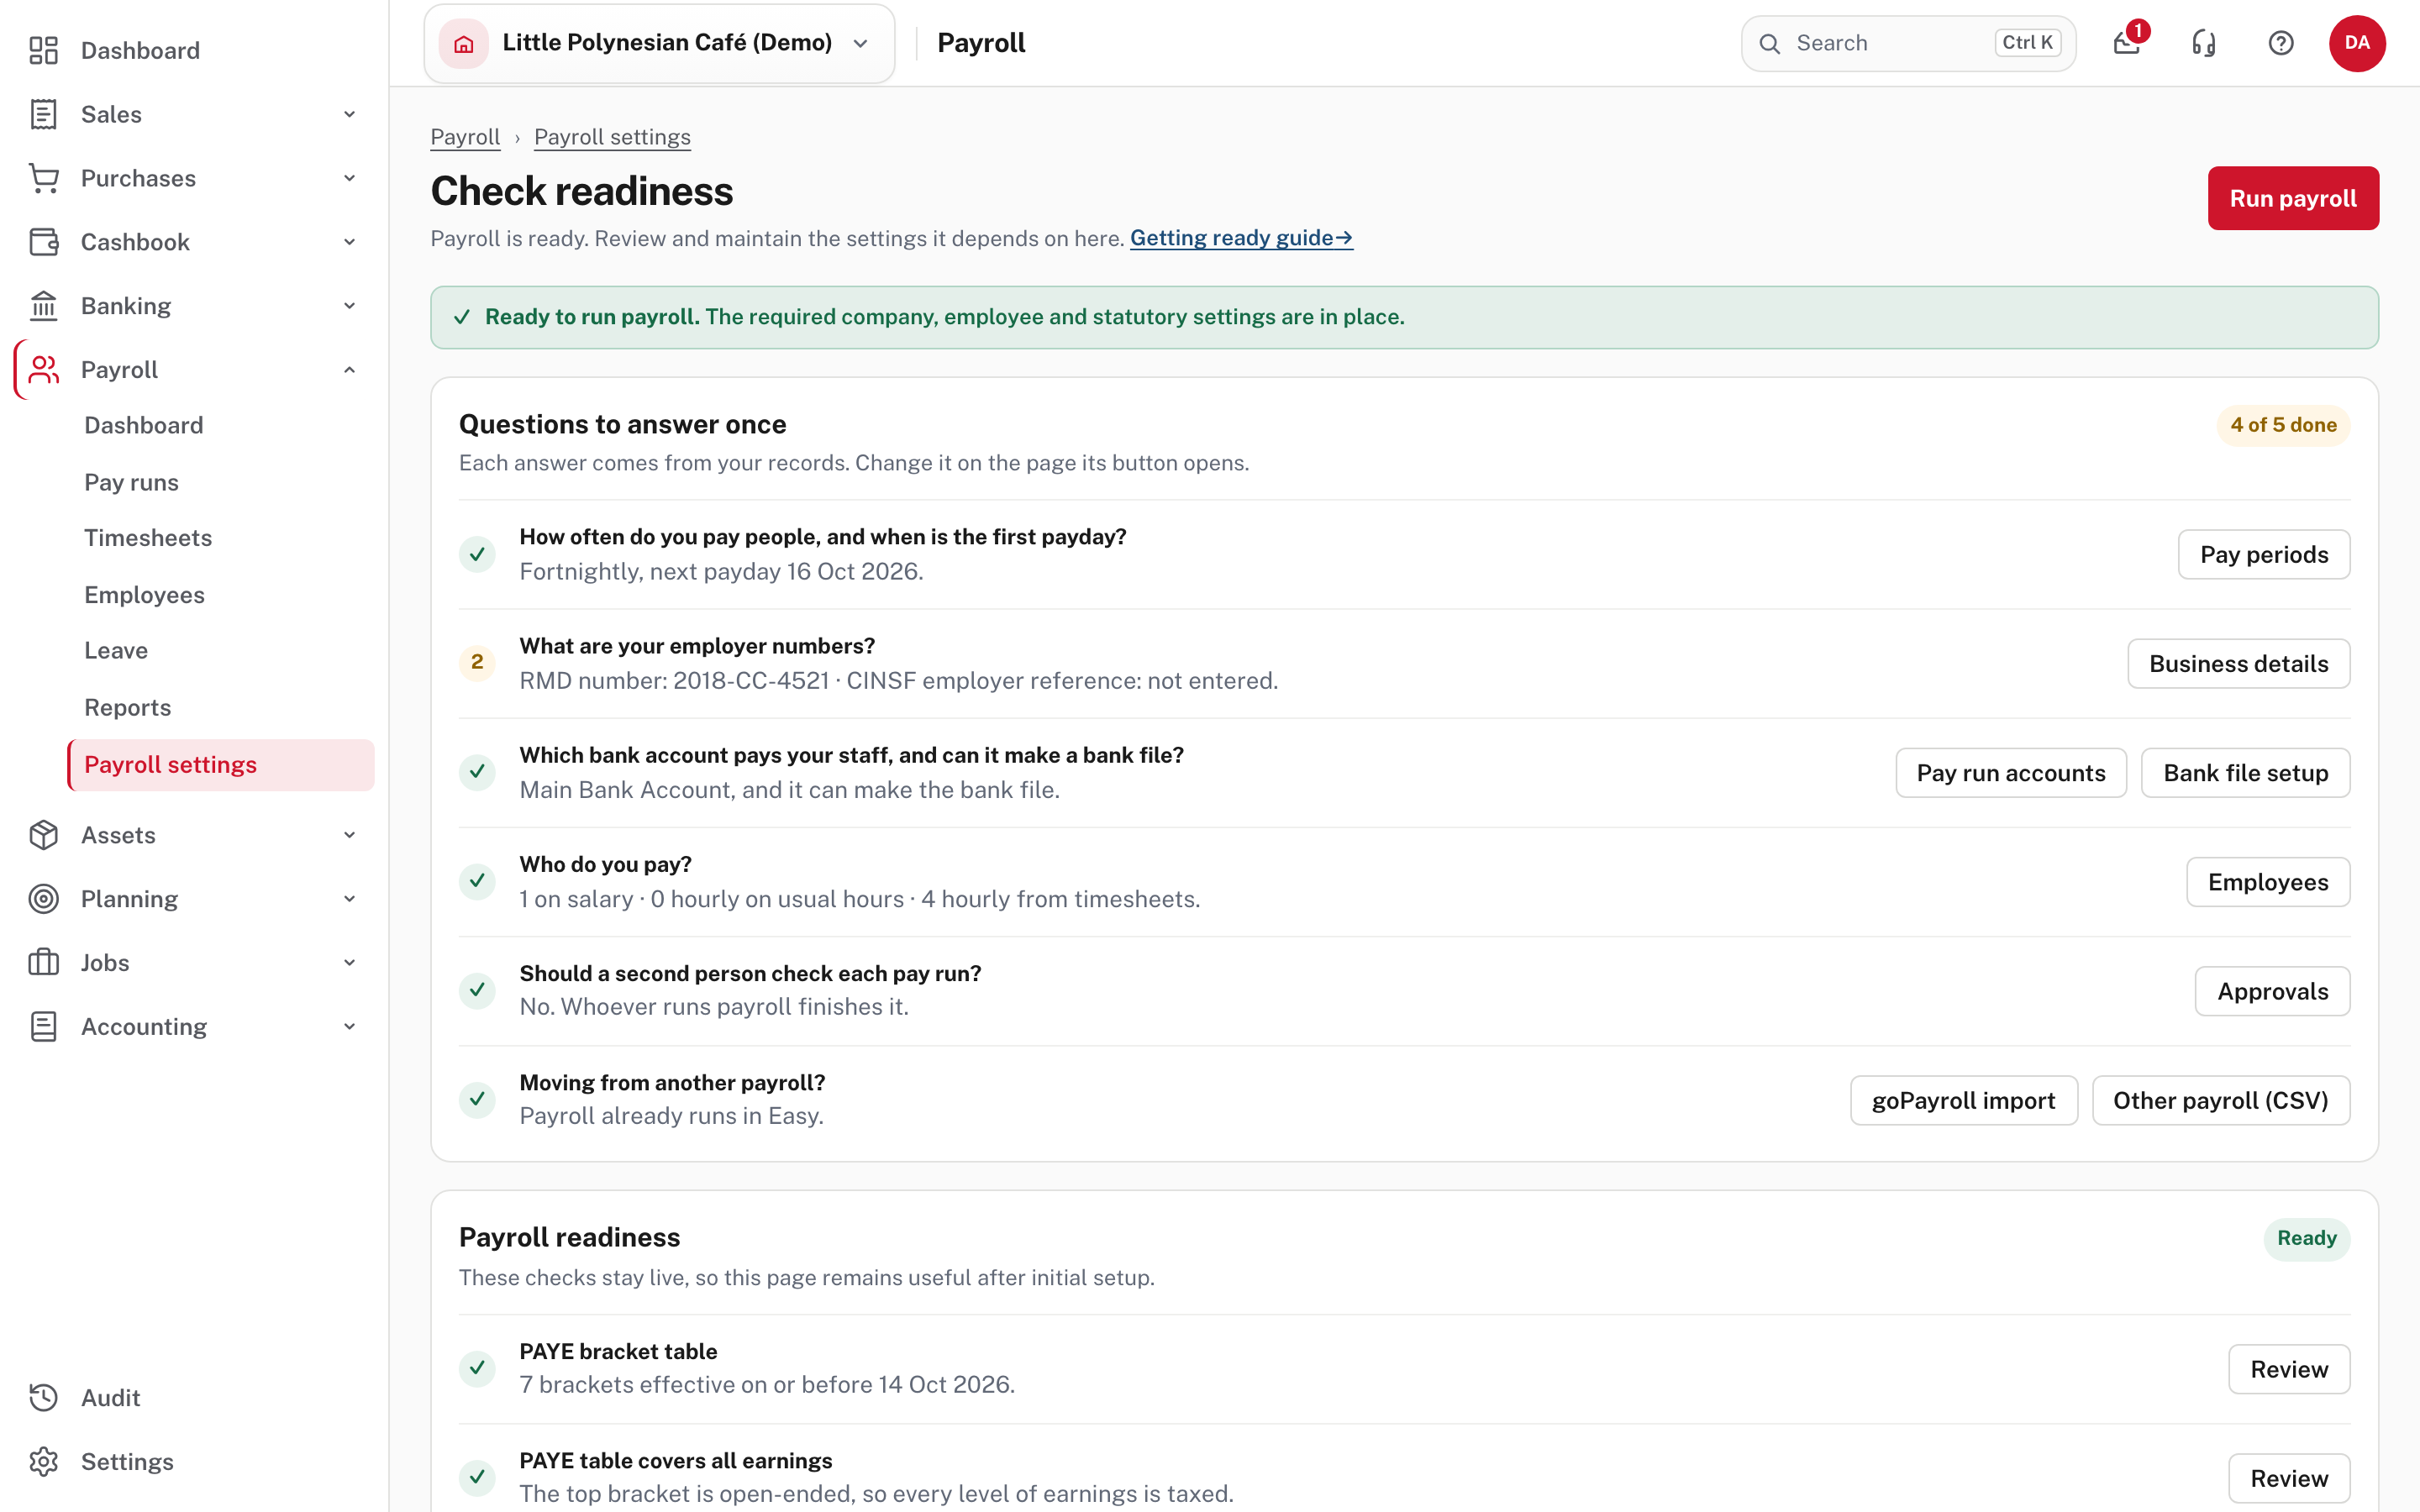
The page has two parts:
- Questions to answer once. Six plain questions: how often you pay and when the first payday is, your employer numbers, which bank account pays your staff (and whether it can make a bank file), who you pay (salary, hourly on usual hours, hourly from timesheets), whether a second person checks each pay run, and, optionally, whether you are moving from another payroll. Each shows the answer from your records, with a button to the page that changes it. A question is done when the answer is there, so the page counts them for you and you tick nothing. In the café, What are your employer numbers? is still To do because no CINSF employer reference is entered on Business details.
- Payroll readiness. The live checks a pay run needs: the PAYE brackets, the CINSF rates, the control accounts and the bank file. A tick is a pass; ! with ADVISORY is something to know about that does not stop a run (here the CINSF employer reference and public holidays). Anything that does stop a pay run is listed with a link to fix it. Once nothing does, the page reads Payroll is ready and offers Run payroll.
The same list also appears where you start a pay run. Payroll → Pay runs → Run payroll opens New pay run; leave Regular pay chosen. If something payroll needs is not set up, a yellow box lists it, with a link to fix each item, and Calculate pay run stays unavailable until you do.
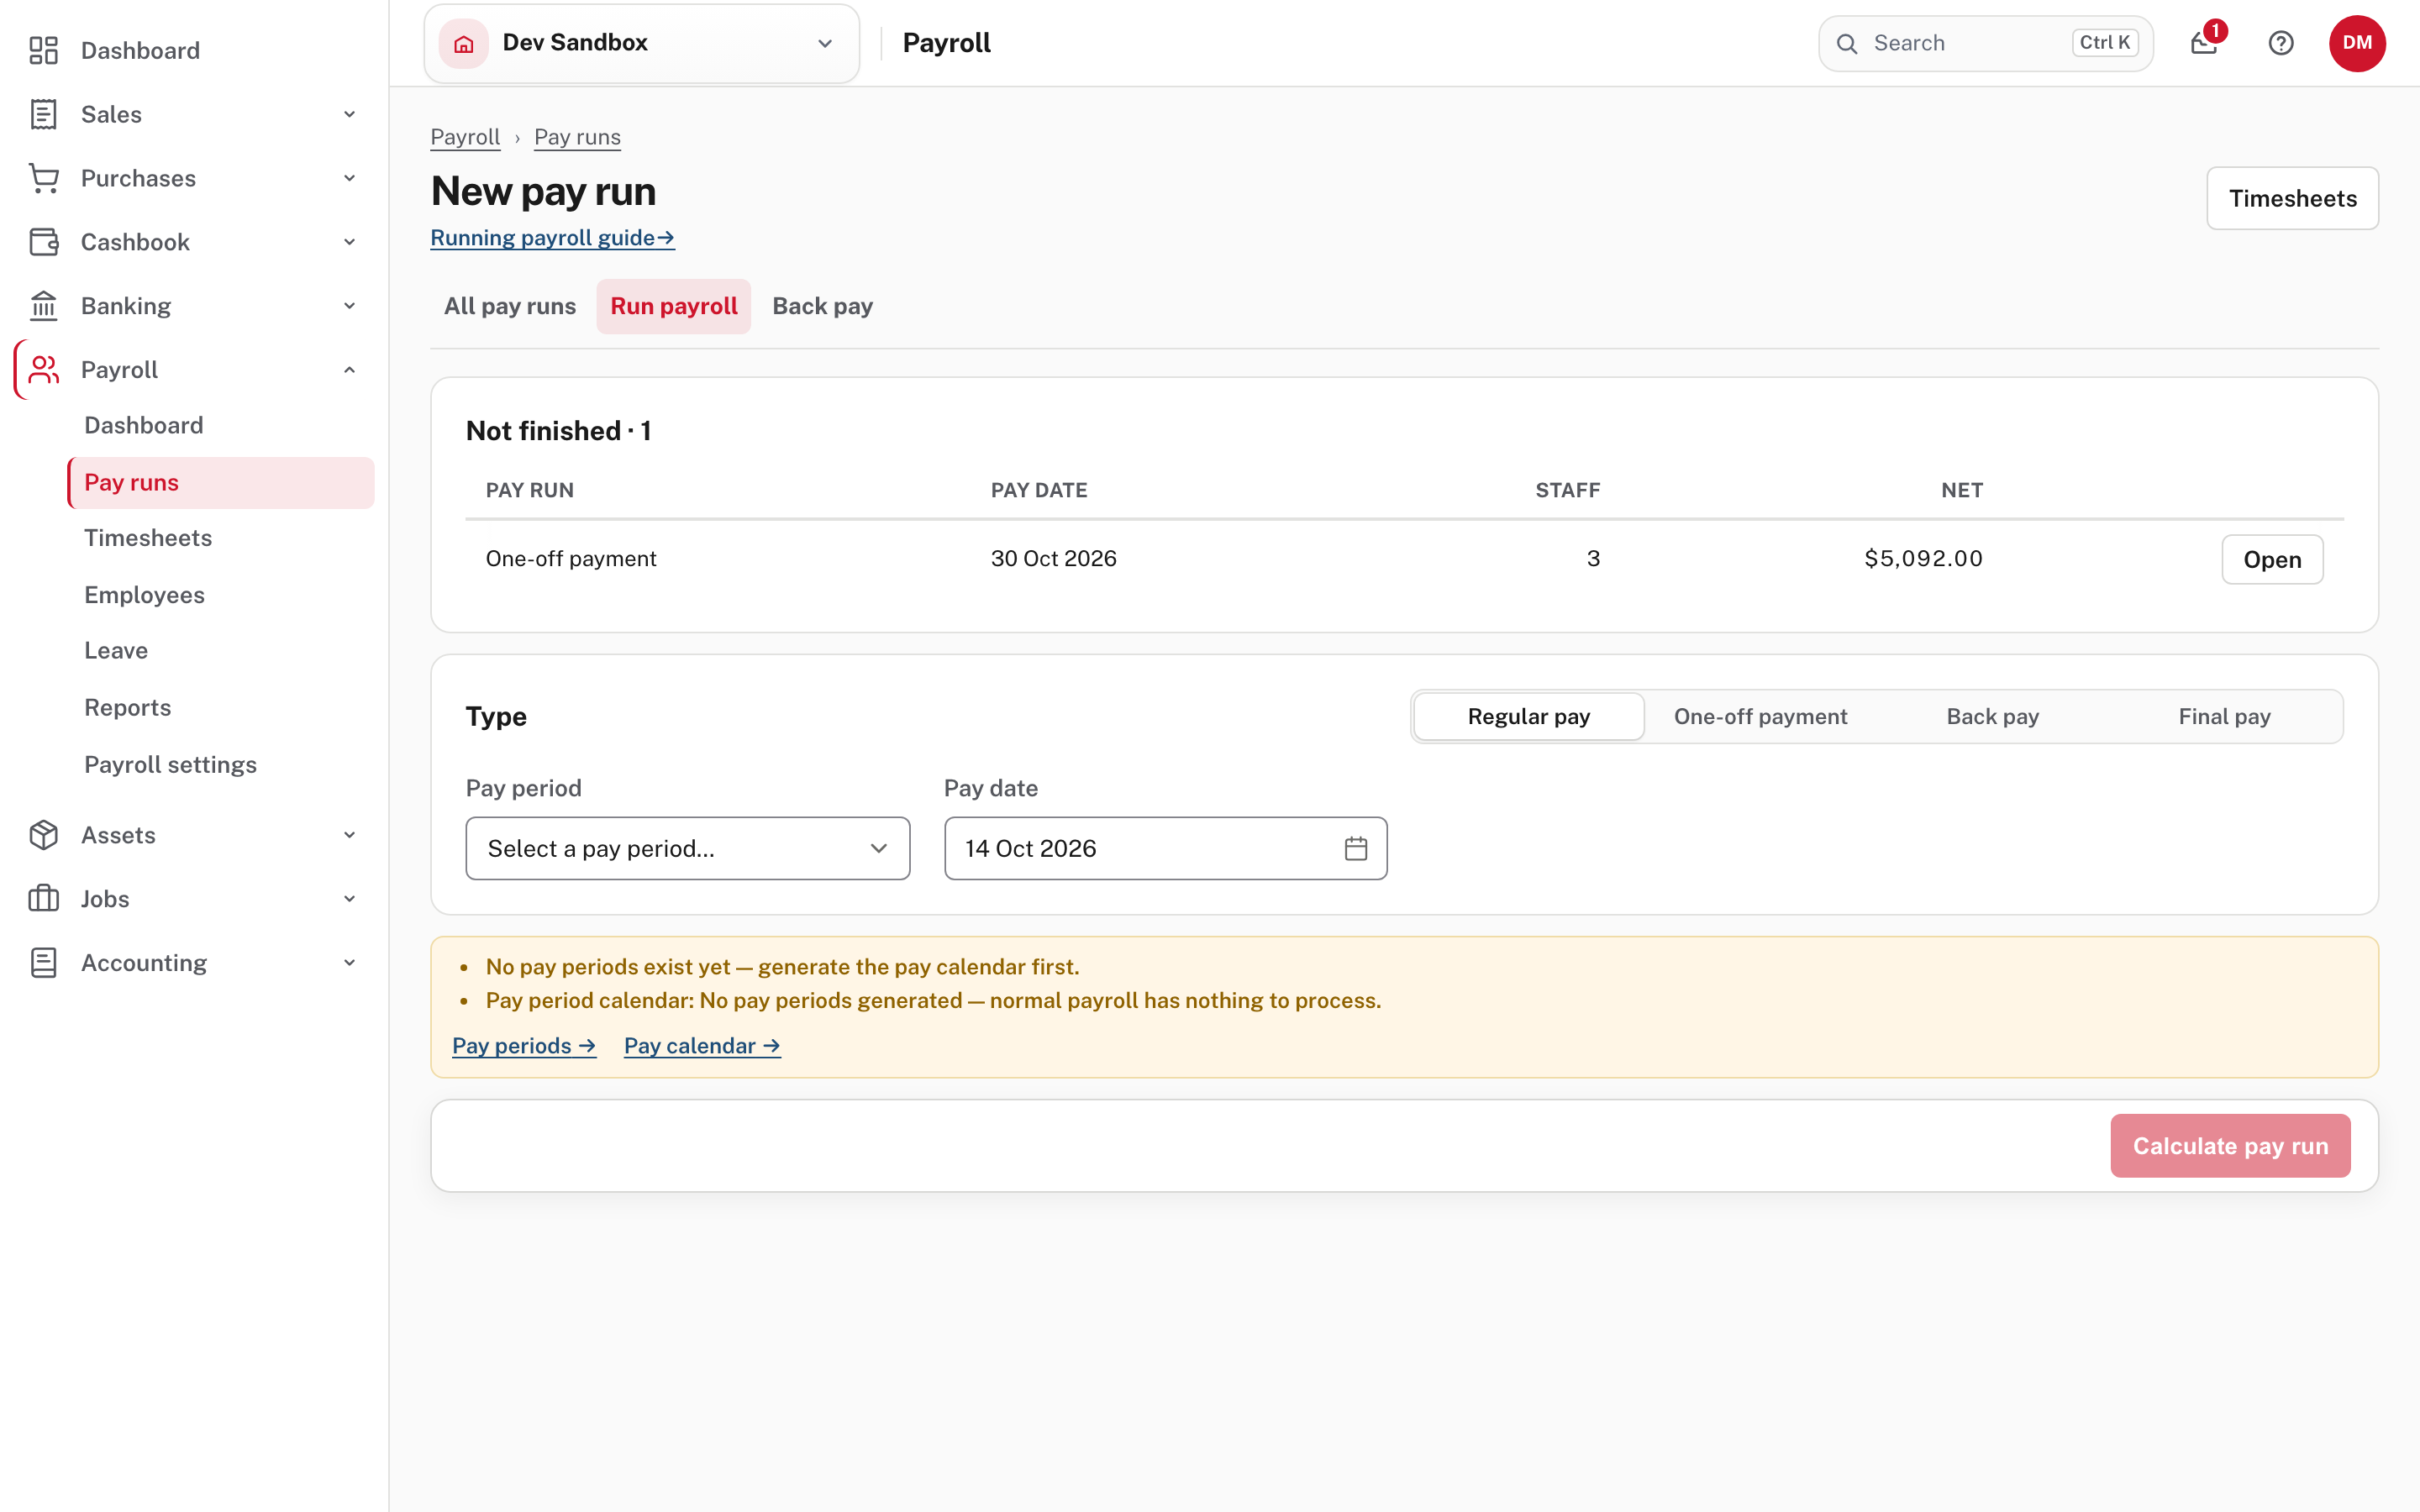
In the picture the company has no pay calendar, so the box says No pay periods exist yet and offers Pay periods and Pay calendar. A run that was started and not finished is listed at the top of the screen (here a one-off payment left in the sandbox). In the café, which is set up, there is no yellow box: the screen lists the pay period and shows the figures behind it (salaried staff, hourly staff on usual hours, hourly staff from timesheets, timesheets not approved, leave requests waiting, back pay due), who is Not included and why, and Calculate pay run is ready. Not shown in the demo: the other items the box can list. Once the run is calculated, its Review step lists anything left as Errors, Warnings and Passed (Run a pay period).
More detail: Running payroll: Get ready to pay.
Check before you continue
Check before you continue
- Full Payroll is on, and the company's RMD number is entered in Business details.
- The pay calendar shows All clear, and Payroll starts is the first period you will really run.
- Weekly overtime needs no action; if your agreements pay daily overtime, the daily rule is set.
- Pay run accounts point at the right bank, wages and CINSF accounts, and the bank account's bank file is ready.
- The PAYE table's top bracket has no upper limit, and the PAYE and CINSF rates match the current notices.
- Public holidays are entered for the current year, including each outer island's own Gospel Day if you have staff there.
- Approvals: a second person is required for pay runs and bank-detail changes, if you have more than one person on payroll.
- You have decided who enters timesheets, and whether payslip and approval emails can be sent.
- Every employee is Ready to pay, with compensation and bank details complete.
- New pay run shows no yellow box about missing setup.
Next
Chapter 2, Run a pay period, covers timesheets, leave, reviewing the run, approval, the bank file and payslips.