2. Run a pay period
Do this every pay period. Once setup (chapter 1) is done, a run takes about fifteen minutes, and the order never changes.
The short version
- Approve the timesheets. Open Payroll → Timesheets. Check the first person's hours, add any leave, then choose Approve. Easy moves straight on to the next person. Repeat until everyone is approved.
- Start the pay run. Choose Create the pay run →, then Calculate pay run.
- Review the run. Open each person's payslip and check it. Add a one-off allowance, bonus or deduction where one is due.
- Finish the pay run. This records the pay in your accounts and locks the figures. (If your company has a second person who signs off each run, Approve comes just before this.)
- Print the reports and pay. On Pay & payslips, print the reports, choose Create bank file, upload the file to your bank, and hand out the payslips.
The four steps across the top of every pay run are Review, Approve, Finish and Pay & payslips. The run is finished before anything is paid, so the bank file and the payslips always come from figures that can no longer change. Extra one-off payments, back pay and a leaver's final pay go through the same steps (chapter 5 and chapter 6).
About the screenshots
Screenshots are from Easy's demo company, Little Polynesian Café: fortnightly pay, 30 September to 13 October 2026, paid 16 October. All names and figures are examples. The demo starts with the Owner as the only person who can approve timesheets; once another person with payroll access exists, Easy asks for a second person to approve, and the second person's screen is shown in step 1 as well. Pay-run approval is off in the demo, and email is not set up. Where the text says "Not shown in the demo", the detail comes from Easy's Help or from the screen's source, because the demo didn't show it.
Before you start
- Payroll is set up (Set up payroll). If something is missing, the New pay run screen lists what blocks the run, with a link to fix each. (Not shown in the demo, which is fully set up.)
- Public holidays are entered for the year. The demo has none, so the review in step 3 shows a warning about it.
- Any new starter or leaver has been dealt with on their record.
- Leave for the period has been requested and approved, so it lands on the timesheets (chapter 4).
- You know who the second person is, if your company has approvals switched on (Payroll settings → Approvals).
Step 1. Approve the timesheets
Payroll → Timesheets.
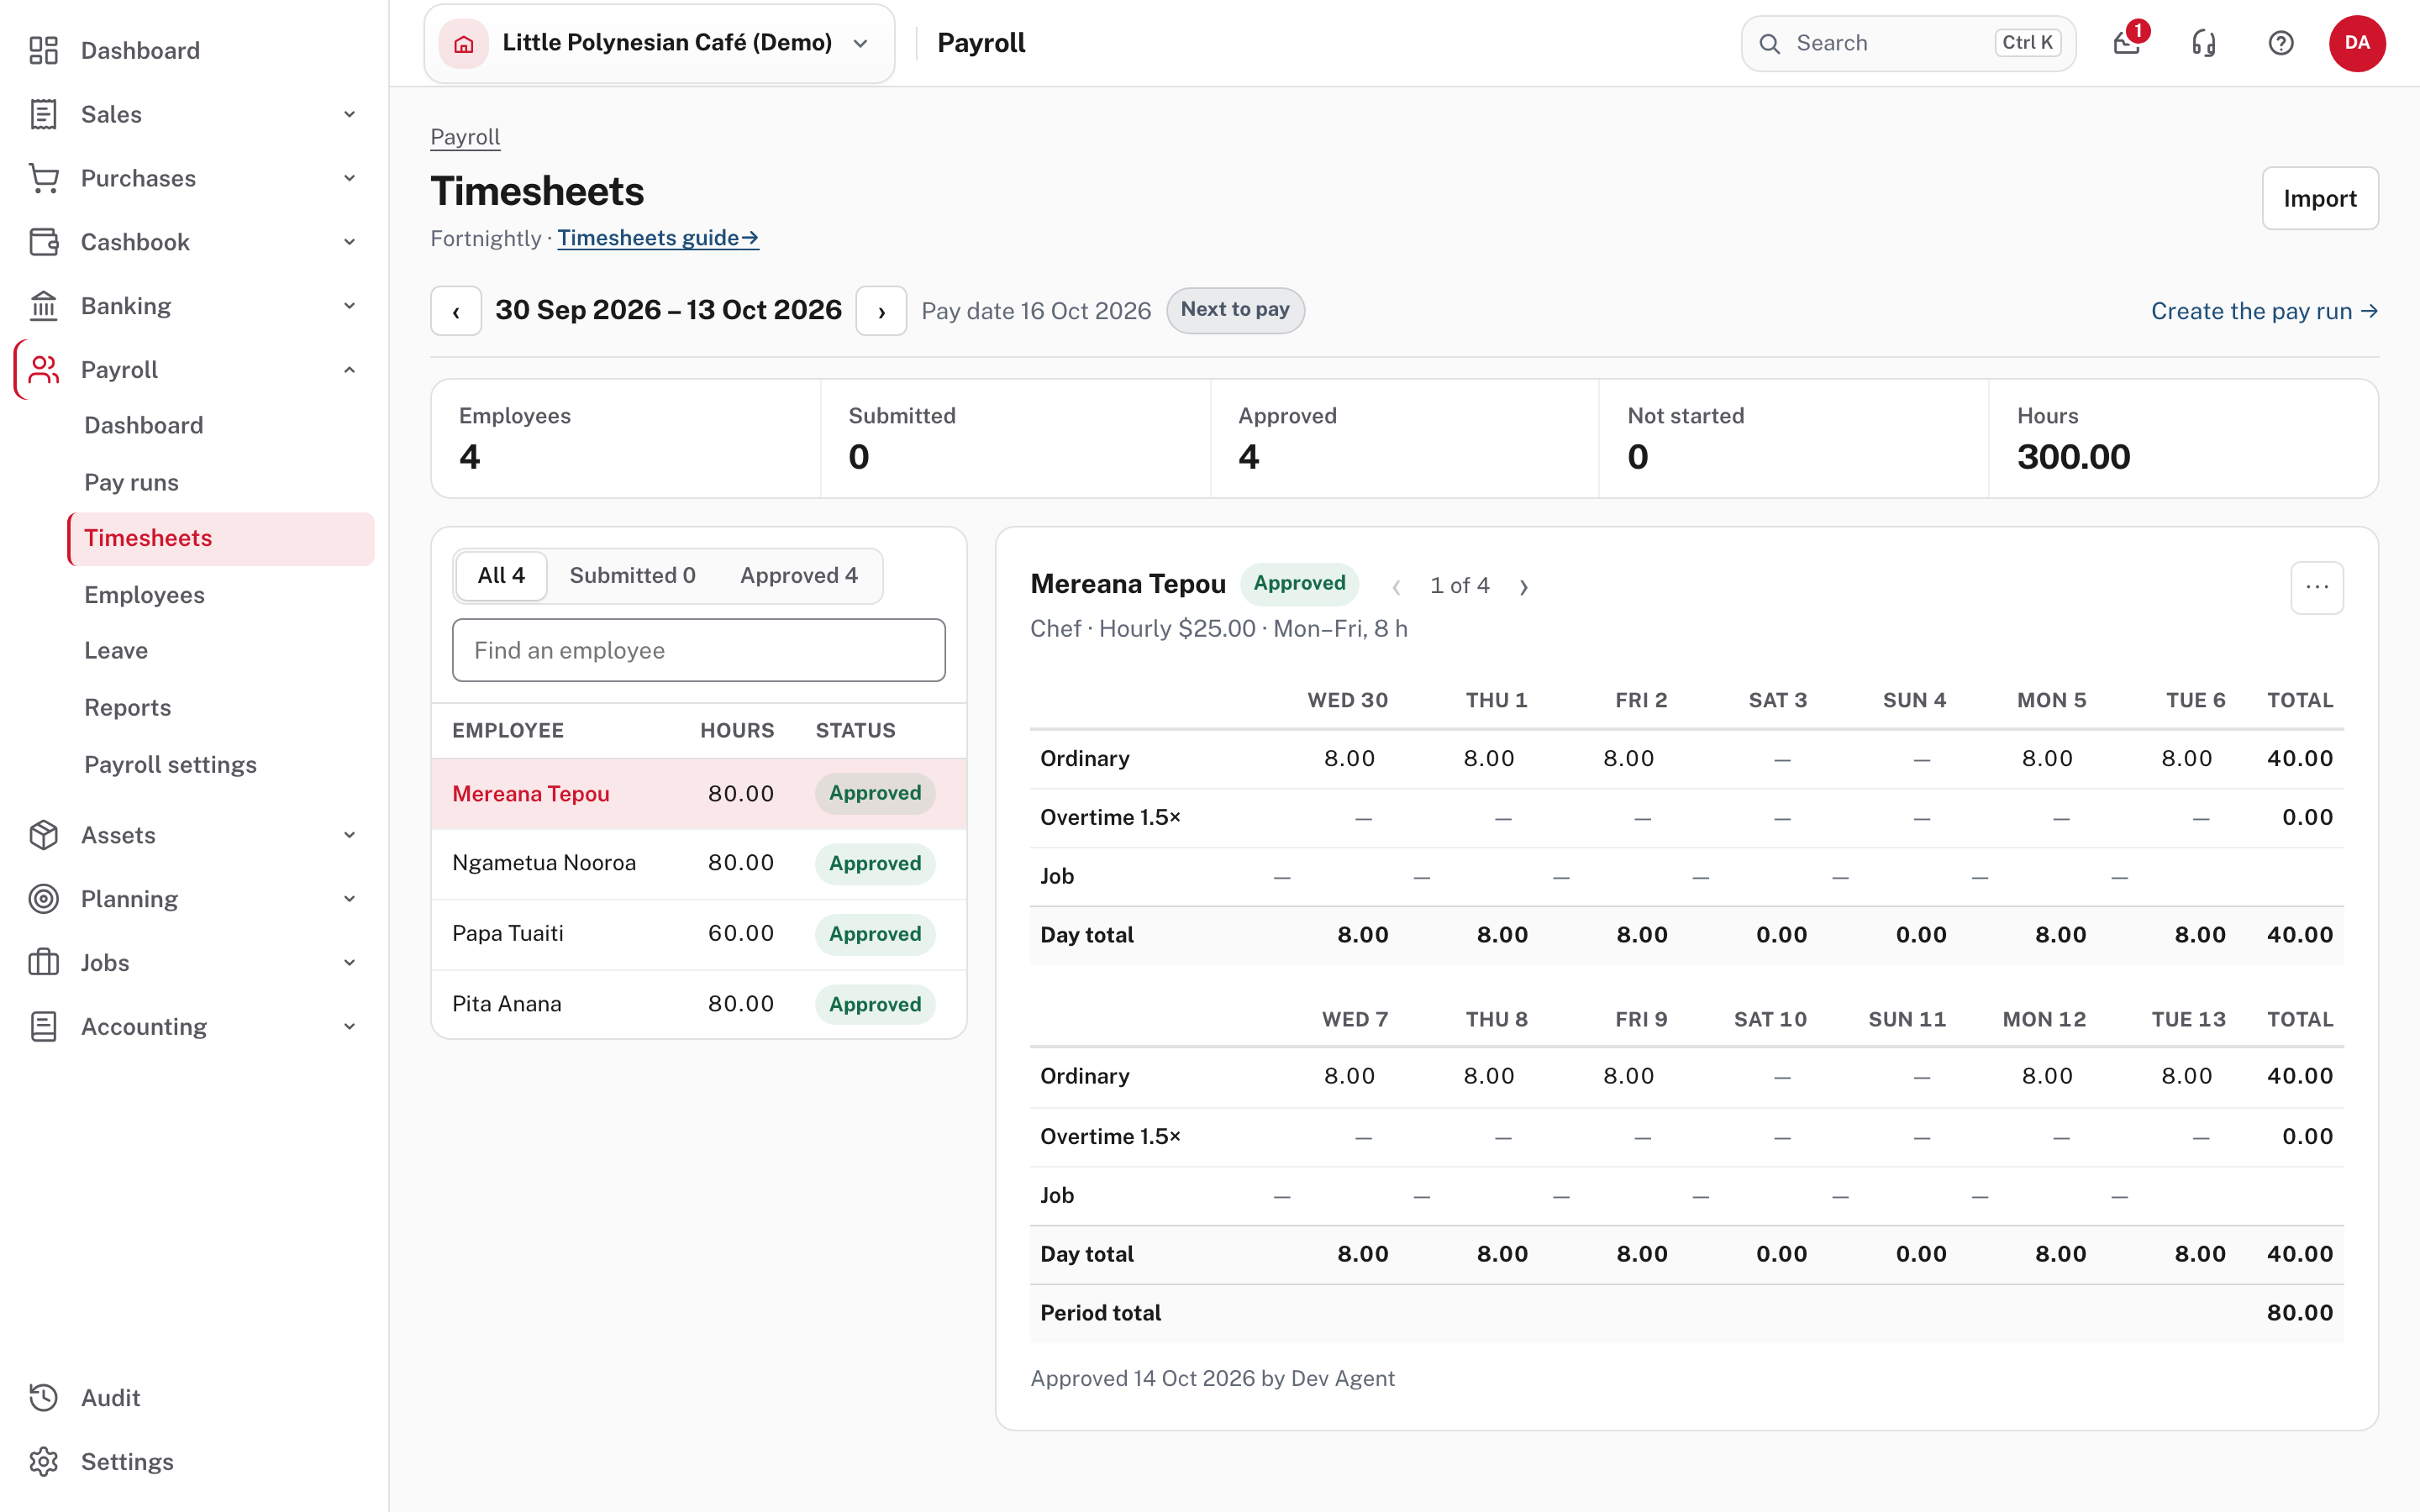
The screen shows one pay period at a time and opens on the one being paid next, marked Next to pay beside the pay date. The arrows beside the dates move to the previous or next period. A row of figures counts the Employees on the period, how many timesheets are Submitted and Approved, how many are Not started, and the Hours entered so far. Submitted and Approved also filter the list.
1. Create the timesheets. On a new period the people show Not started. Choose Create 4 timesheets at the top right: it drafts one for everybody who has none, filled from their usual hours (a new starter from their first day, a leaver to their last) and any leave already approved.
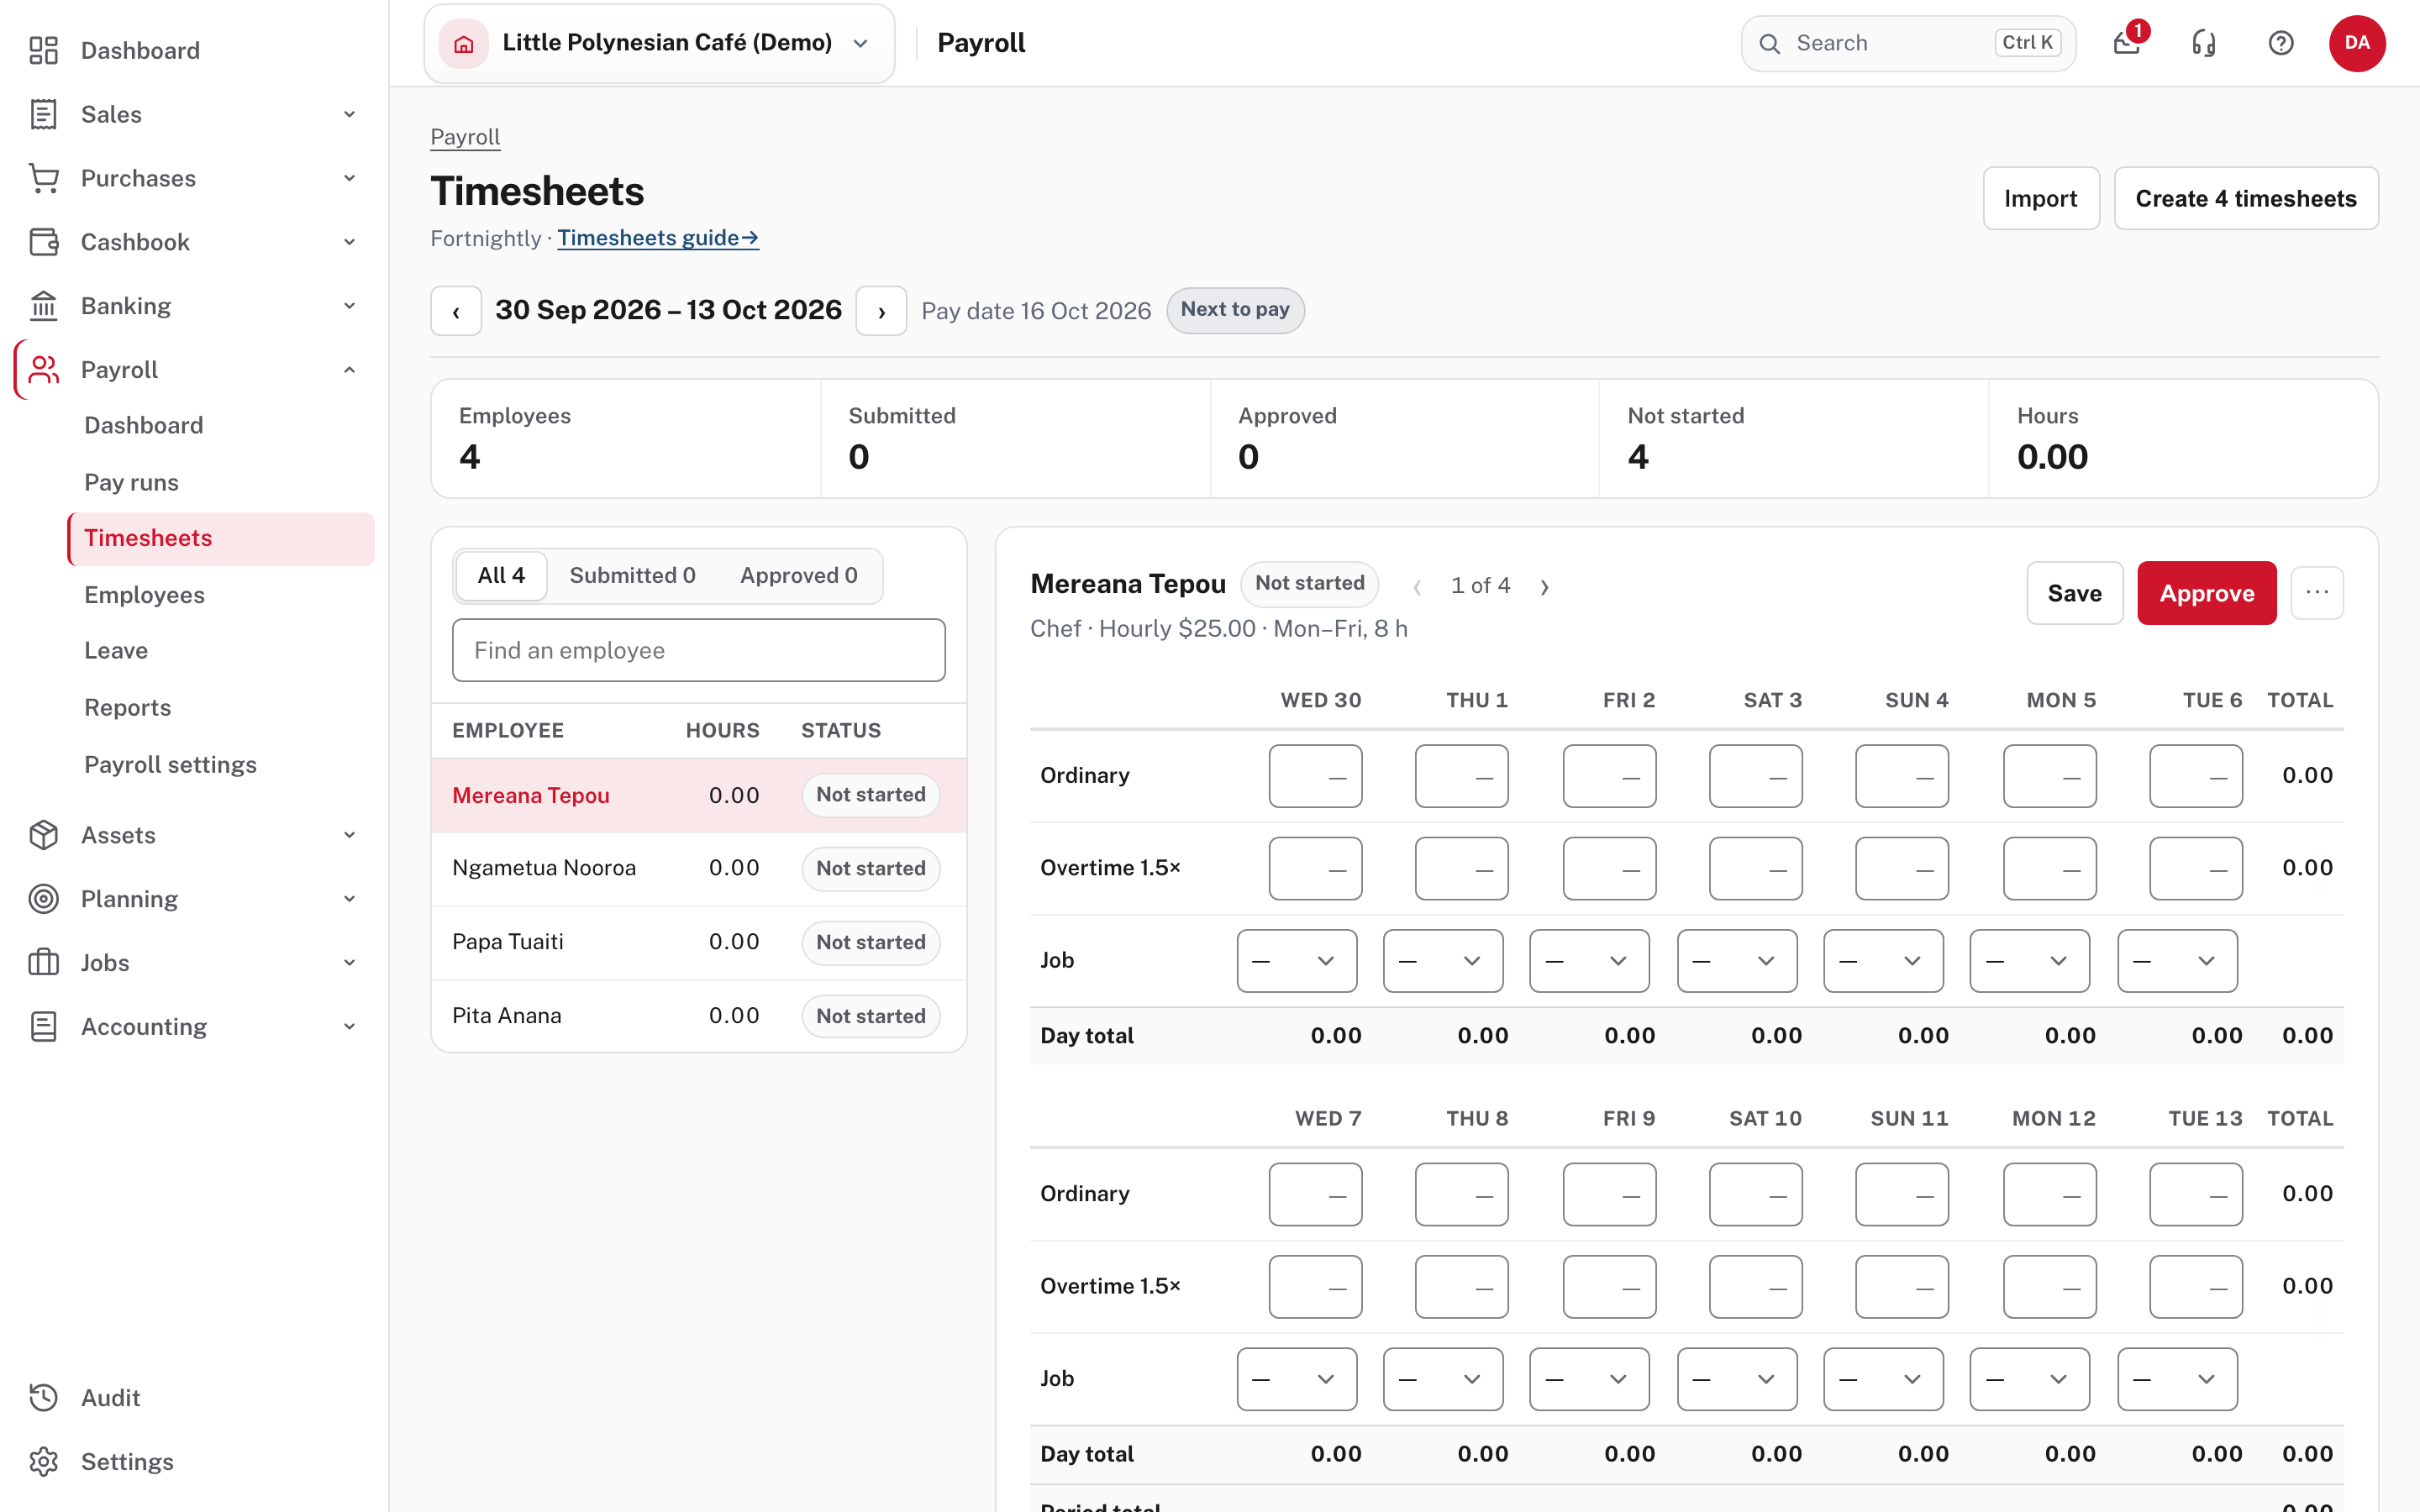
2. Check the first person. The people are on the left with their hours and status (Not started, Draft, Submitted, Approved). The first one is already open on the right: the period's days across (a fortnight is two weeks, one under the other) and one row for each kind of time, Ordinary, Overtime 1.5×, and a row for each kind of leave. If a Job row is there, it names the job the day's hours were worked on.
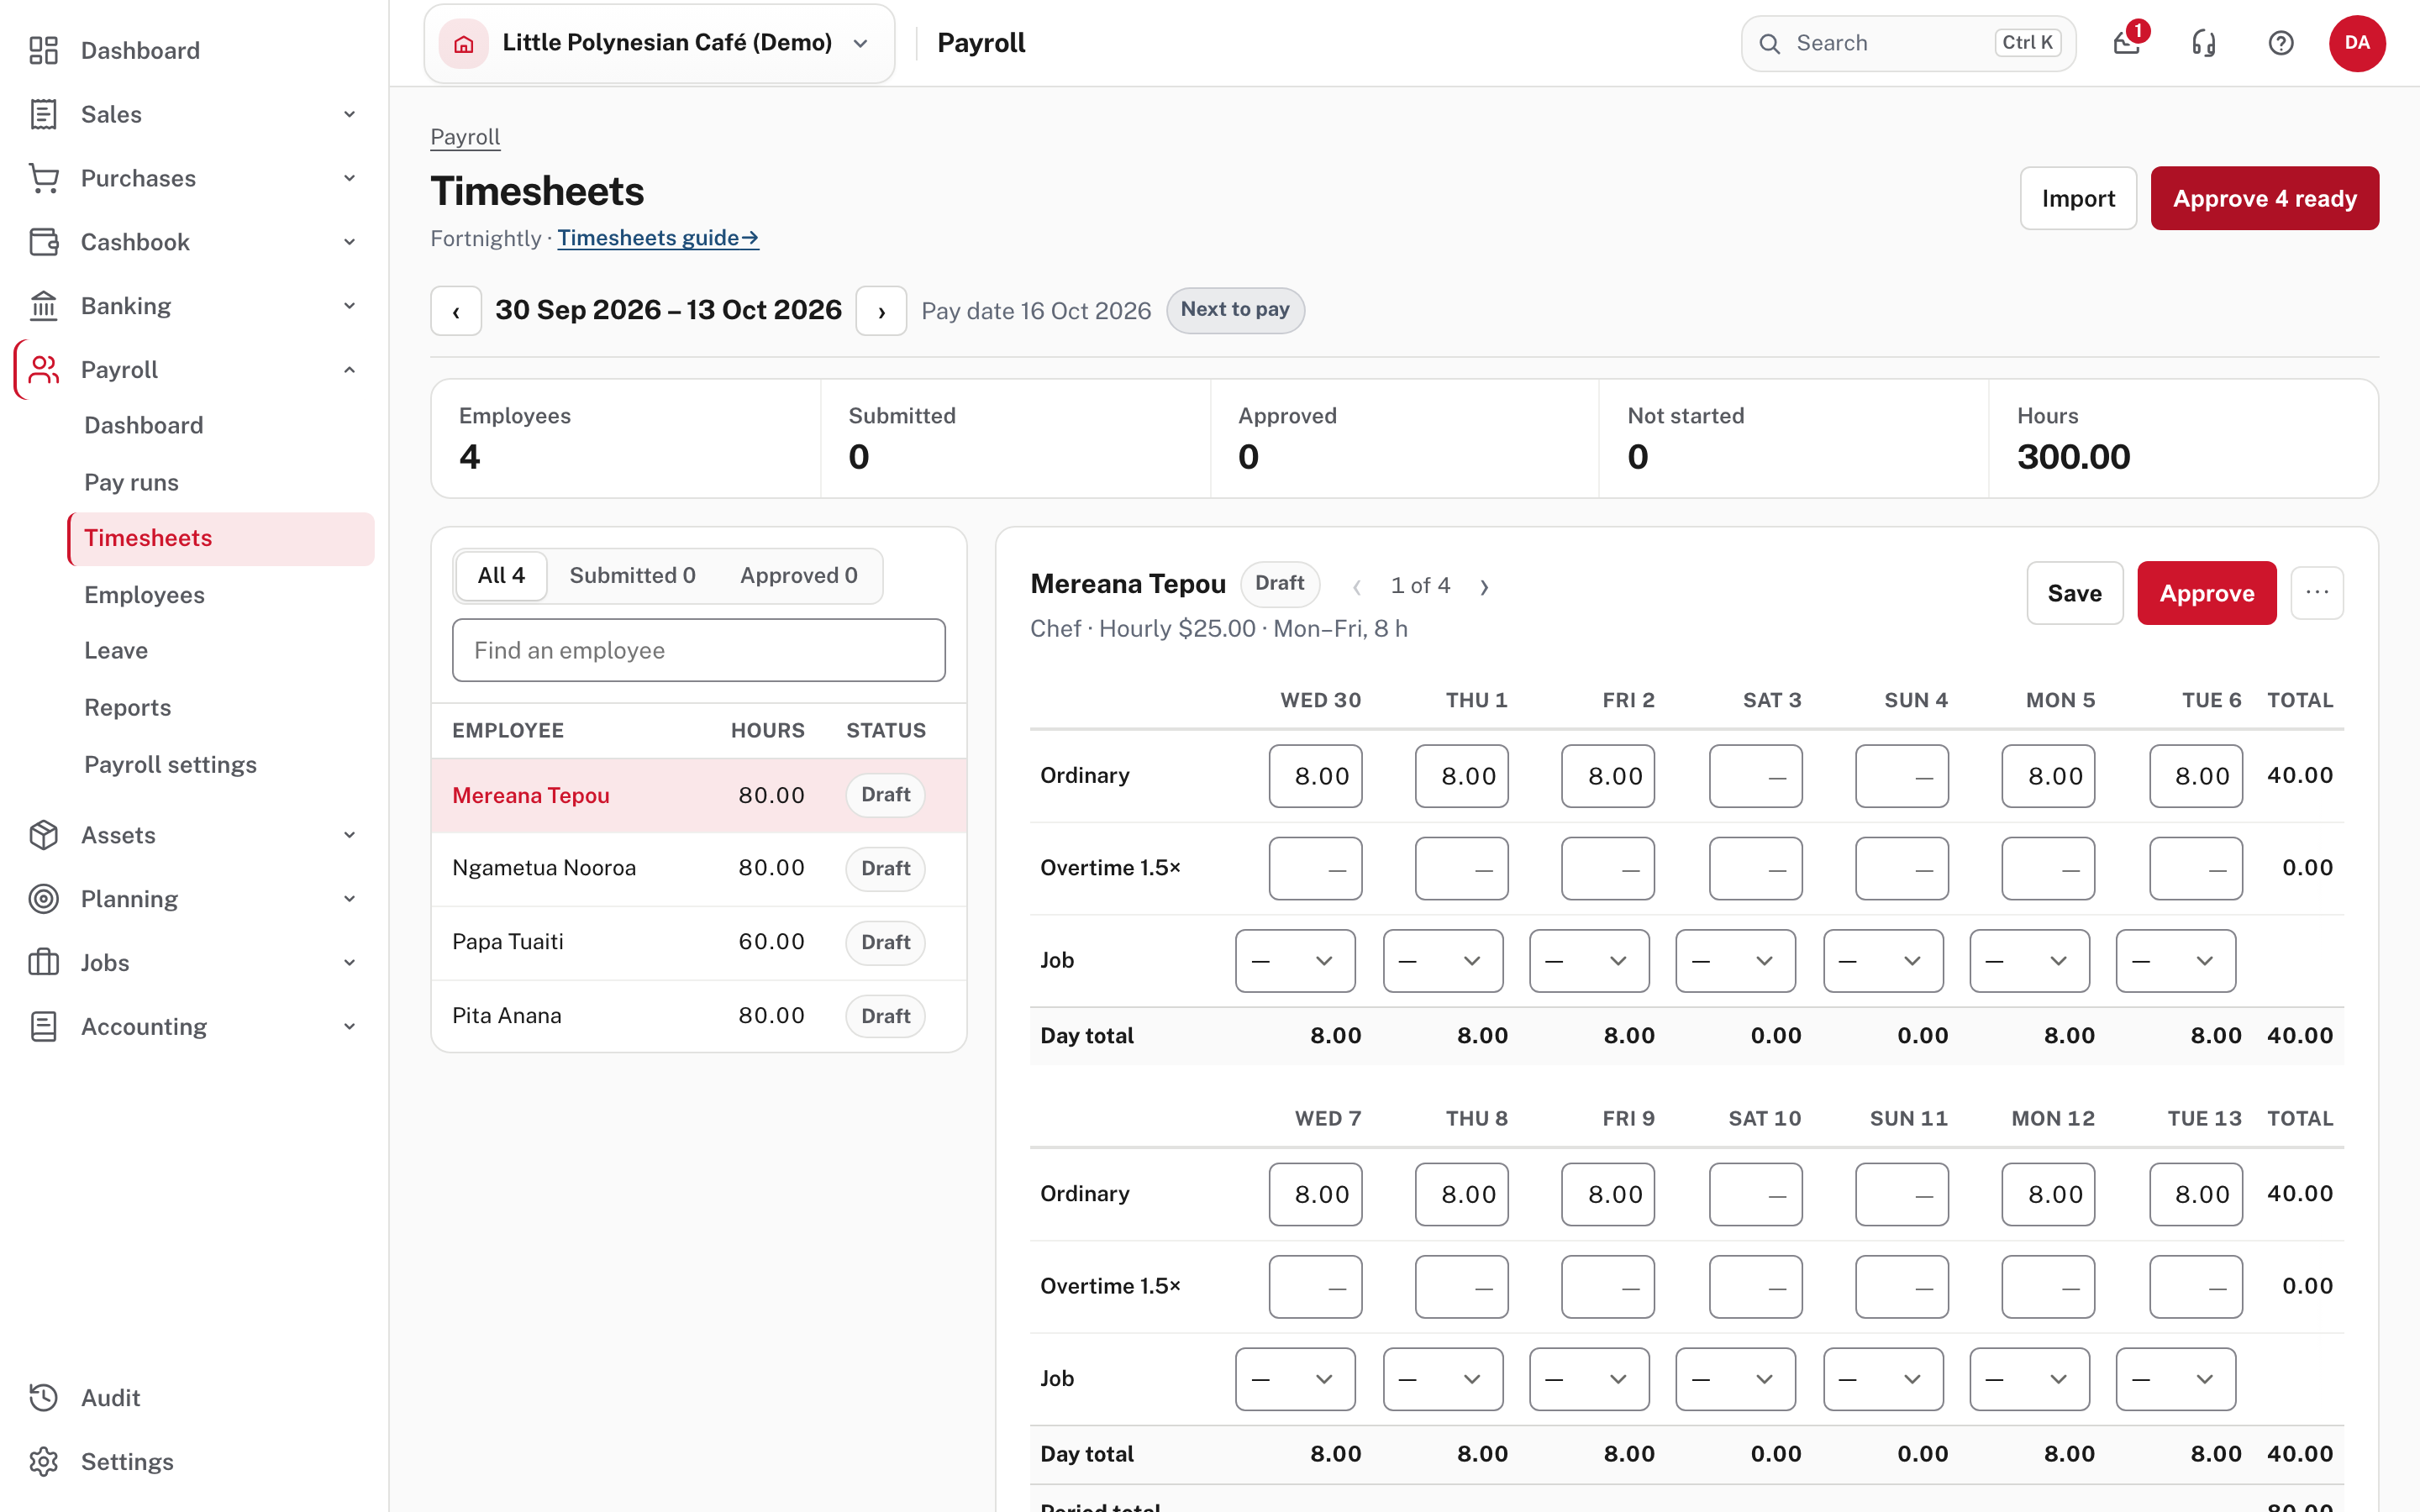
- Change the hours. Type into the boxes, then Save. The arrow keys and Enter move to the same day on the row above or below, and Tab moves along the days. Fill from work pattern fills the empty working days with their usual hours.
- Enter leave. Choose + Add leave under the grid, pick the kind of leave, then type the hours on the days taken (chapter 4 shows it). Leave from an approved request is already on the grid, as figures.
- Import (top right) brings in a clock or time-sheet file instead of keying the hours.
3. Approve, and Easy moves to the next person. What the button says depends on who is allowed to decide these hours. When the company's rules let you decide hours you keyed (for example, you are the only person who can approve), it says Approve, and one click approves. Easy then says the person's hours are approved and opens the next person who still needs a decision. Check them, change anything that is wrong, Approve, and carry on down the list.
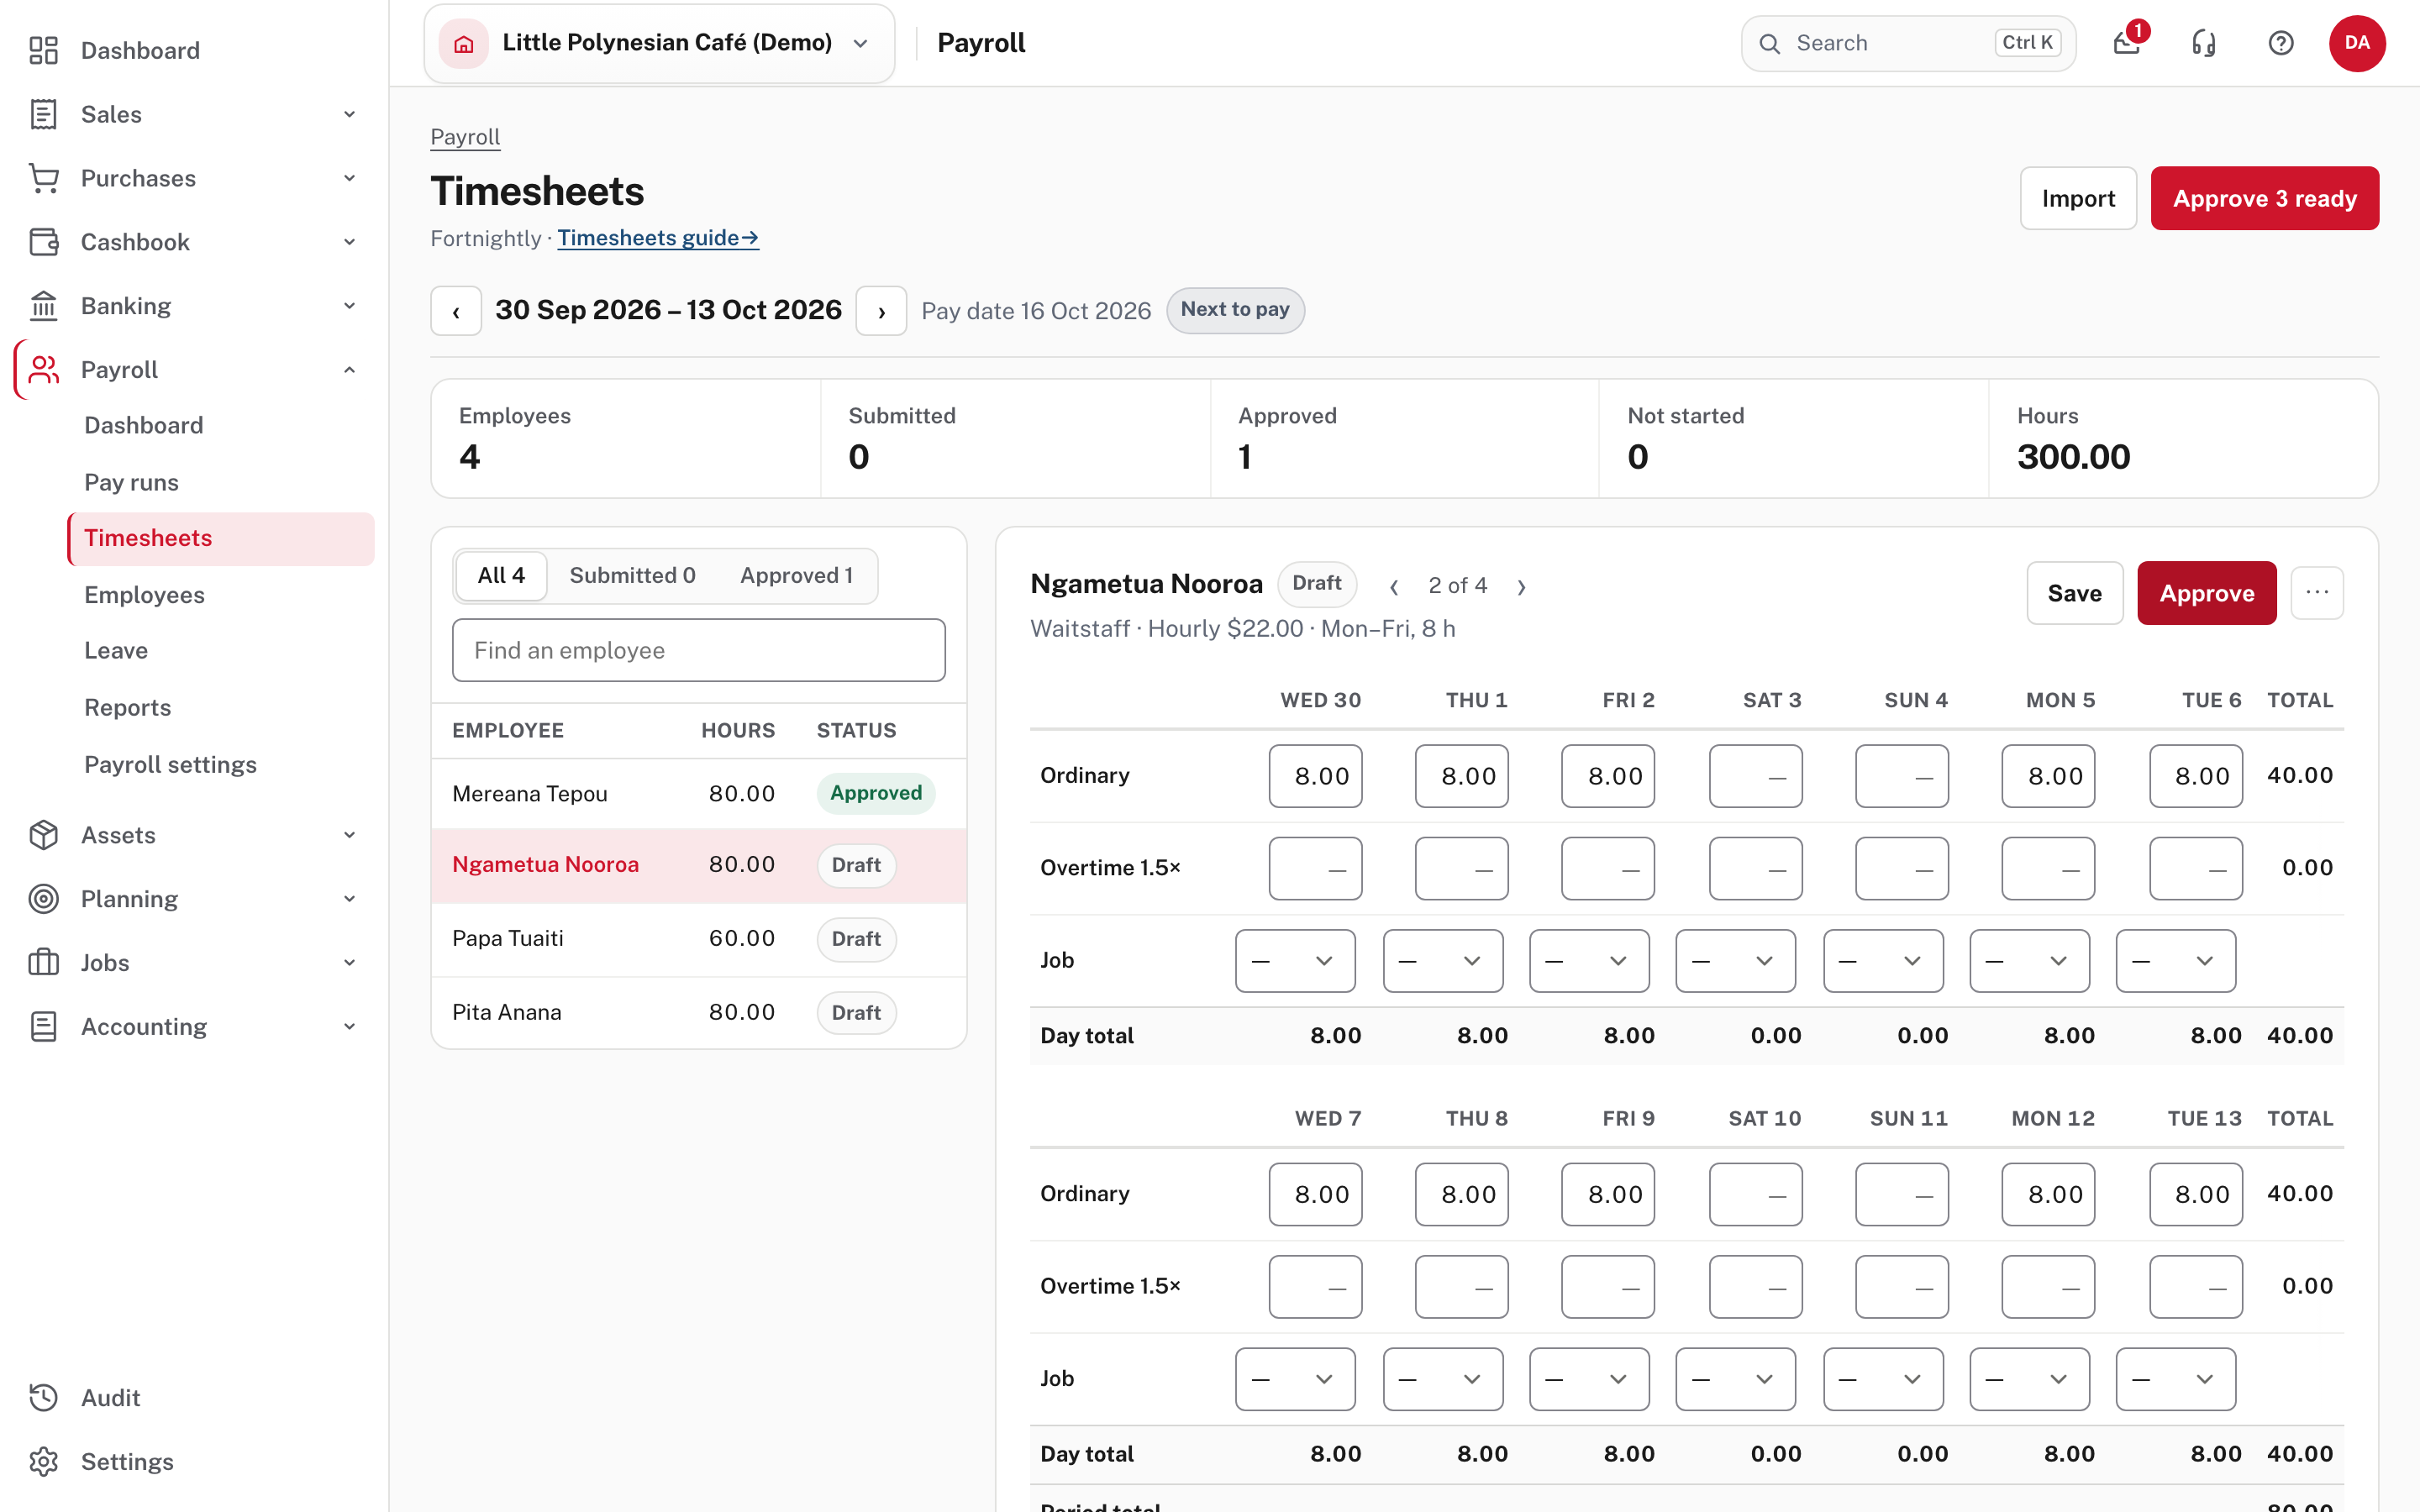
Approve 3 ready at the top approves everyone left in one go, once you are happy with them all. The arrows beside a person's name (‹ ›) move through the list without deciding anything.
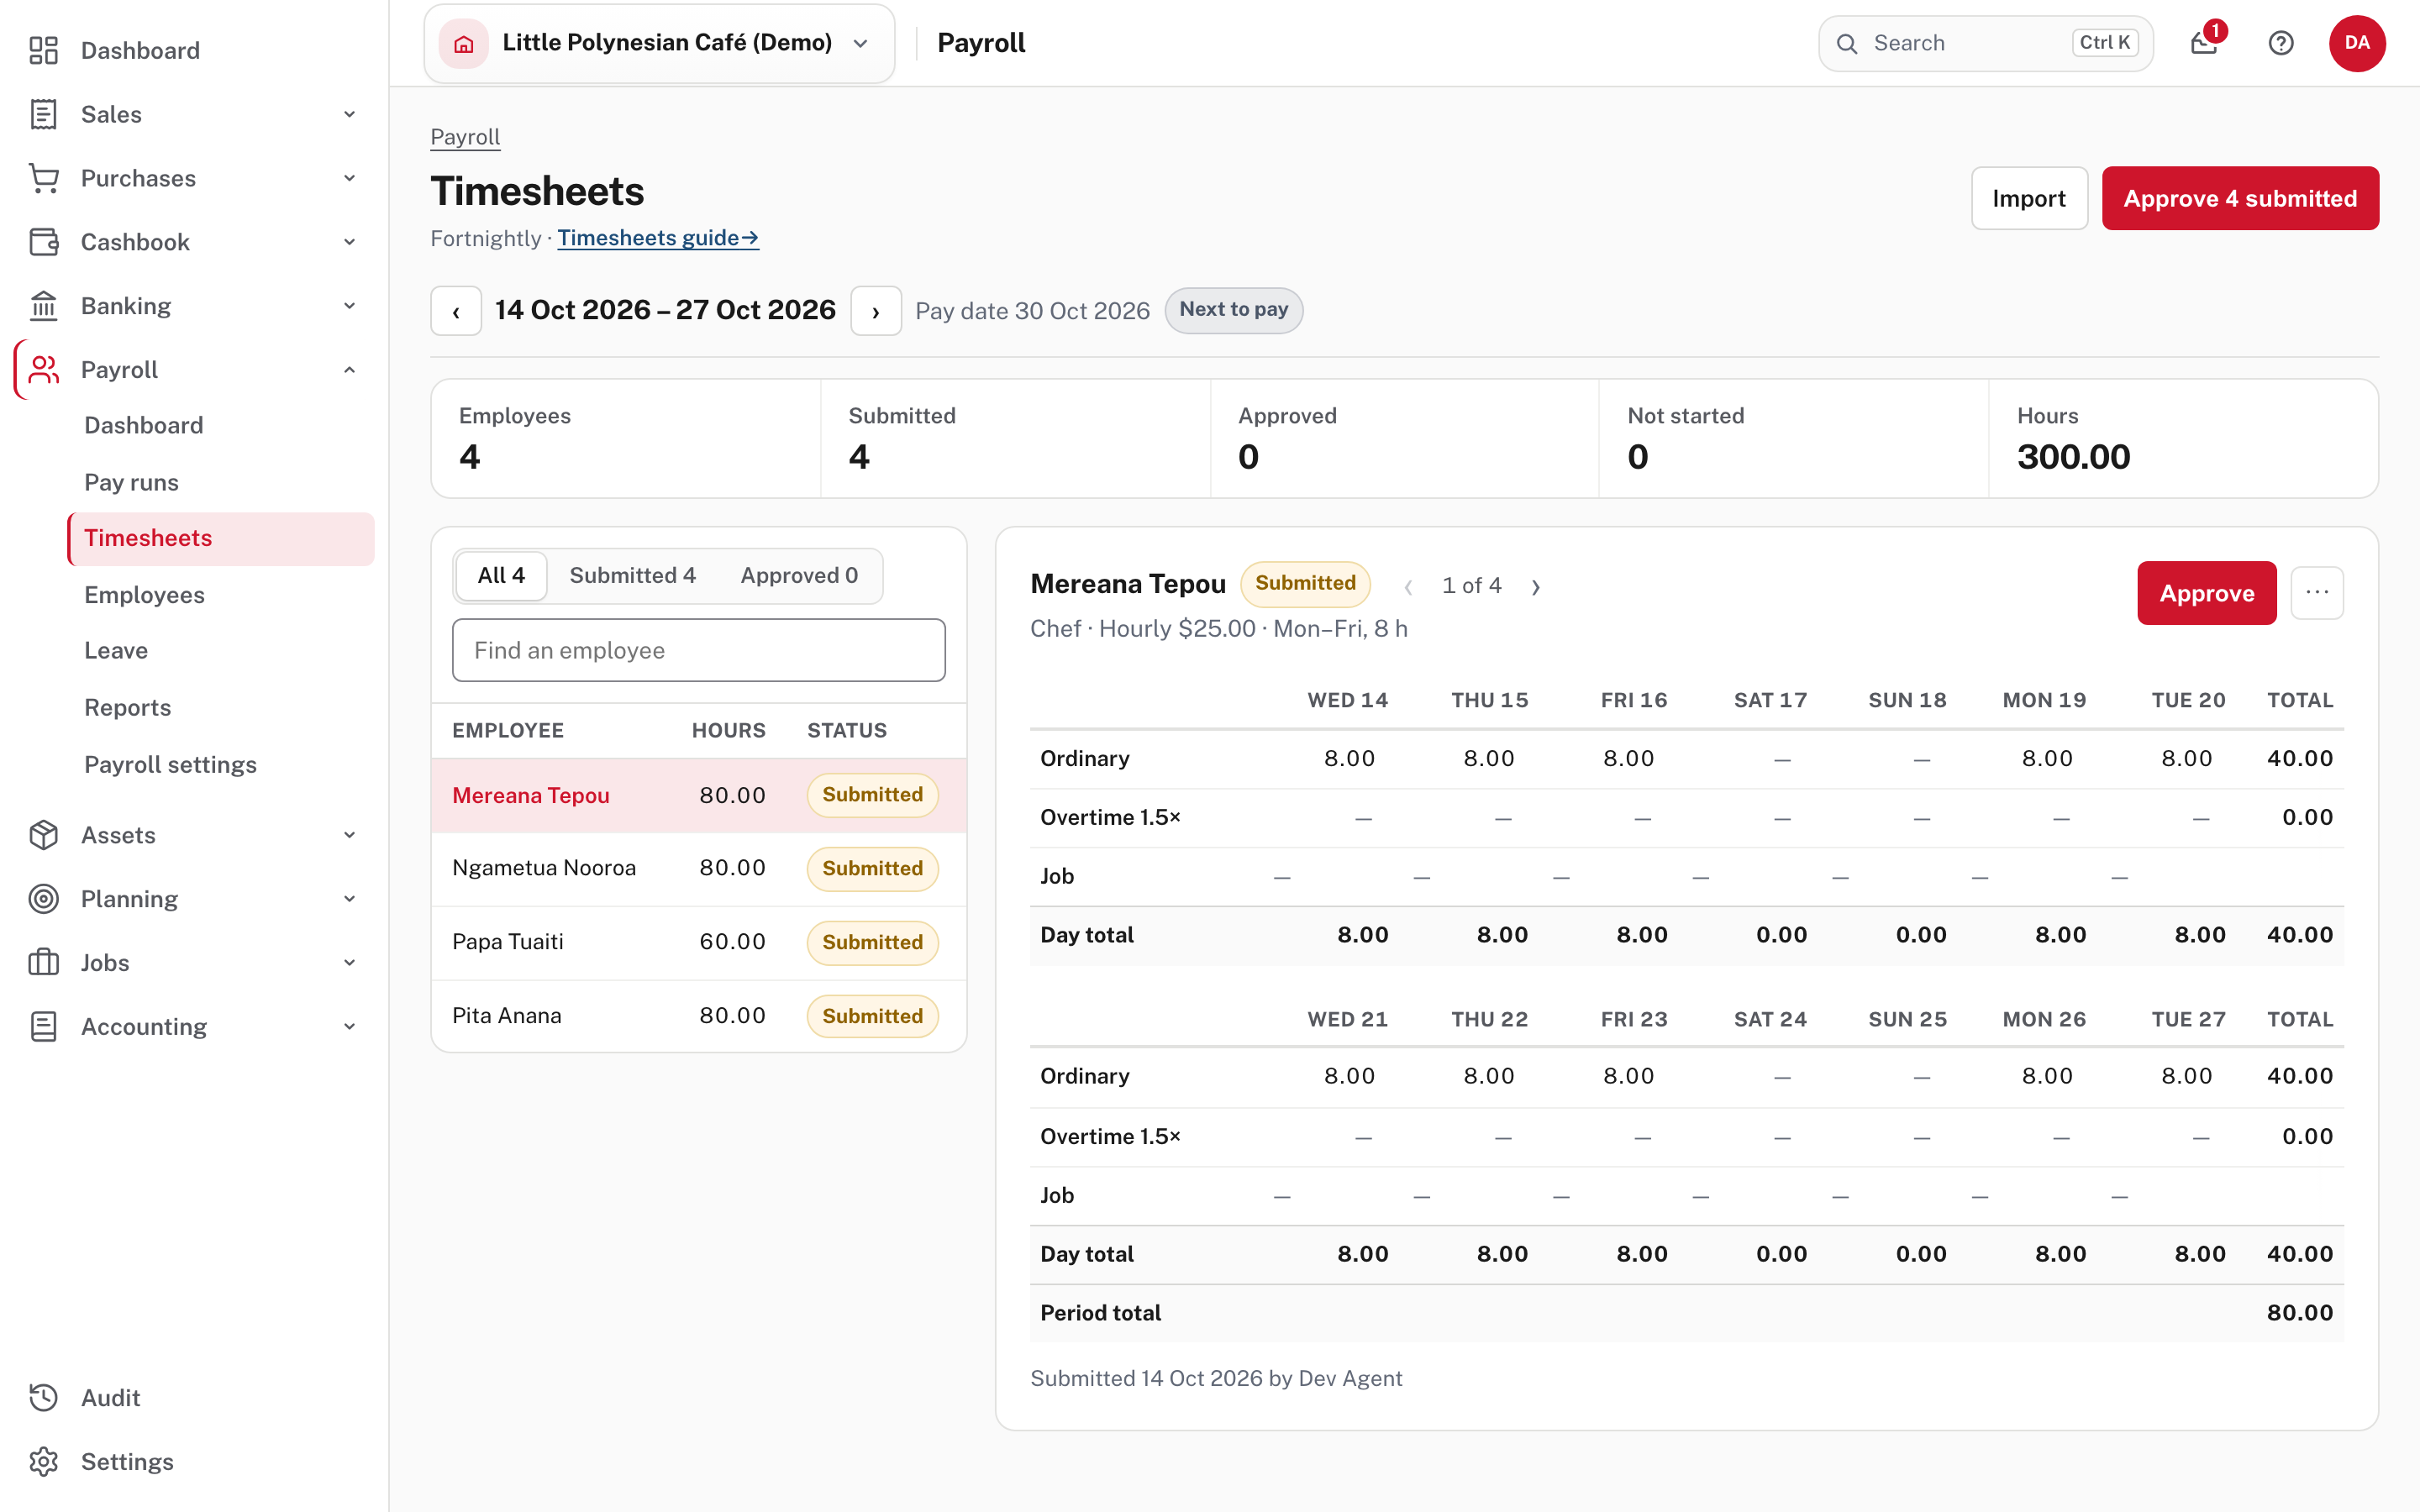
When someone else must decide, the buttons say Send for approval and Send 4 for approval. The people show Submitted, and the line under the name says A different person must decide this request. The second person opens the same screen and chooses Approve for one person, or Approve 4 submitted for all of them. The picture shows the next period, where the Owner is no longer the only approver.
Not shown in the demo, from Easy's Help: Send back… is in the ⋯ menu beside Approve, and a draft or sent-back timesheet that is not needed can be removed with Delete draft in the same menu.
Only approved timesheets are paid. Someone who is paid from a timesheet and has no approved one is left off the run, and the run names them. Once a timesheet is submitted or approved its hours show as figures, not boxes. To correct hours after approval, change them on the person's payslip in the pay run (step 3).
More detail: Timesheets in payroll.
Check before you continue
- Every person who should be paid shows Approved.
- Hours look right for the period, including overtime and any leave.
- The figures say Approved 4 and Not started 0.
Step 2. Start the pay run
When everyone is approved, the period shows Create the pay run → on the right.
If leave requests for the period are still waiting, that link reads Review N leave requests → instead, so decide them first. (Not shown in the demo: taken from Easy's Help.) You can also start from Payroll → Pay runs → Run payroll or the Run payroll button on the Payroll dashboard's Next pay run card.
The New pay run screen is the one front door for every kind of run. The switch at the top chooses Regular pay, One-off payment, Back pay or Final pay. This chapter is Regular pay: approved timesheets, plus regular pay for the people who have no timesheet.
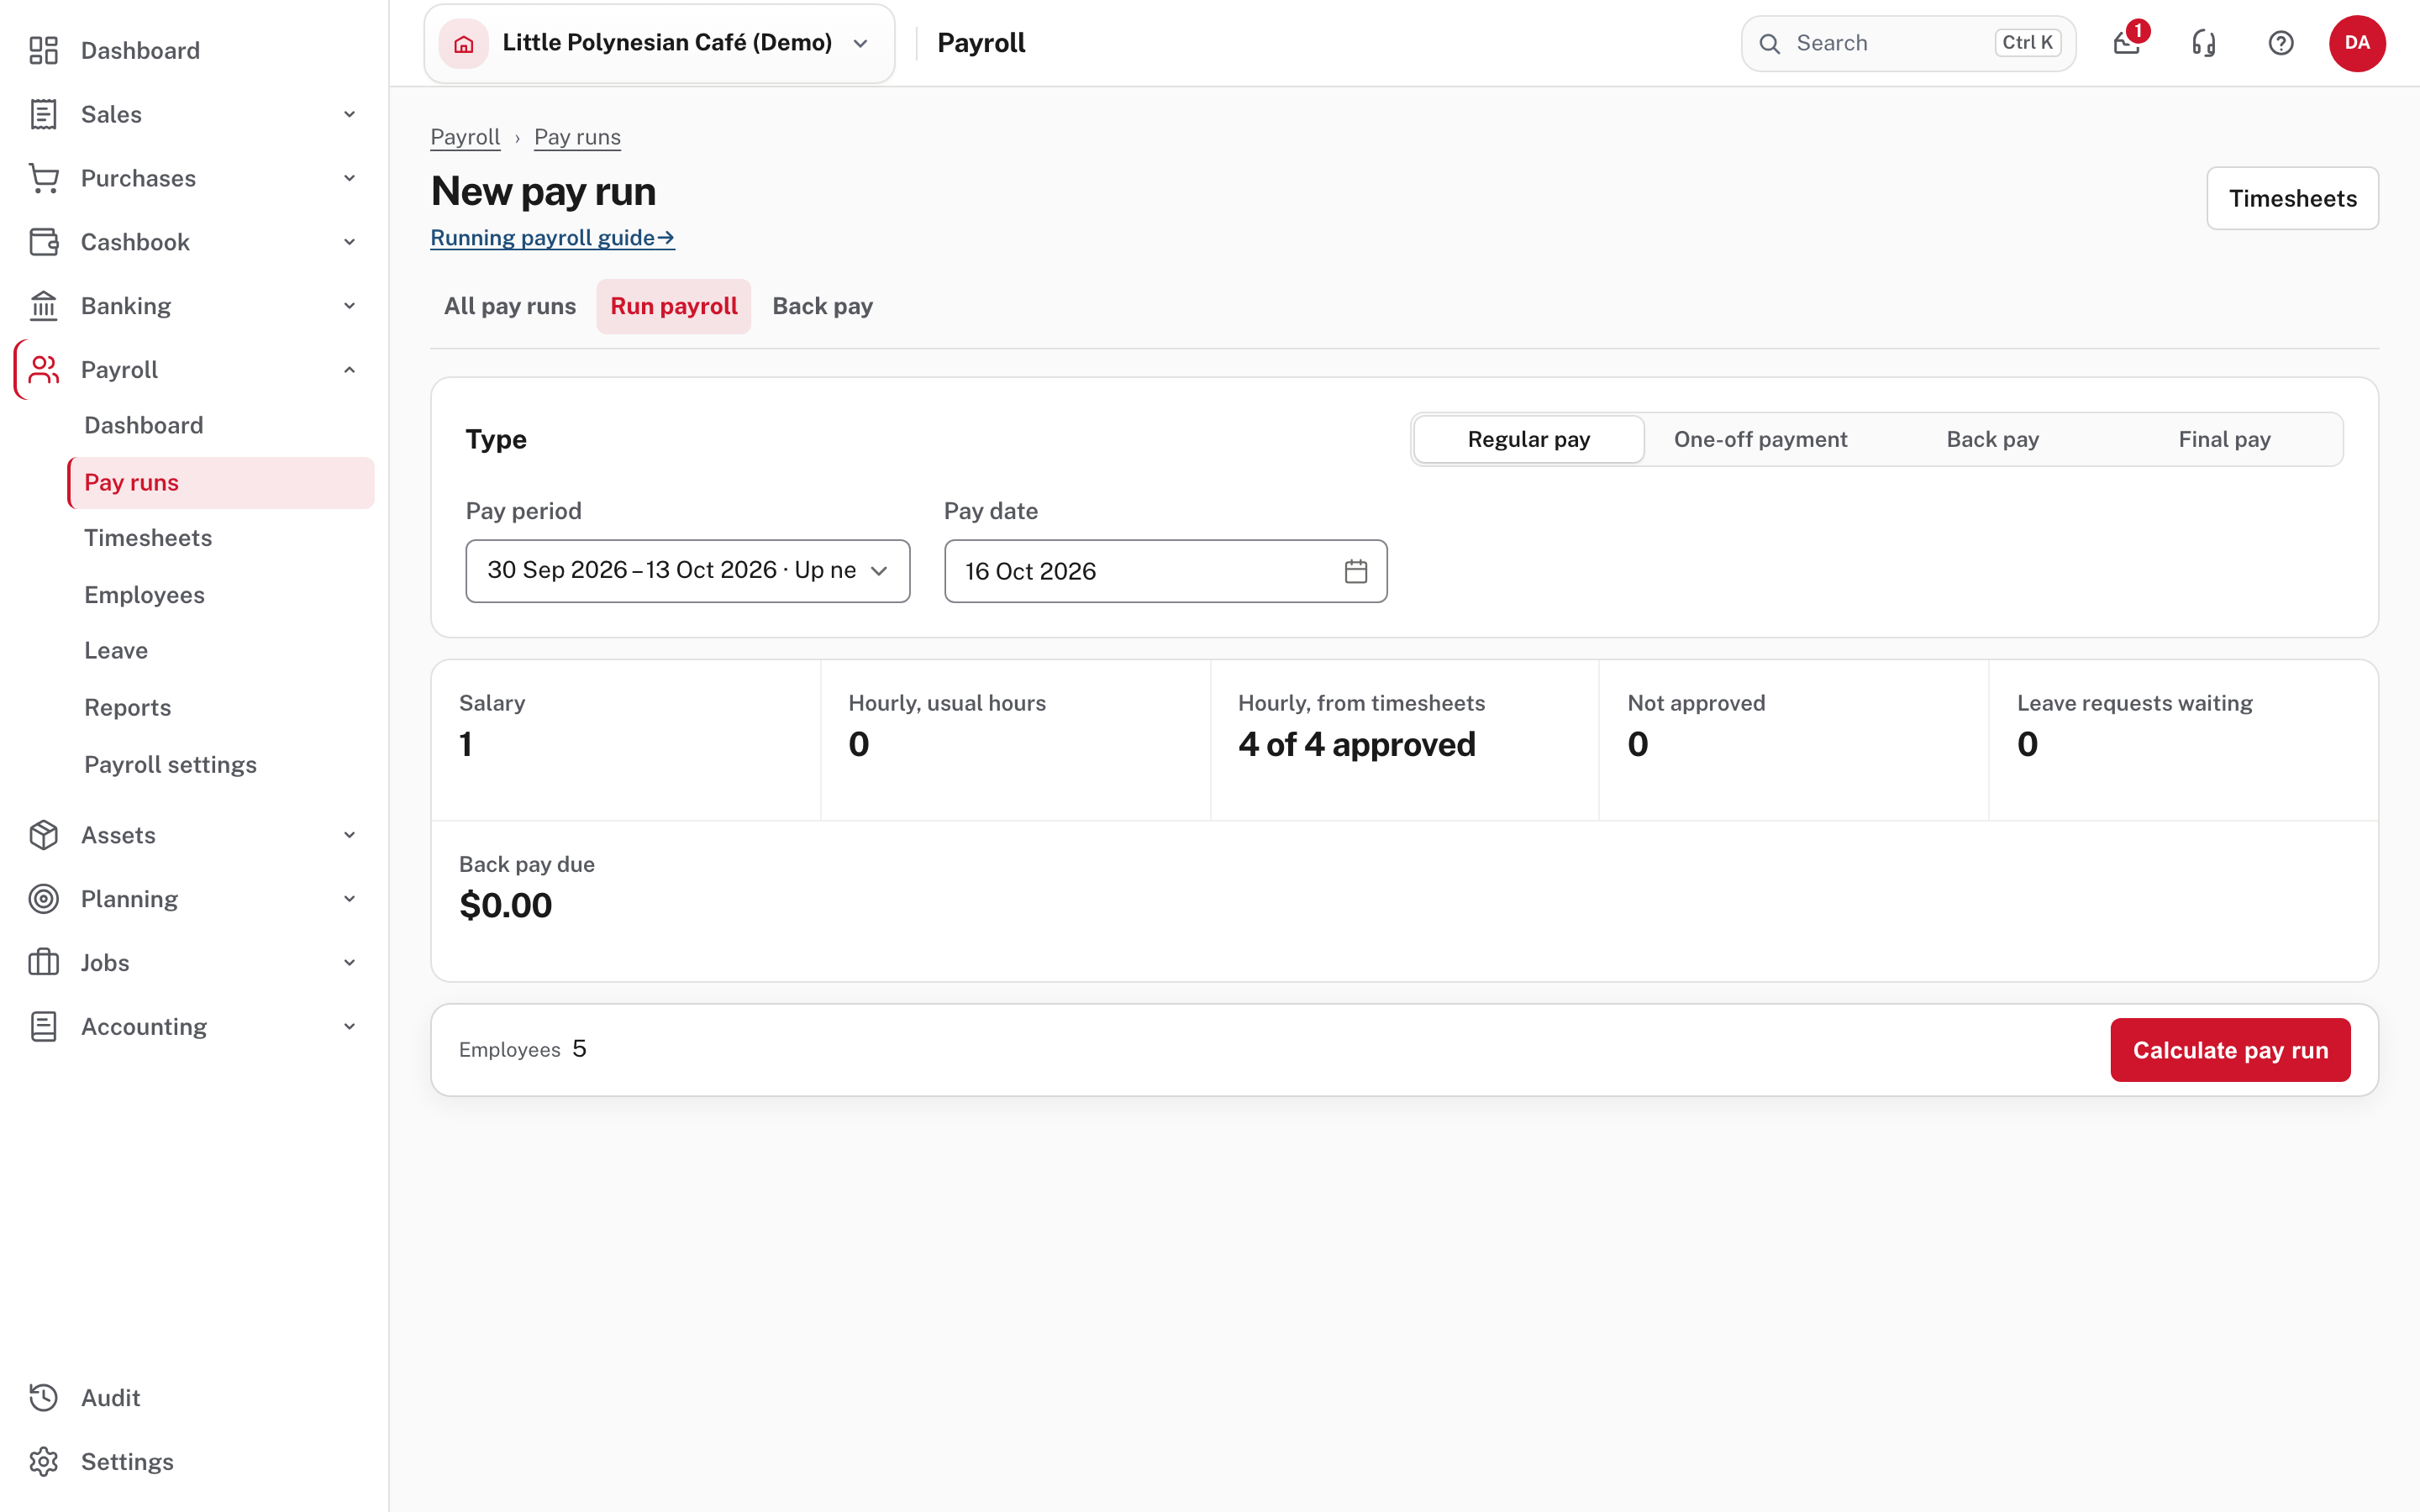
| Field | What it is |
|---|---|
| Pay period | The period being paid. Each period in the list says where it stands. |
| Pay date | When the pay is dated. It is filled from the pay calendar. Calculate pay run stays off while it is before the period's last day (from the screen's source). |
Check the figures before you press Calculate pay run:
- Salary: the people paid their salary with no timesheet.
- Hourly, usual hours: hourly people paid their usual hours with no timesheet.
- Hourly, from timesheets: the people paid from their hours, here 4 of 4 approved.
- Not approved: should be 0. If it isn't, go back to step 1.
- Leave requests waiting: should be 0.
- Back pay due: back pay owed from a rate change (chapter 5).
If anyone is left out, a Not included table names each person and the reason, for example No approved timesheet, with a link to the timesheets. The Employees count at the bottom is who will be on the run. The account the net pay leaves is chosen later, on the Finish step.
One regular period at a time
If an earlier regular period is still open, finish it before starting the next one. A one-off, back pay or final pay run is not part of the schedule, so an open regular period does not block it.
Step 3. Review the run
Calculate pay run builds the run and opens it. Nothing is paid or recorded yet; this is your chance to look.
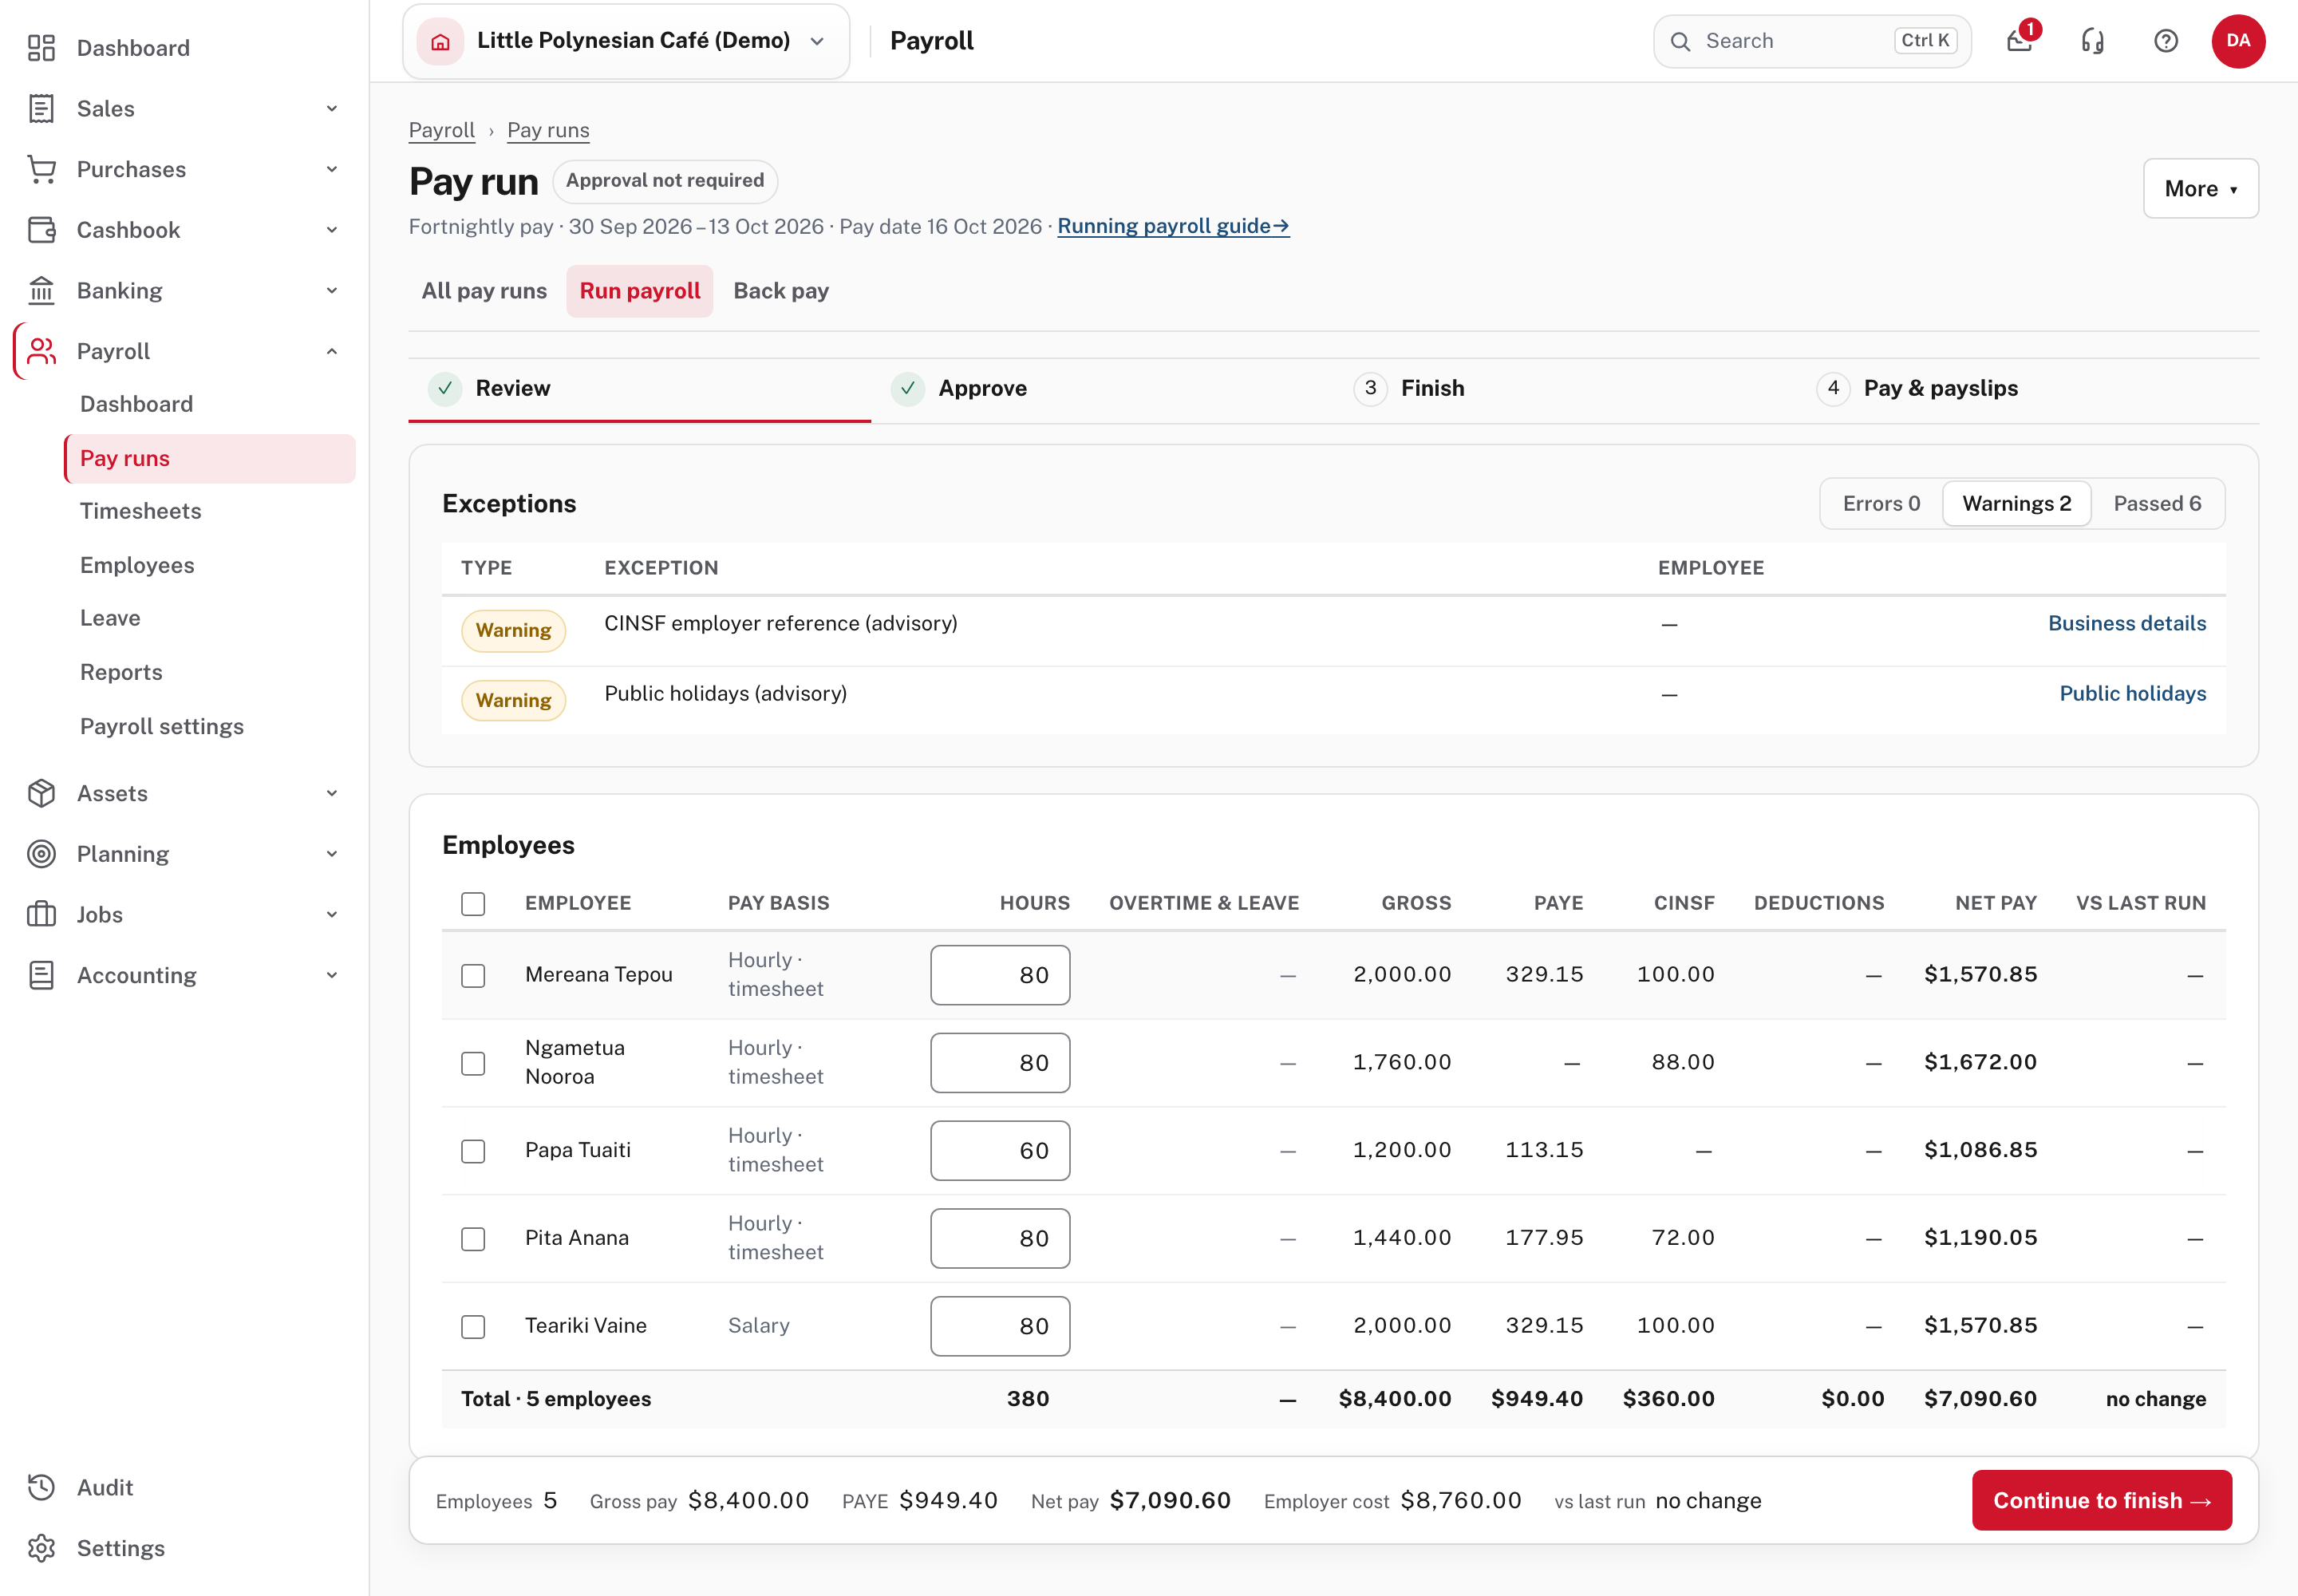
The title is Pay run, with a status beside it (Approval not required in the demo); the run gets its number when it is finished. The four steps run across the top: a tick means a step is done, and ! means it is blocked. The bar at the bottom always shows the totals and the button for the next step.
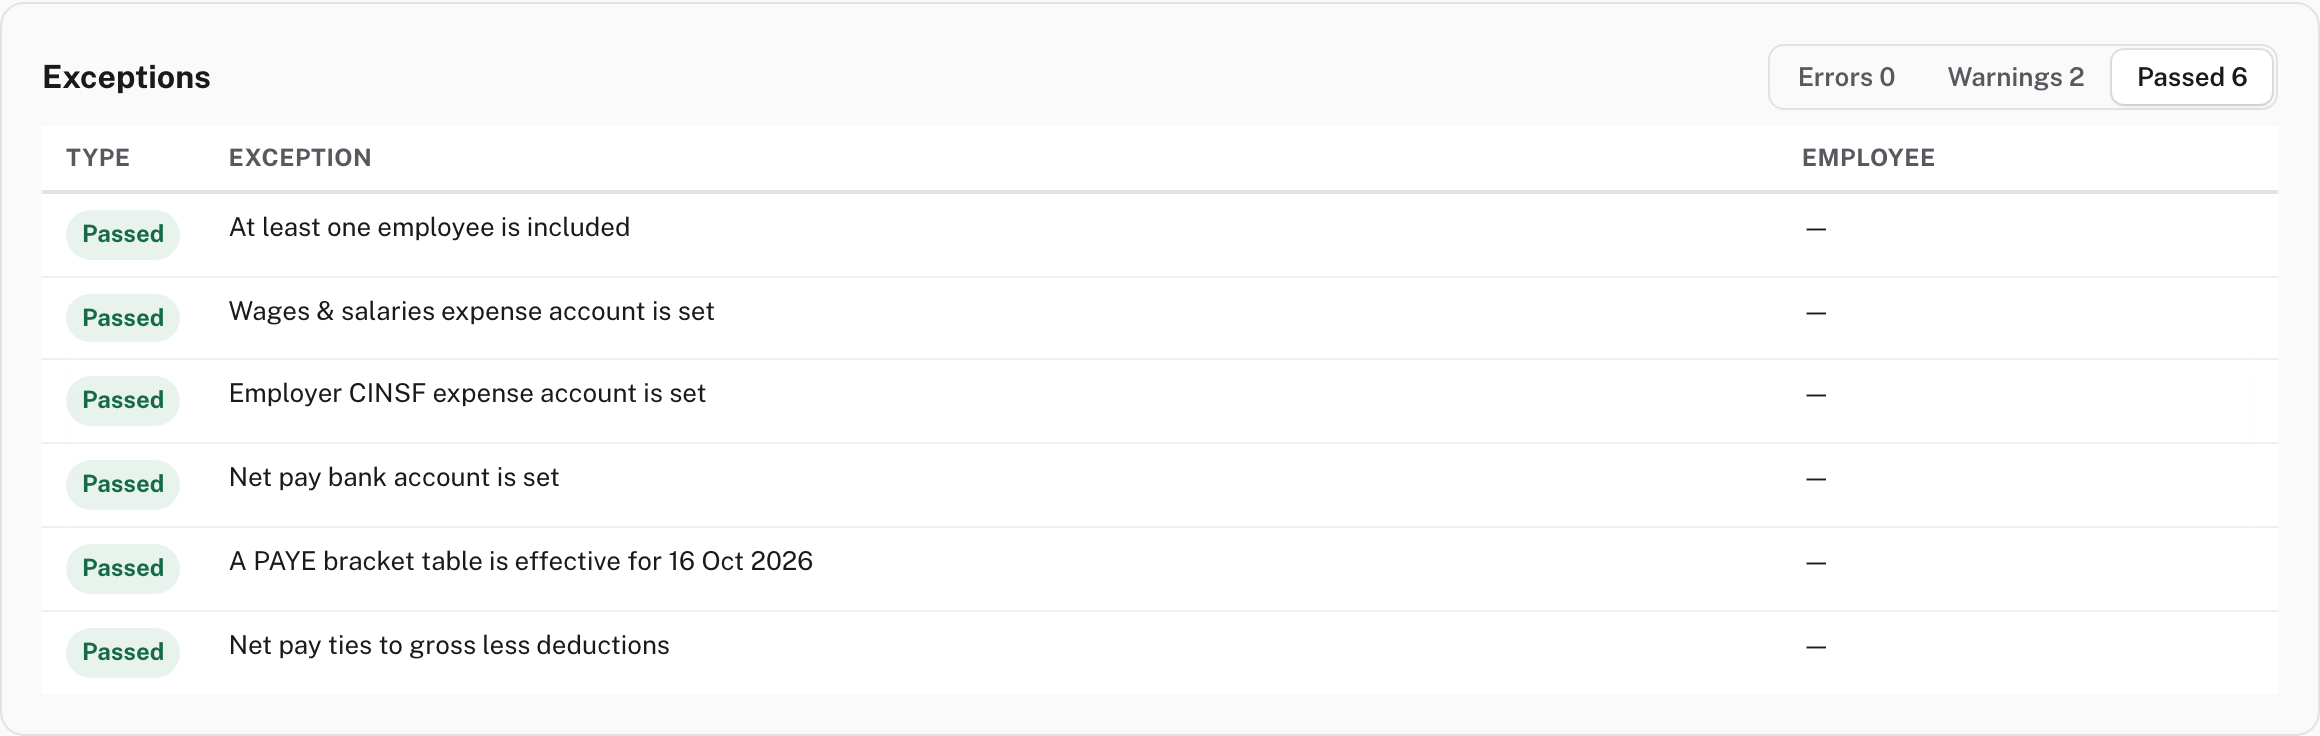
Exceptions. Choose Errors, Warnings or Passed to see each group with its count. Each row names the exception, the person it is about, and the link that clears it; hover a row for the full sentence. An error stops the run until it is cleared (the bar then reads Resolve N checks →; not shown in the demo, which has no errors). A warning does not. The demo has two: CINSF employer reference (advisory), because no reference is entered on Business details, and Public holidays (advisory), because no public holidays are entered for 2026.
Employees. Everyone on the run, with their Pay basis, Hours, Overtime & leave, Gross, PAYE, CINSF, Deductions, Net pay and vs last run. A dash in the last column is the quiet result you want in a settled month; a person who changed shows by how much, so you can see why. A dot beside a name marks someone with an exception. (Not shown in the demo: nobody had one.) An hourly person's ordinary hours can be typed straight into their row; the payslip is worked out again when you leave the box.
Review each payslip
Choose a name in the table to open that person's payslip.
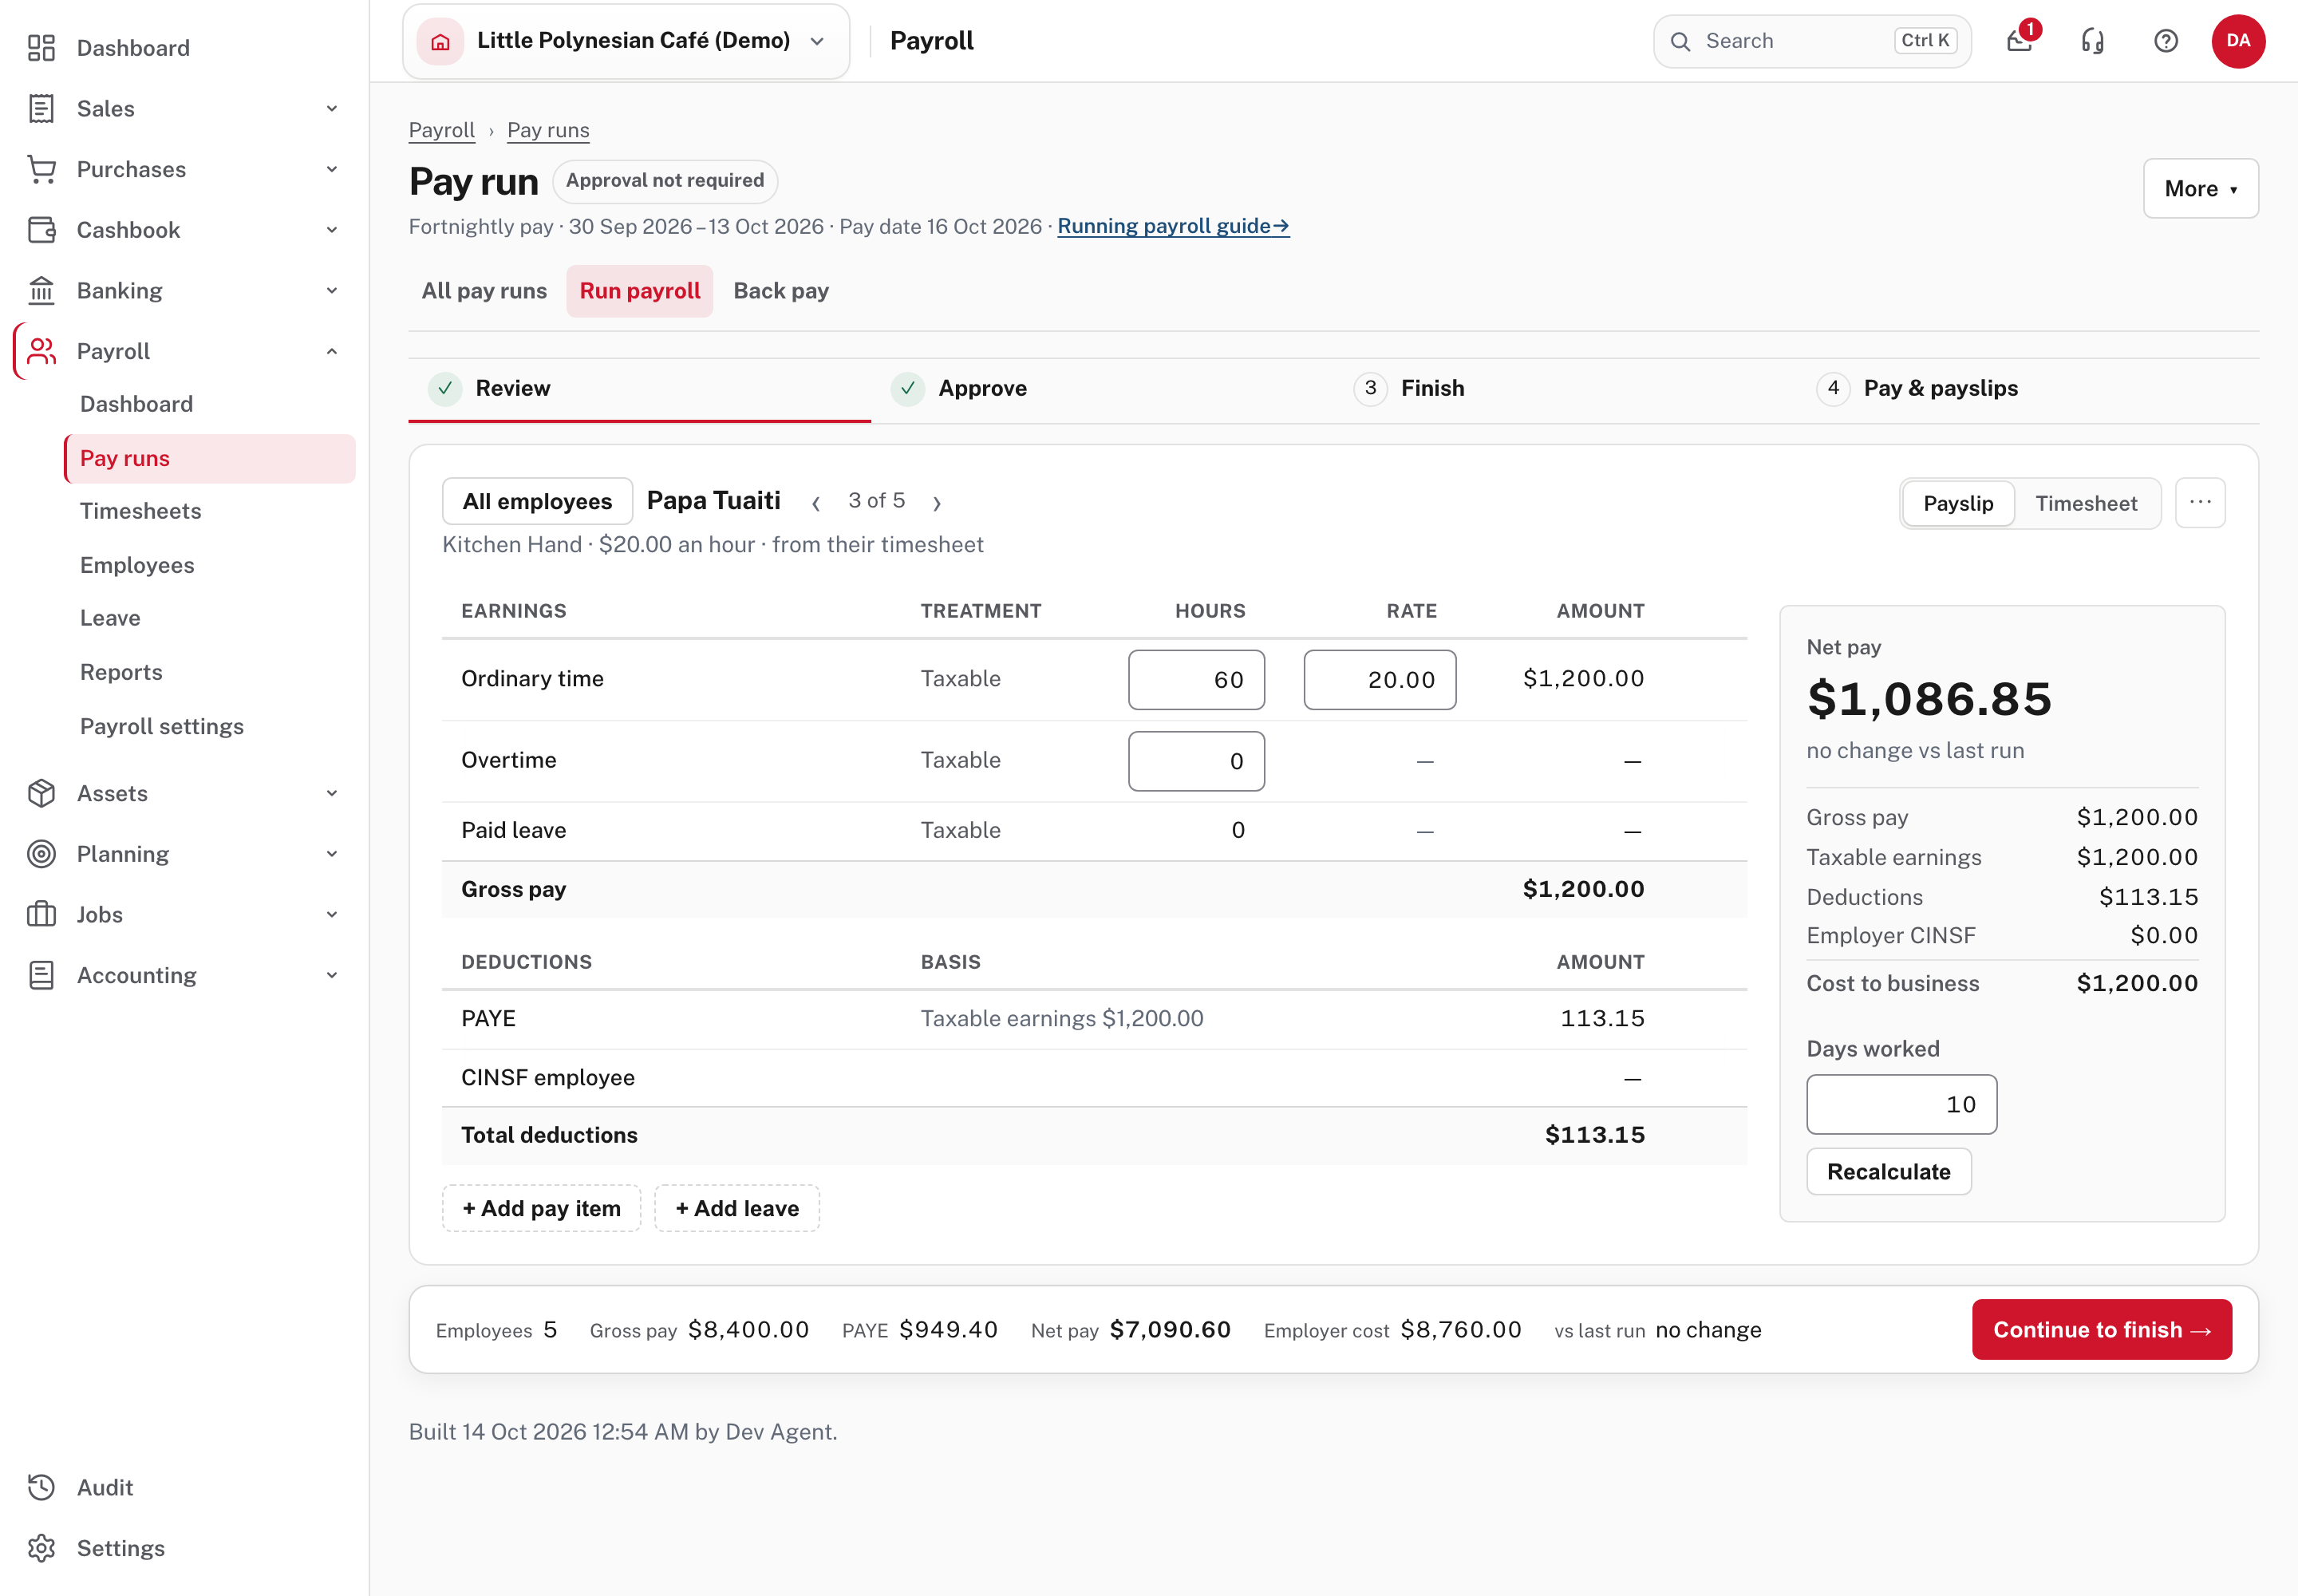
- Earnings lists ordinary time, overtime and paid leave with hours, rate and amount. The Treatment column says how each is taxed (here, Taxable).
- Deductions shows PAYE, with the taxable earnings it was worked out on, and the employee's CINSF.
- The summary beside them shows Net pay (and how it compares with the last run), gross pay, taxable earnings, deductions, employer CINSF and the cost to the business, with the days worked.
- The arrows beside the name (‹ ›) move to the previous or next person, here 3 of 5, so you can check everyone in turn without going back to the table. Payslip / Timesheet switches between the pay and the hours behind it, and All employees goes back to the table.
- Change an hour, the rate or an amount and everything updates as you type; the run's totals show Unsaved until you Save payslip. Cancel puts the saved payslip back. Saving withdraws any approval already given. (Not shown in the demo: taken from Easy's Help.) A change here is for this run only. It does not change the person's usual pay or their timesheet.
Add a one-off allowance, bonus or deduction
Choose + Add pay item under the tables. The item is for this run only: change the person's pay settings if it should repeat. Save any change you made on the payslip first, then fill in the form and choose Add to payslip.
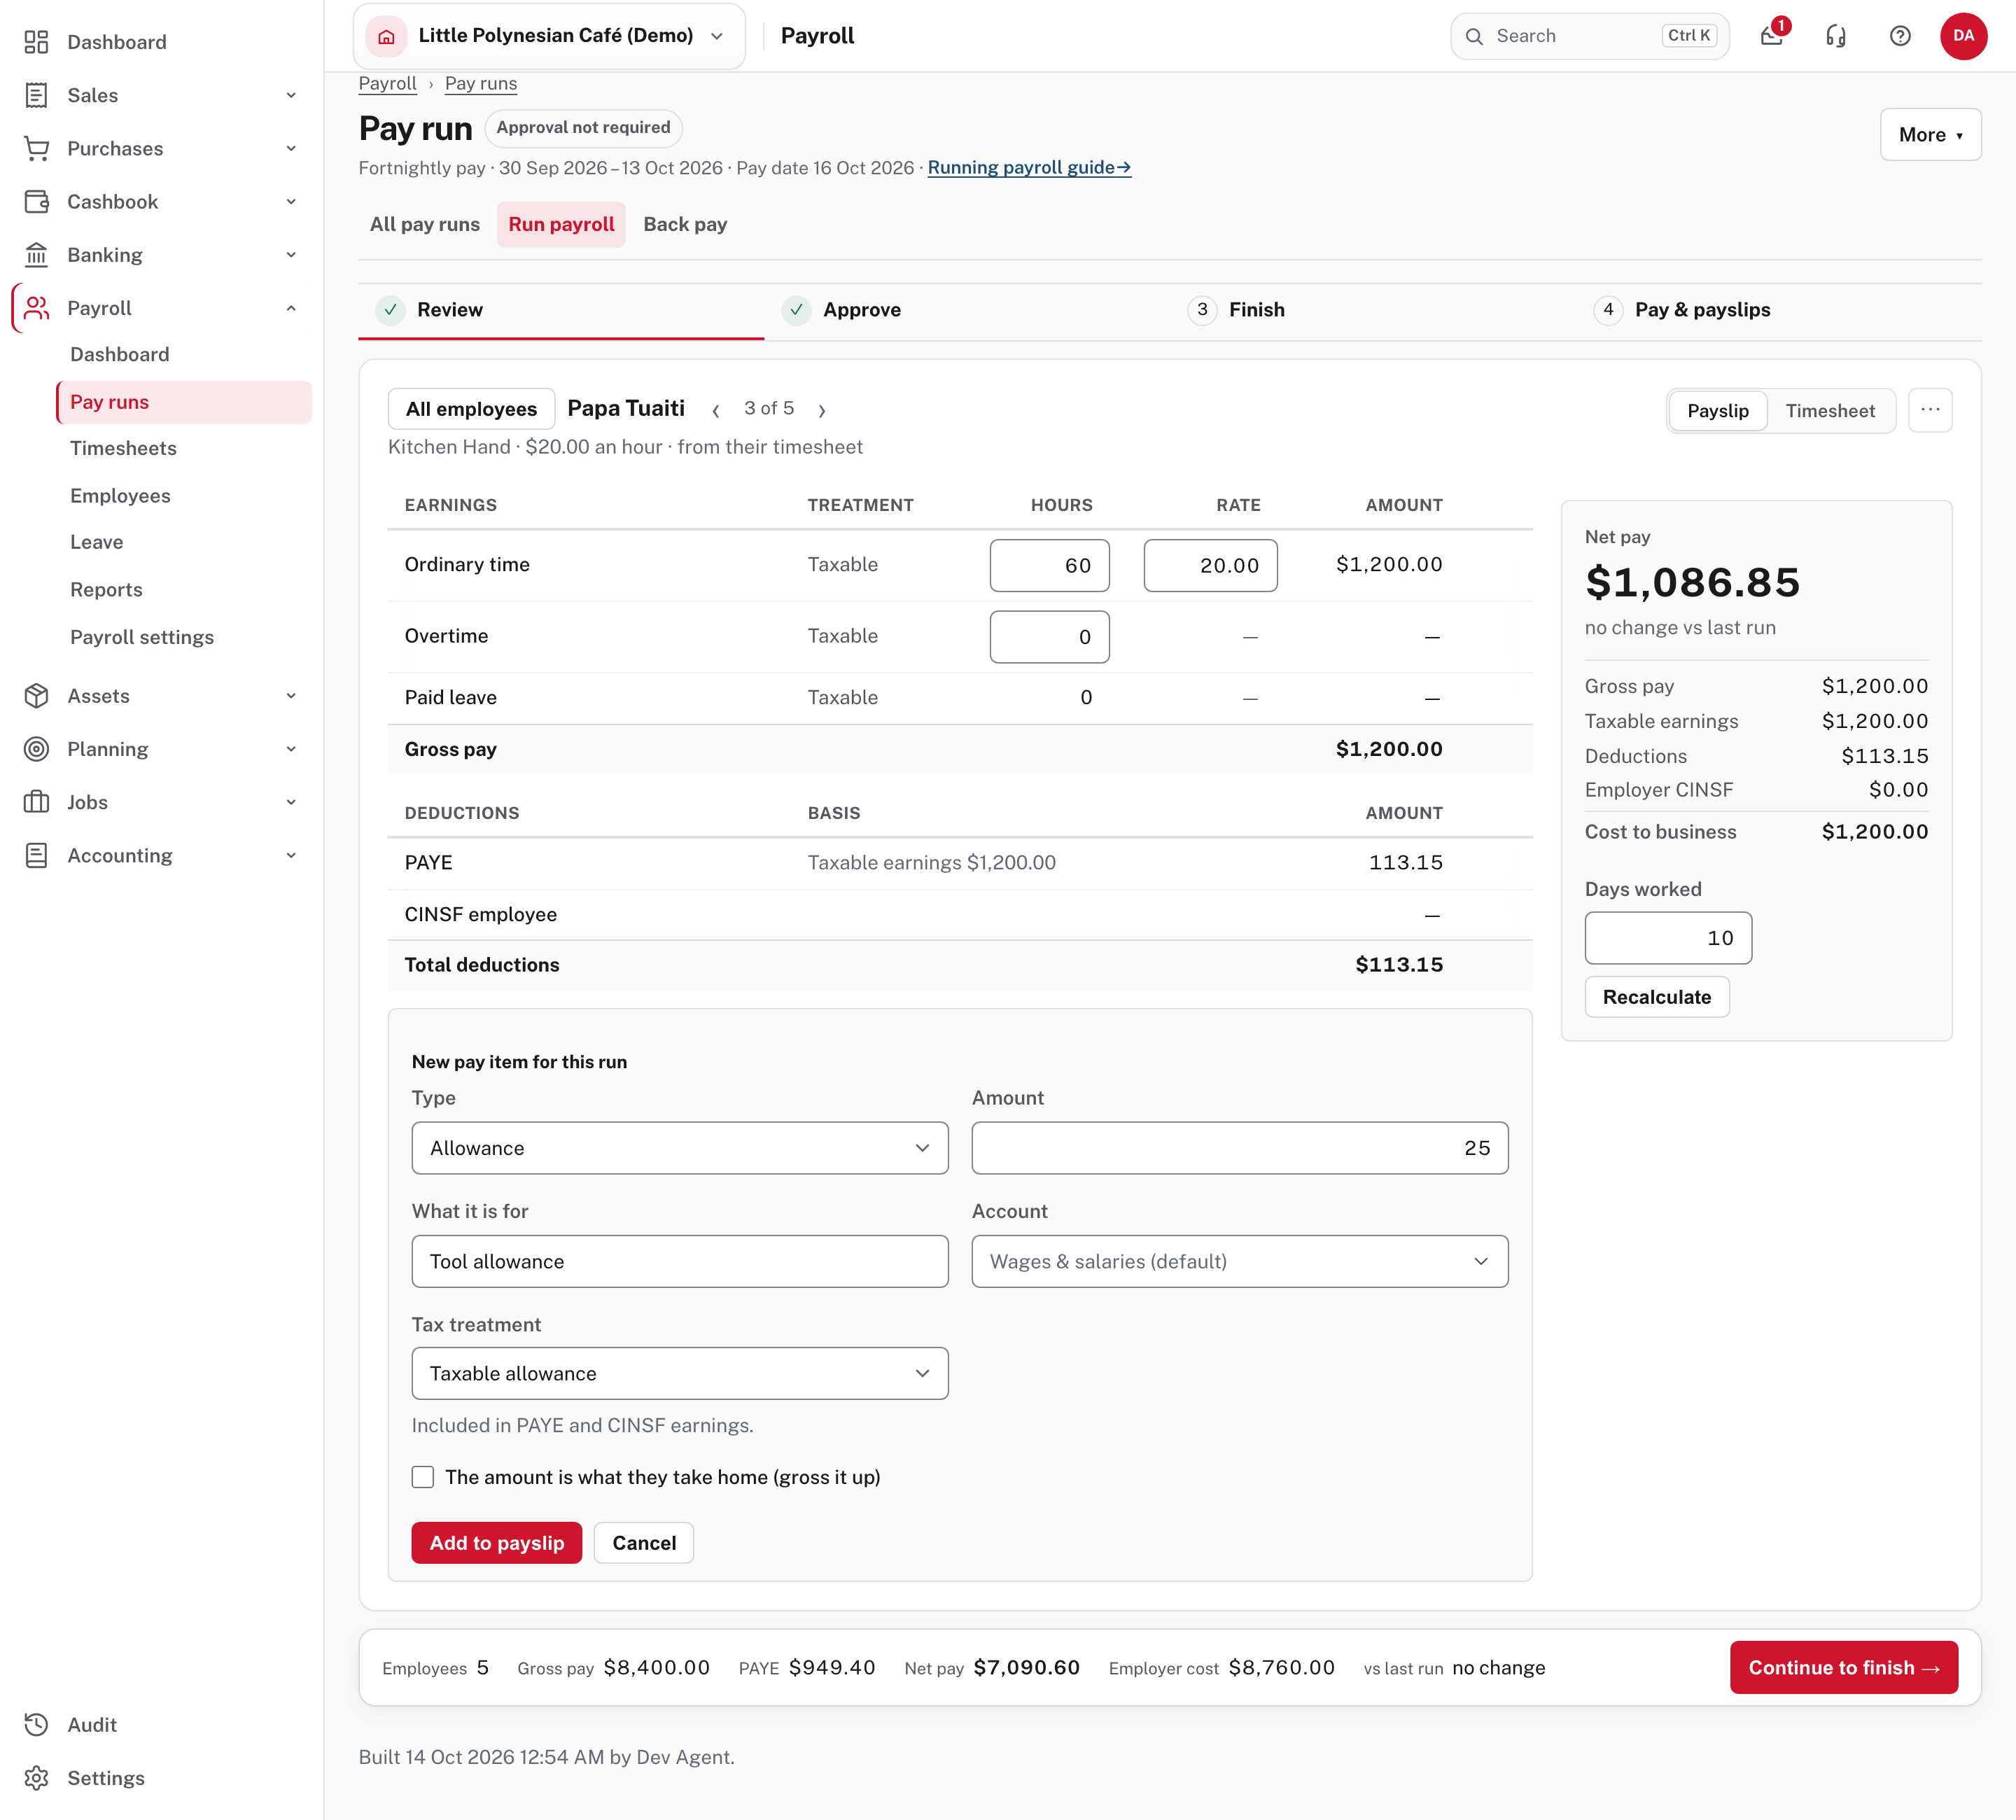
| Type | How it is paid and taxed (from the form's own note) |
|---|---|
| Bonus | An extra emolument: taxed at the flat extra-emolument rate, and CINSF is taken on it. |
| Allowance | Taxable allowance is included in PAYE and CINSF earnings. Non-taxable allowance is left out of PAYE but is still in CINSF earnings. |
| Reimbursement | An expense paid back: no PAYE and no CINSF. |
| Deduction | Taken from the pay after tax. |
Type the Amount and What it is for. Account is where the cost is recorded: it starts as Wages & salaries (default). A deduction has no default; choose the liability account it is held in. Tick The amount is what they take home to have Easy work out the gross that leaves that amount after tax (bonus and allowance only).
Enter leave on a payslip
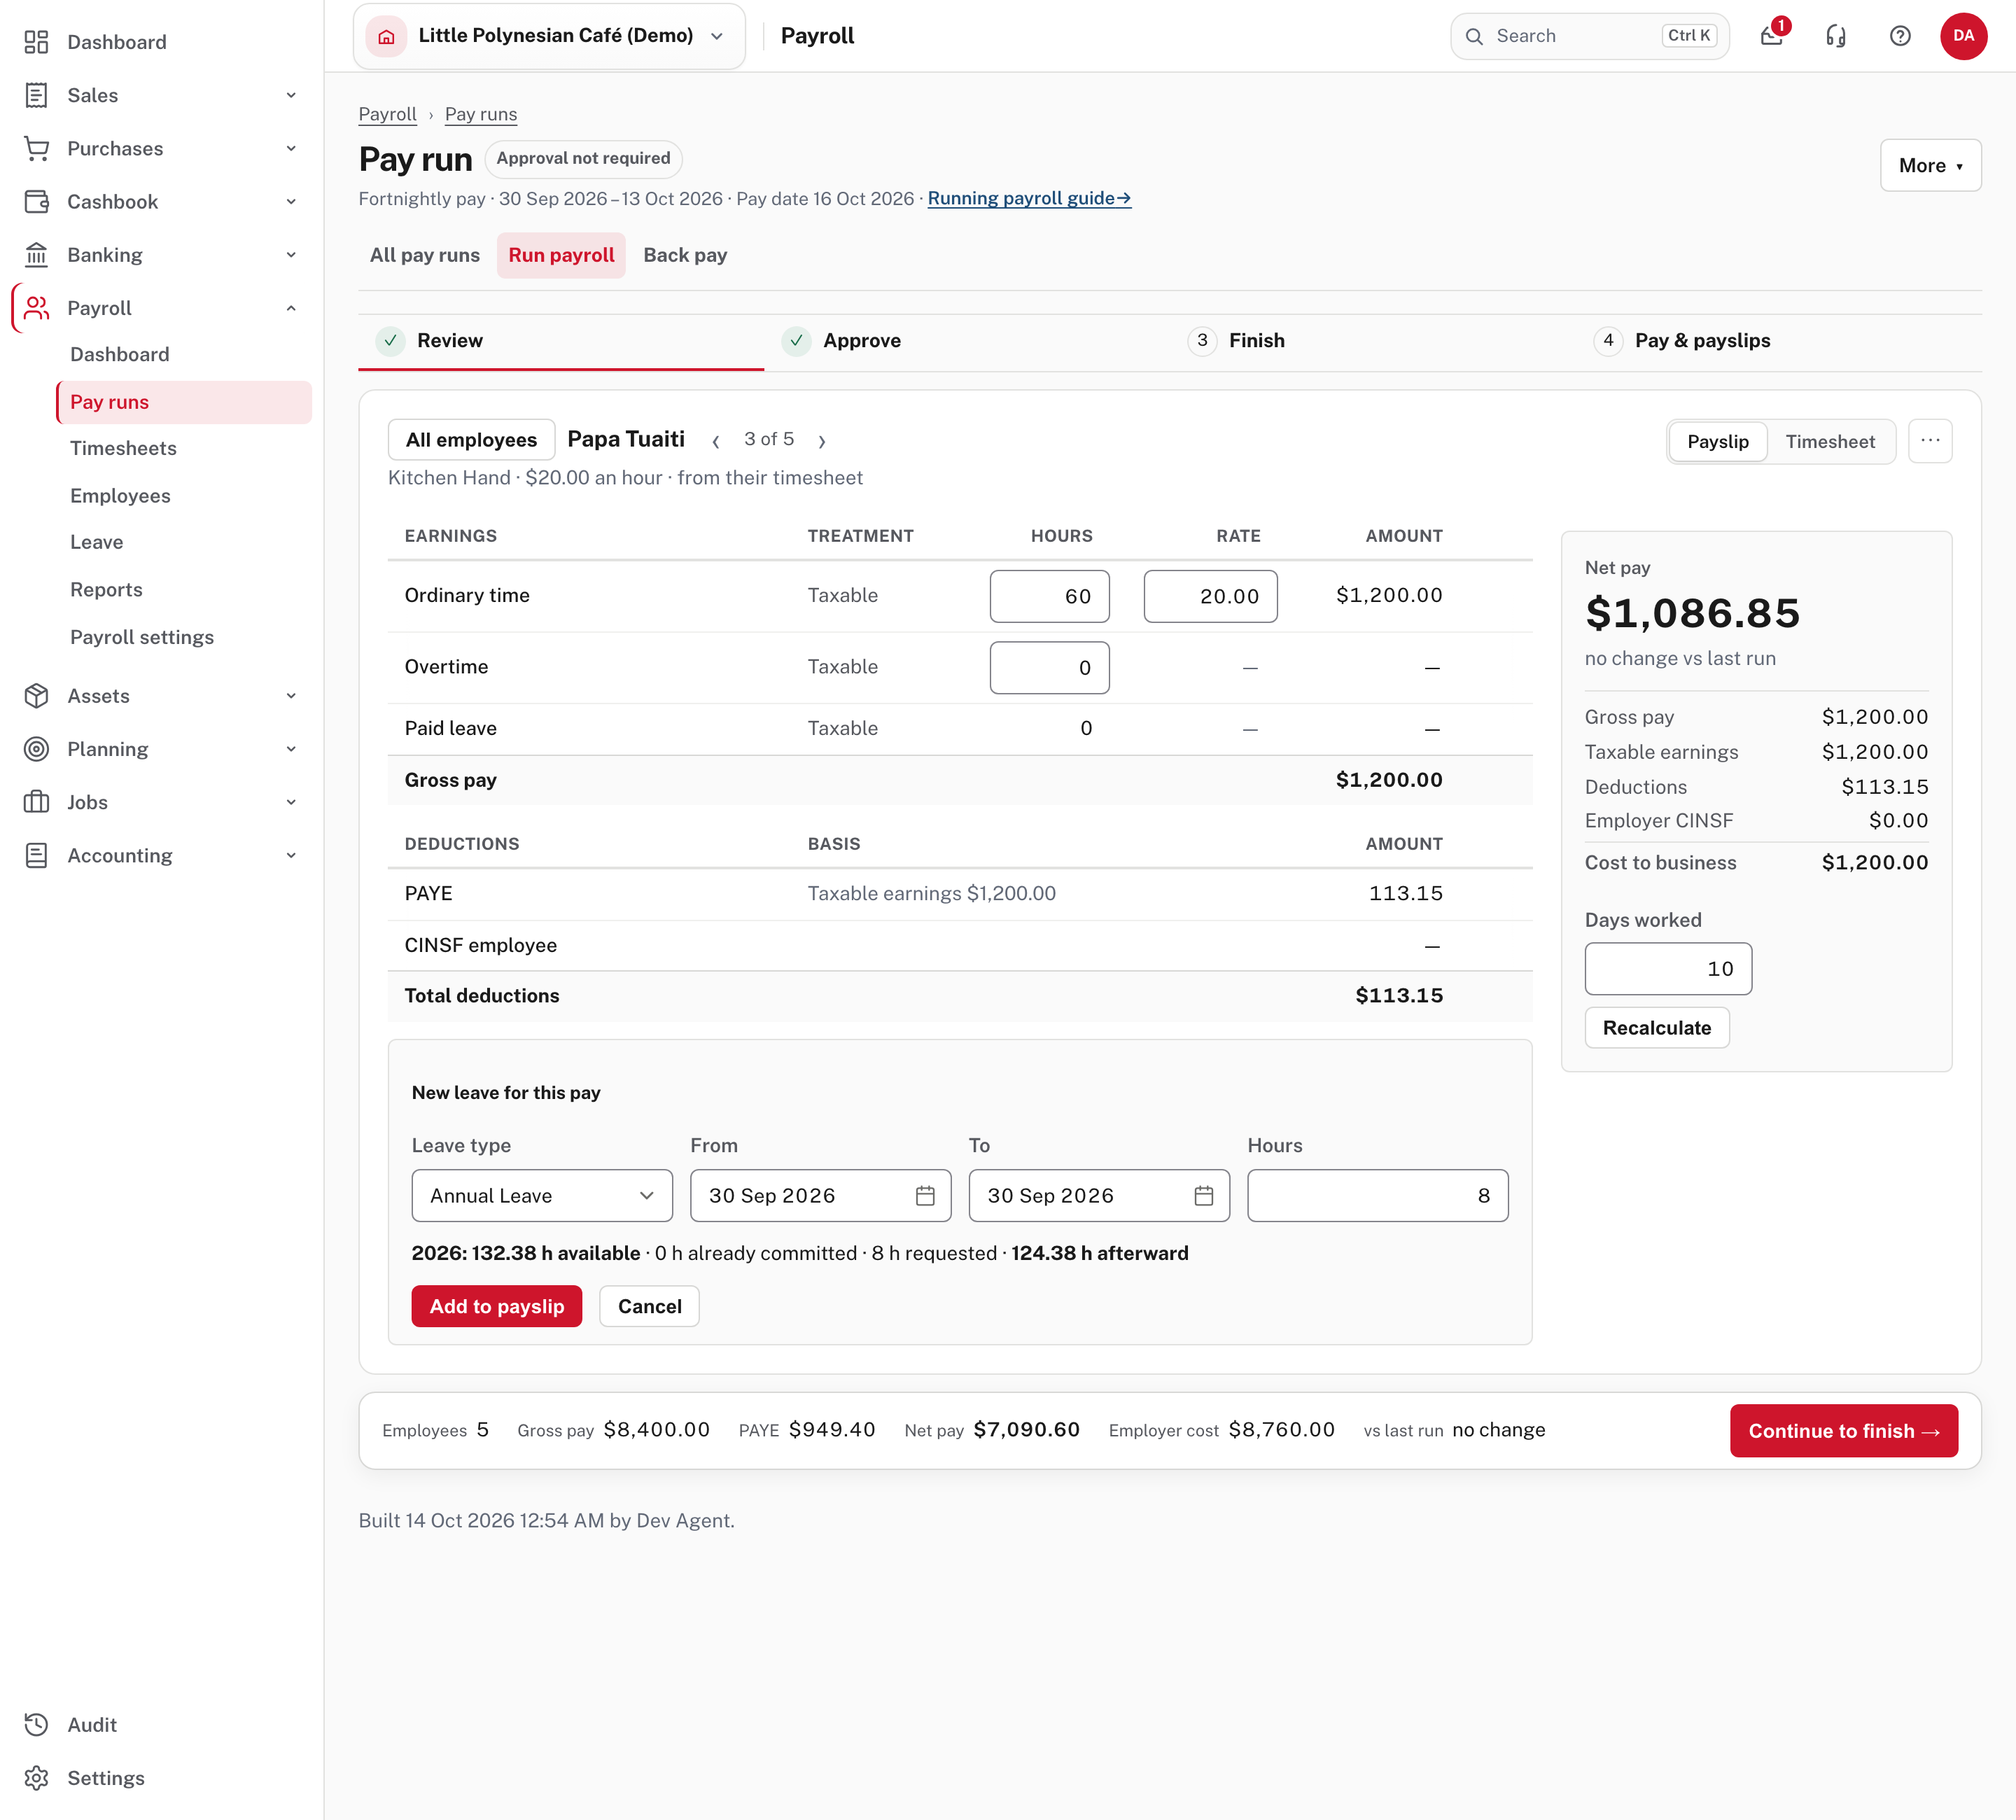
Choose + Add leave, beside + Add pay item. Pick the leave type, the dates inside this pay period and the hours. The form shows the person's balance before and after, then Add to payslip puts the hours in the earnings. Leave on the timesheet (step 1) is the usual way; this is for someone paid their usual hours, or leave you forgot.
More detail: Paid leave in a pay run.
Change several people at once
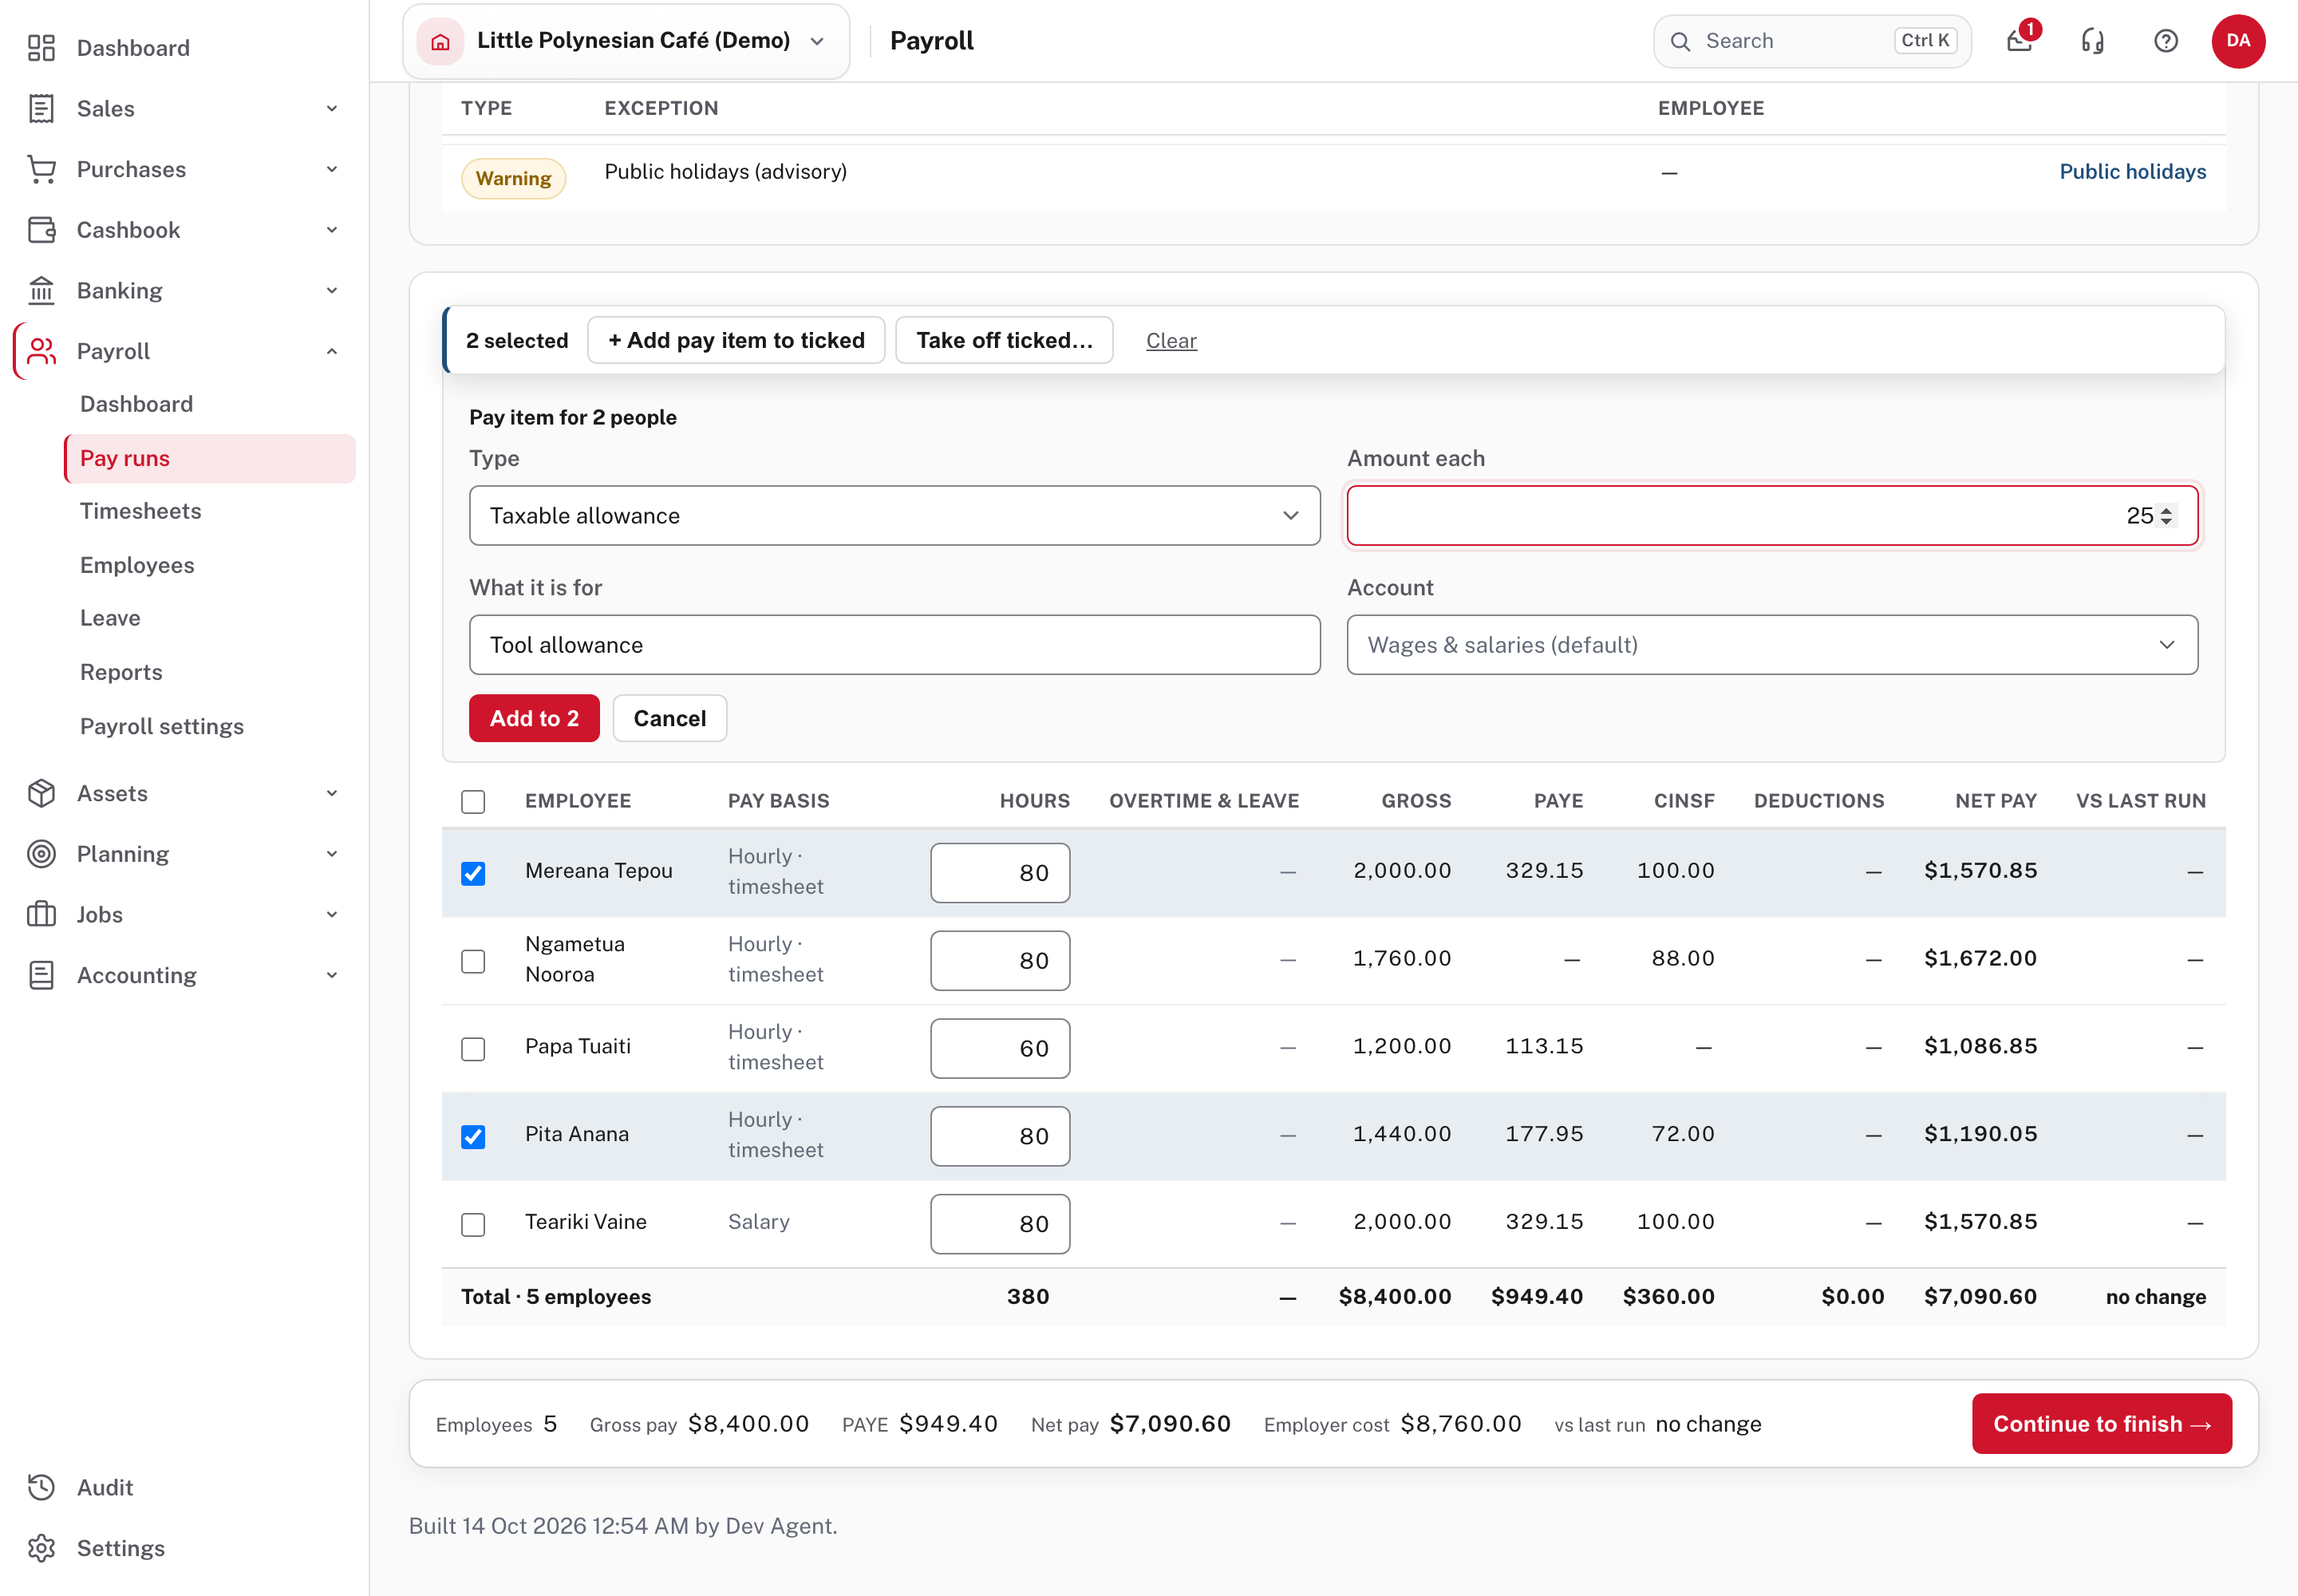
Tick the people in the Employees table. A bar appears with + Add pay item to ticked (the same bonus, allowance or deduction for each, Amount each) and Take off ticked… (one reason for all of them).
Other things on this step
- To leave one person out, open their payslip, choose ⋯, then Take off this run…. You give a reason, and it is kept with the run and in the audit trail. (Not shown in the demo: from the screen's source.)
- More (top right) holds the things done to the run as a whole: Open timesheets, Start another pay run, Rebuild from the timesheets and Discard this payroll.
- If hours are approved after the run was built, an exception says Hours changed since the run was built and offers Rebuild. Rebuilding brings the hours in again and asks for any approval again. It keeps the pay items you added and the people you took off, and replaces other payslip edits, so do it before you edit.
More detail: Running payroll, step by step and How an employee's pay is calculated.
When Review has no warnings, nothing is waiting for a second person and nothing stops the run, the button at the bottom right reads Finish pay run and finishes from here, after asking once. The demo has two warnings, so its button reads Continue to finish →.
Check before you continue
- The people count is right, and nobody is missing or on the run who shouldn't be.
- Total gross, net and employer cost are about what you expect against the last run.
- Every person who changed against the last run has a reason you recognise.
- Errors is 0.
Step 4. Approve
Choose Approve in the steps across the top, or Continue to finish → to go past it. What happens here depends on the pay-run approval policy (Payroll settings → Approvals).
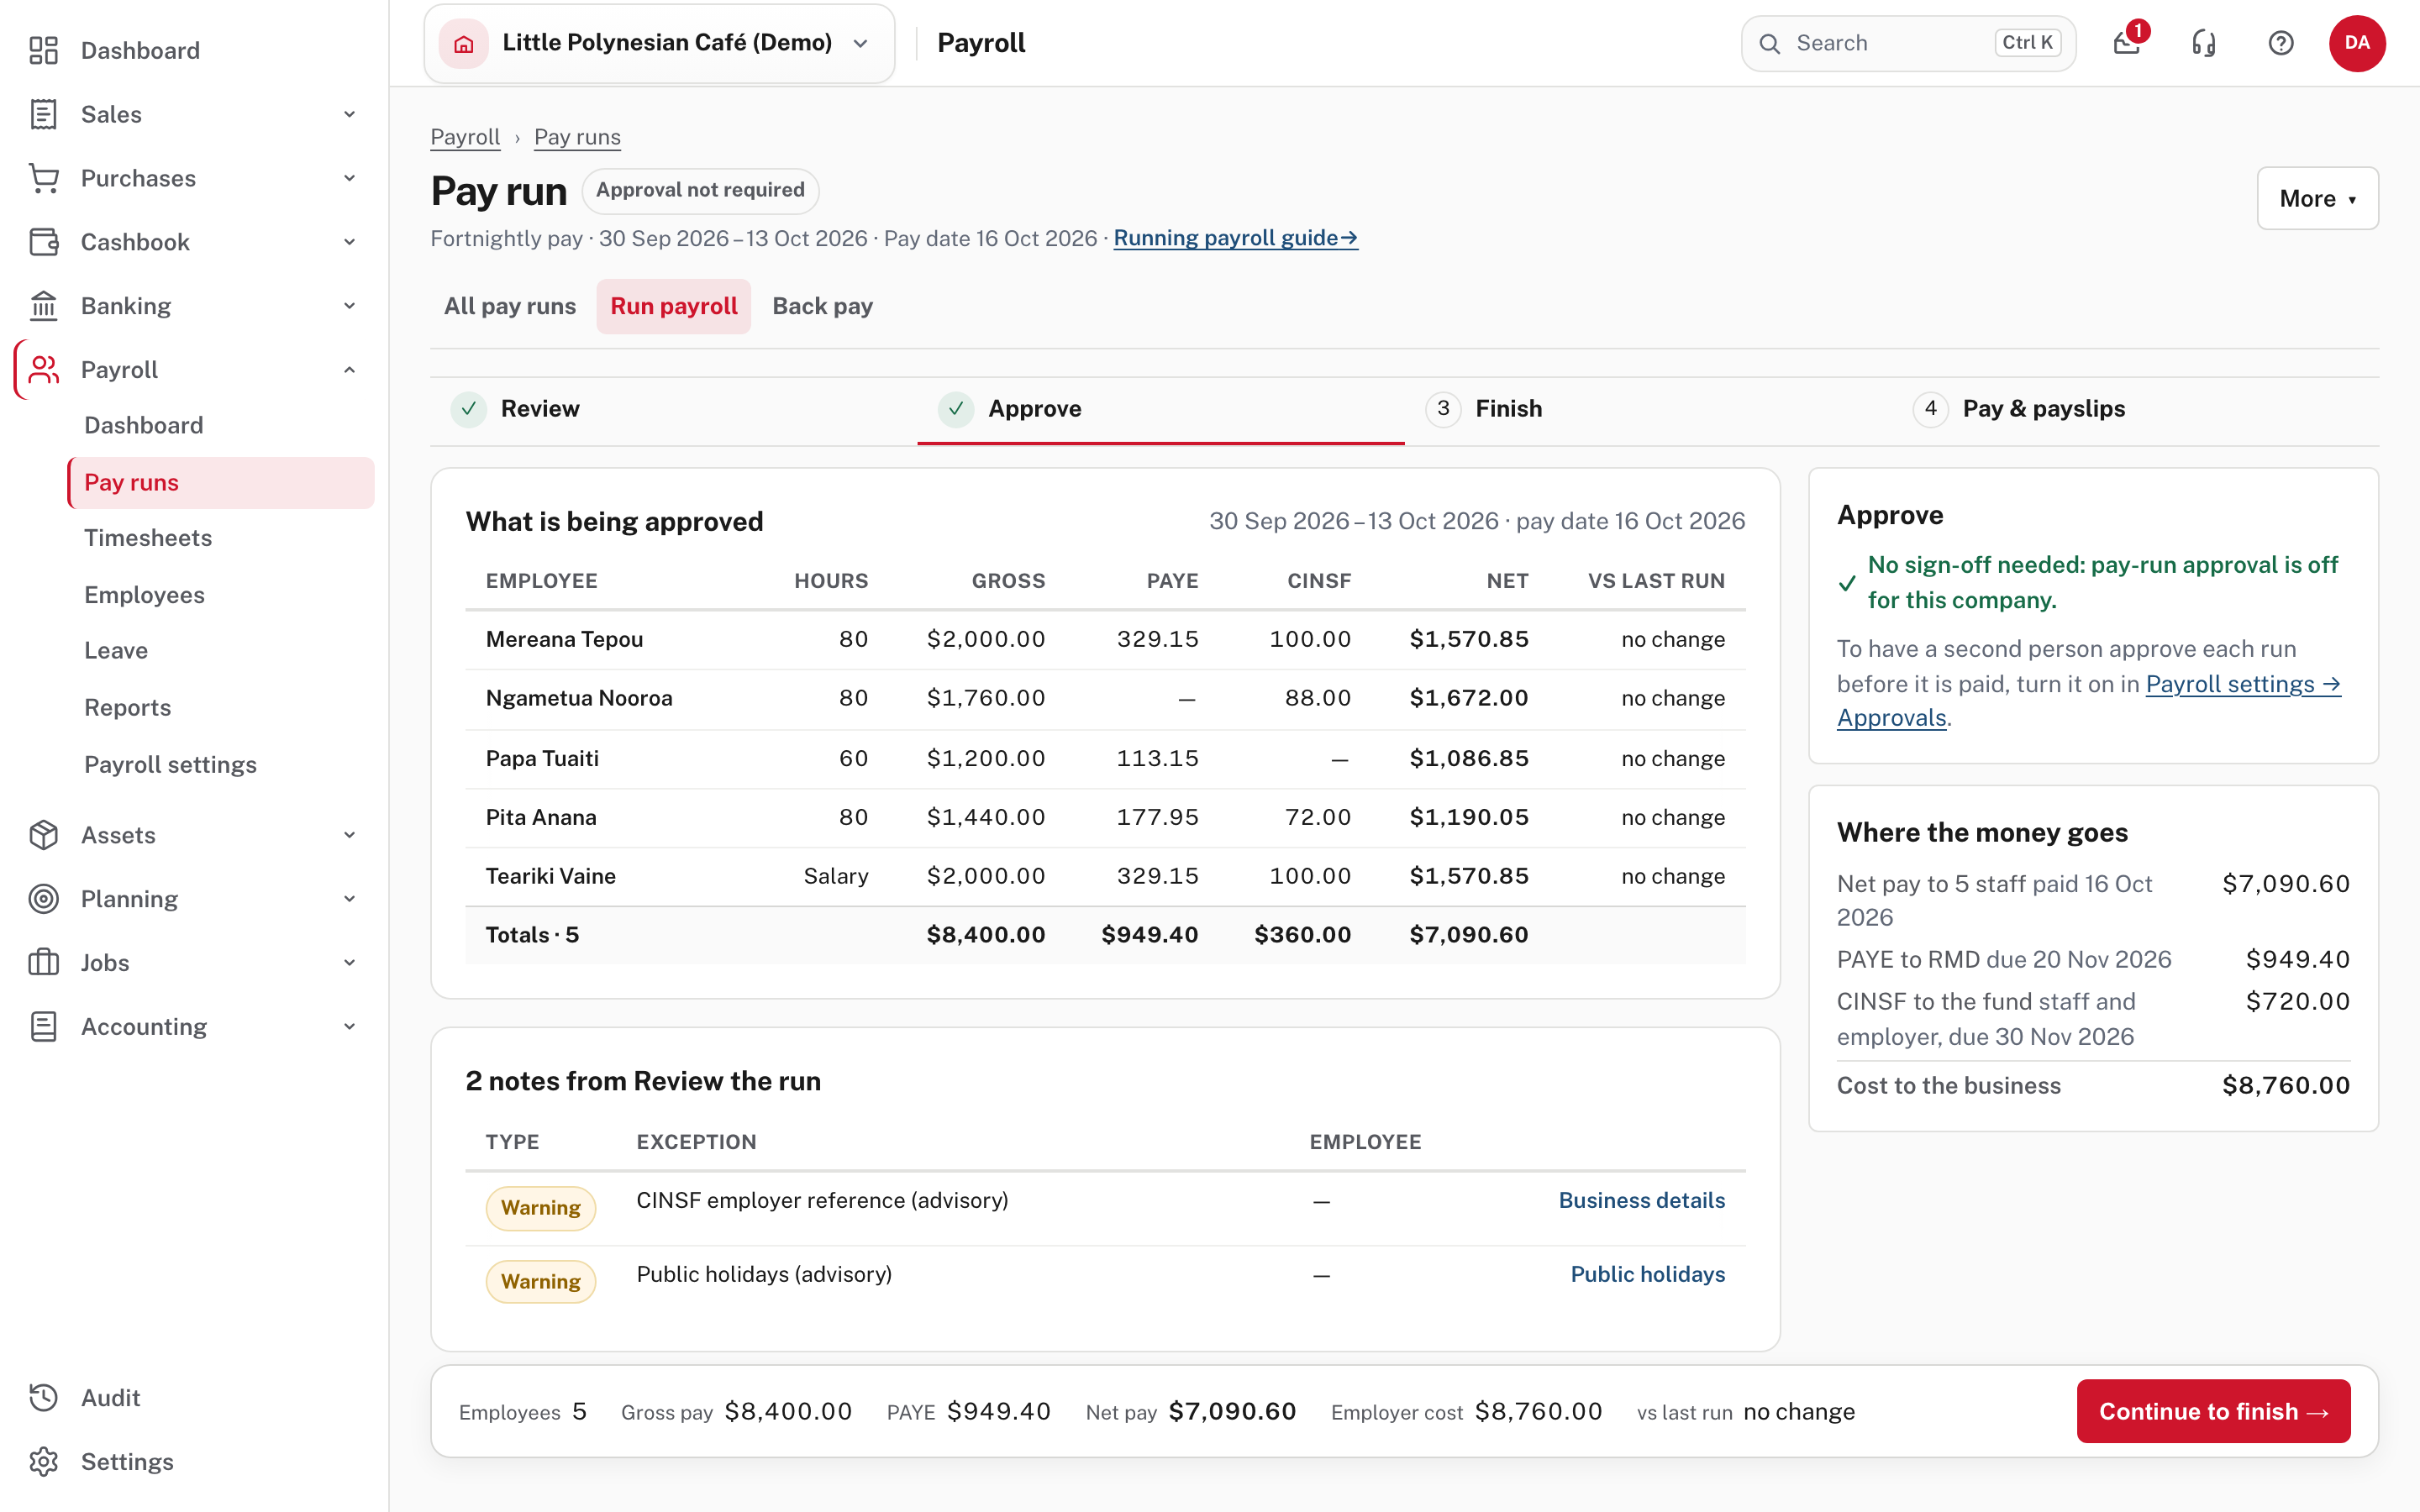
- No approval needed (the demo's setting): the step shows No sign-off needed: pay-run approval is off for this company, and you go straight to Finish. The table is what you would be approving: each person's hours, gross, PAYE, CINSF and net, with the notes from Review and Where the money goes (net pay to staff, PAYE to RMD, CINSF to the fund, and the cost to the business).
- A second person signs off: the run waits. The card on this step offers Approve this run and Send back…. The Owner, Administrators and Accountants can sign off; they see the run under My actions in Mail and on this step. A run sent back is kept with every edit on it and shows Sent back with the reason. Make the corrections on Review, then choose Send for approval again.
- If the person who built the run is the only one who could sign it off, they sign it off themselves and type why. The note is kept on the record.
(Not shown in the demo: the last two come from Easy's Help and the screen's source.)
More detail: Payroll approvals and controls.
Step 5. Finish the pay run
Choose Continue to finish →. This is the step that records the pay in your accounts.
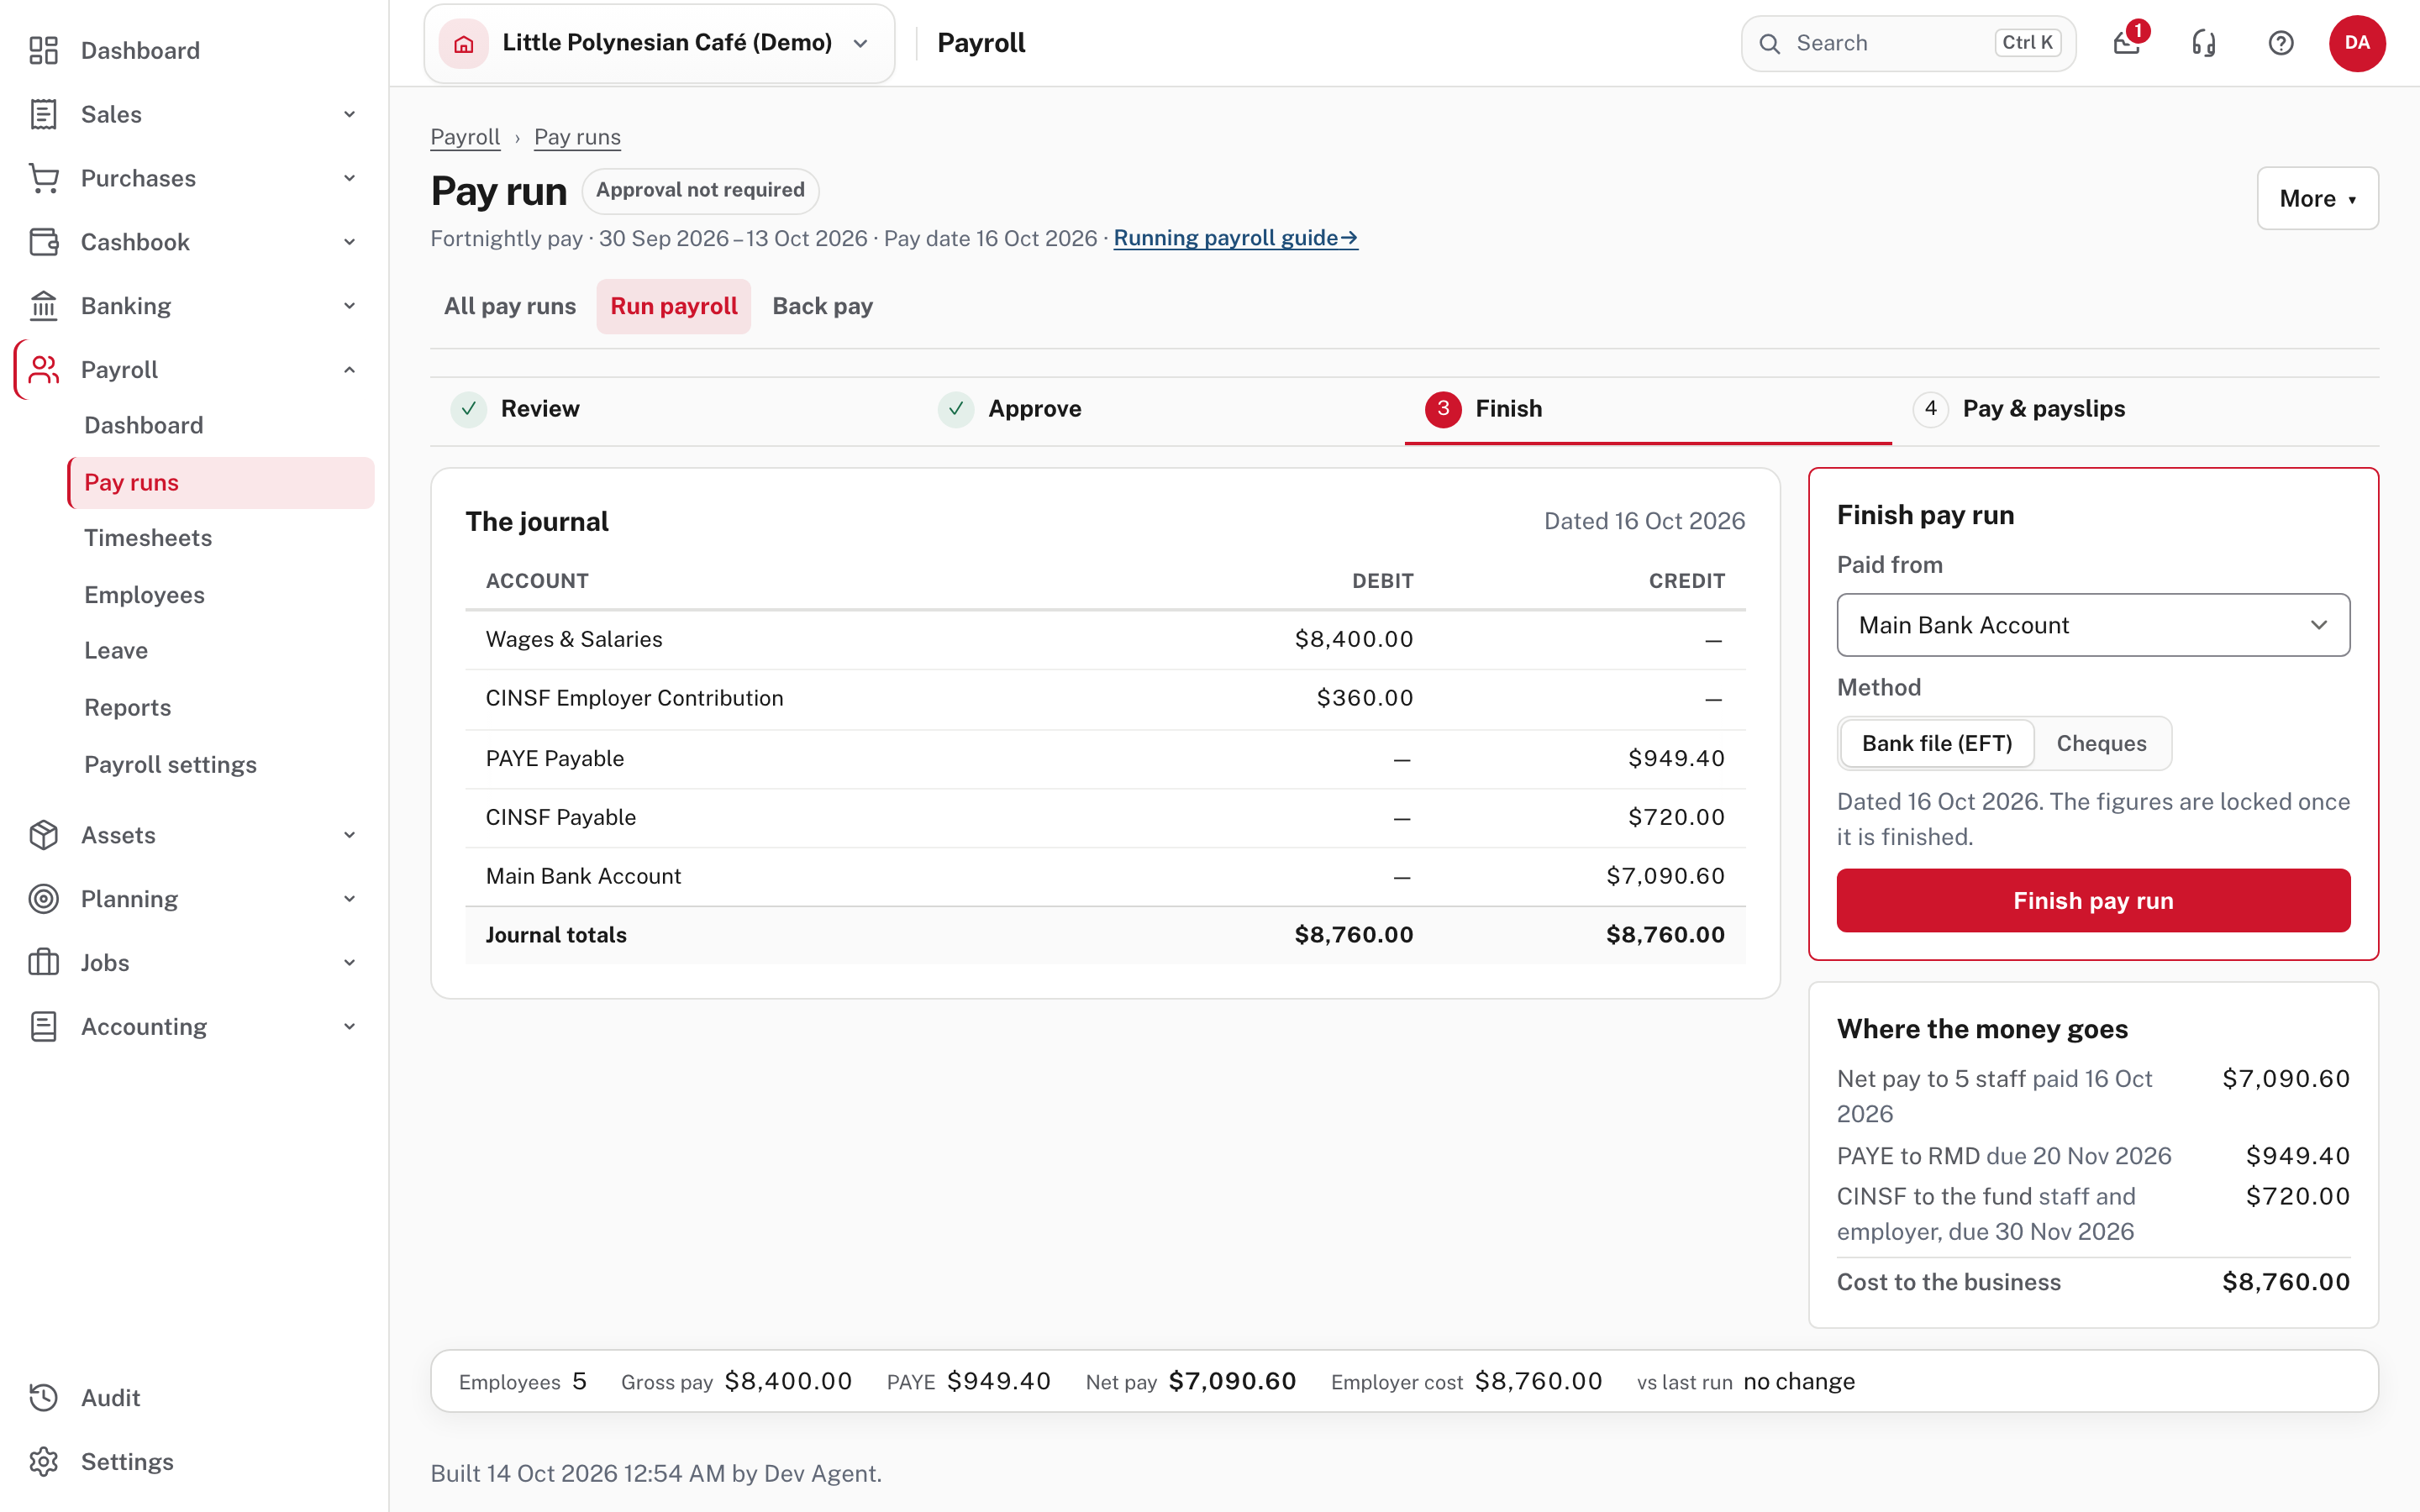
The card on the right sets how the pay will go out, because both choices change the journal beside it:
- Paid from: the bank account the net pay leaves. Check it is the account you pay from.
- Method: Bank file (EFT) or Cheques.
The journal shows exactly what will be recorded, dated the pay date. For this run:
| Account | Debit | Credit |
|---|---|---|
| Wages & Salaries | $8,400.00 | |
| CINSF Employer Contribution | $360.00 | |
| PAYE Payable | $949.40 | |
| CINSF Payable | $720.00 | |
| Main Bank Account | $7,090.60 |
It balances (both totals are $8,760.00), and the employer's contribution and the employee's both go into CINSF Payable. PAYE and CINSF stay as amounts you owe until you pay them (chapter 3). Where the money goes repeats the answer in plain terms: net pay to staff, PAYE to RMD and CINSF to the fund with their due dates, and the cost to the business.
If something stops the run, a box above the button says N things to fix first and gives a link for each: an error in Review, a sign-off still waiting, missing employee details, or, for a bank file, a bank file setup that is incomplete or someone with no bank account. (Not shown in the demo, which has nothing in the way.)
Choose Finish pay run. Easy asks once more.
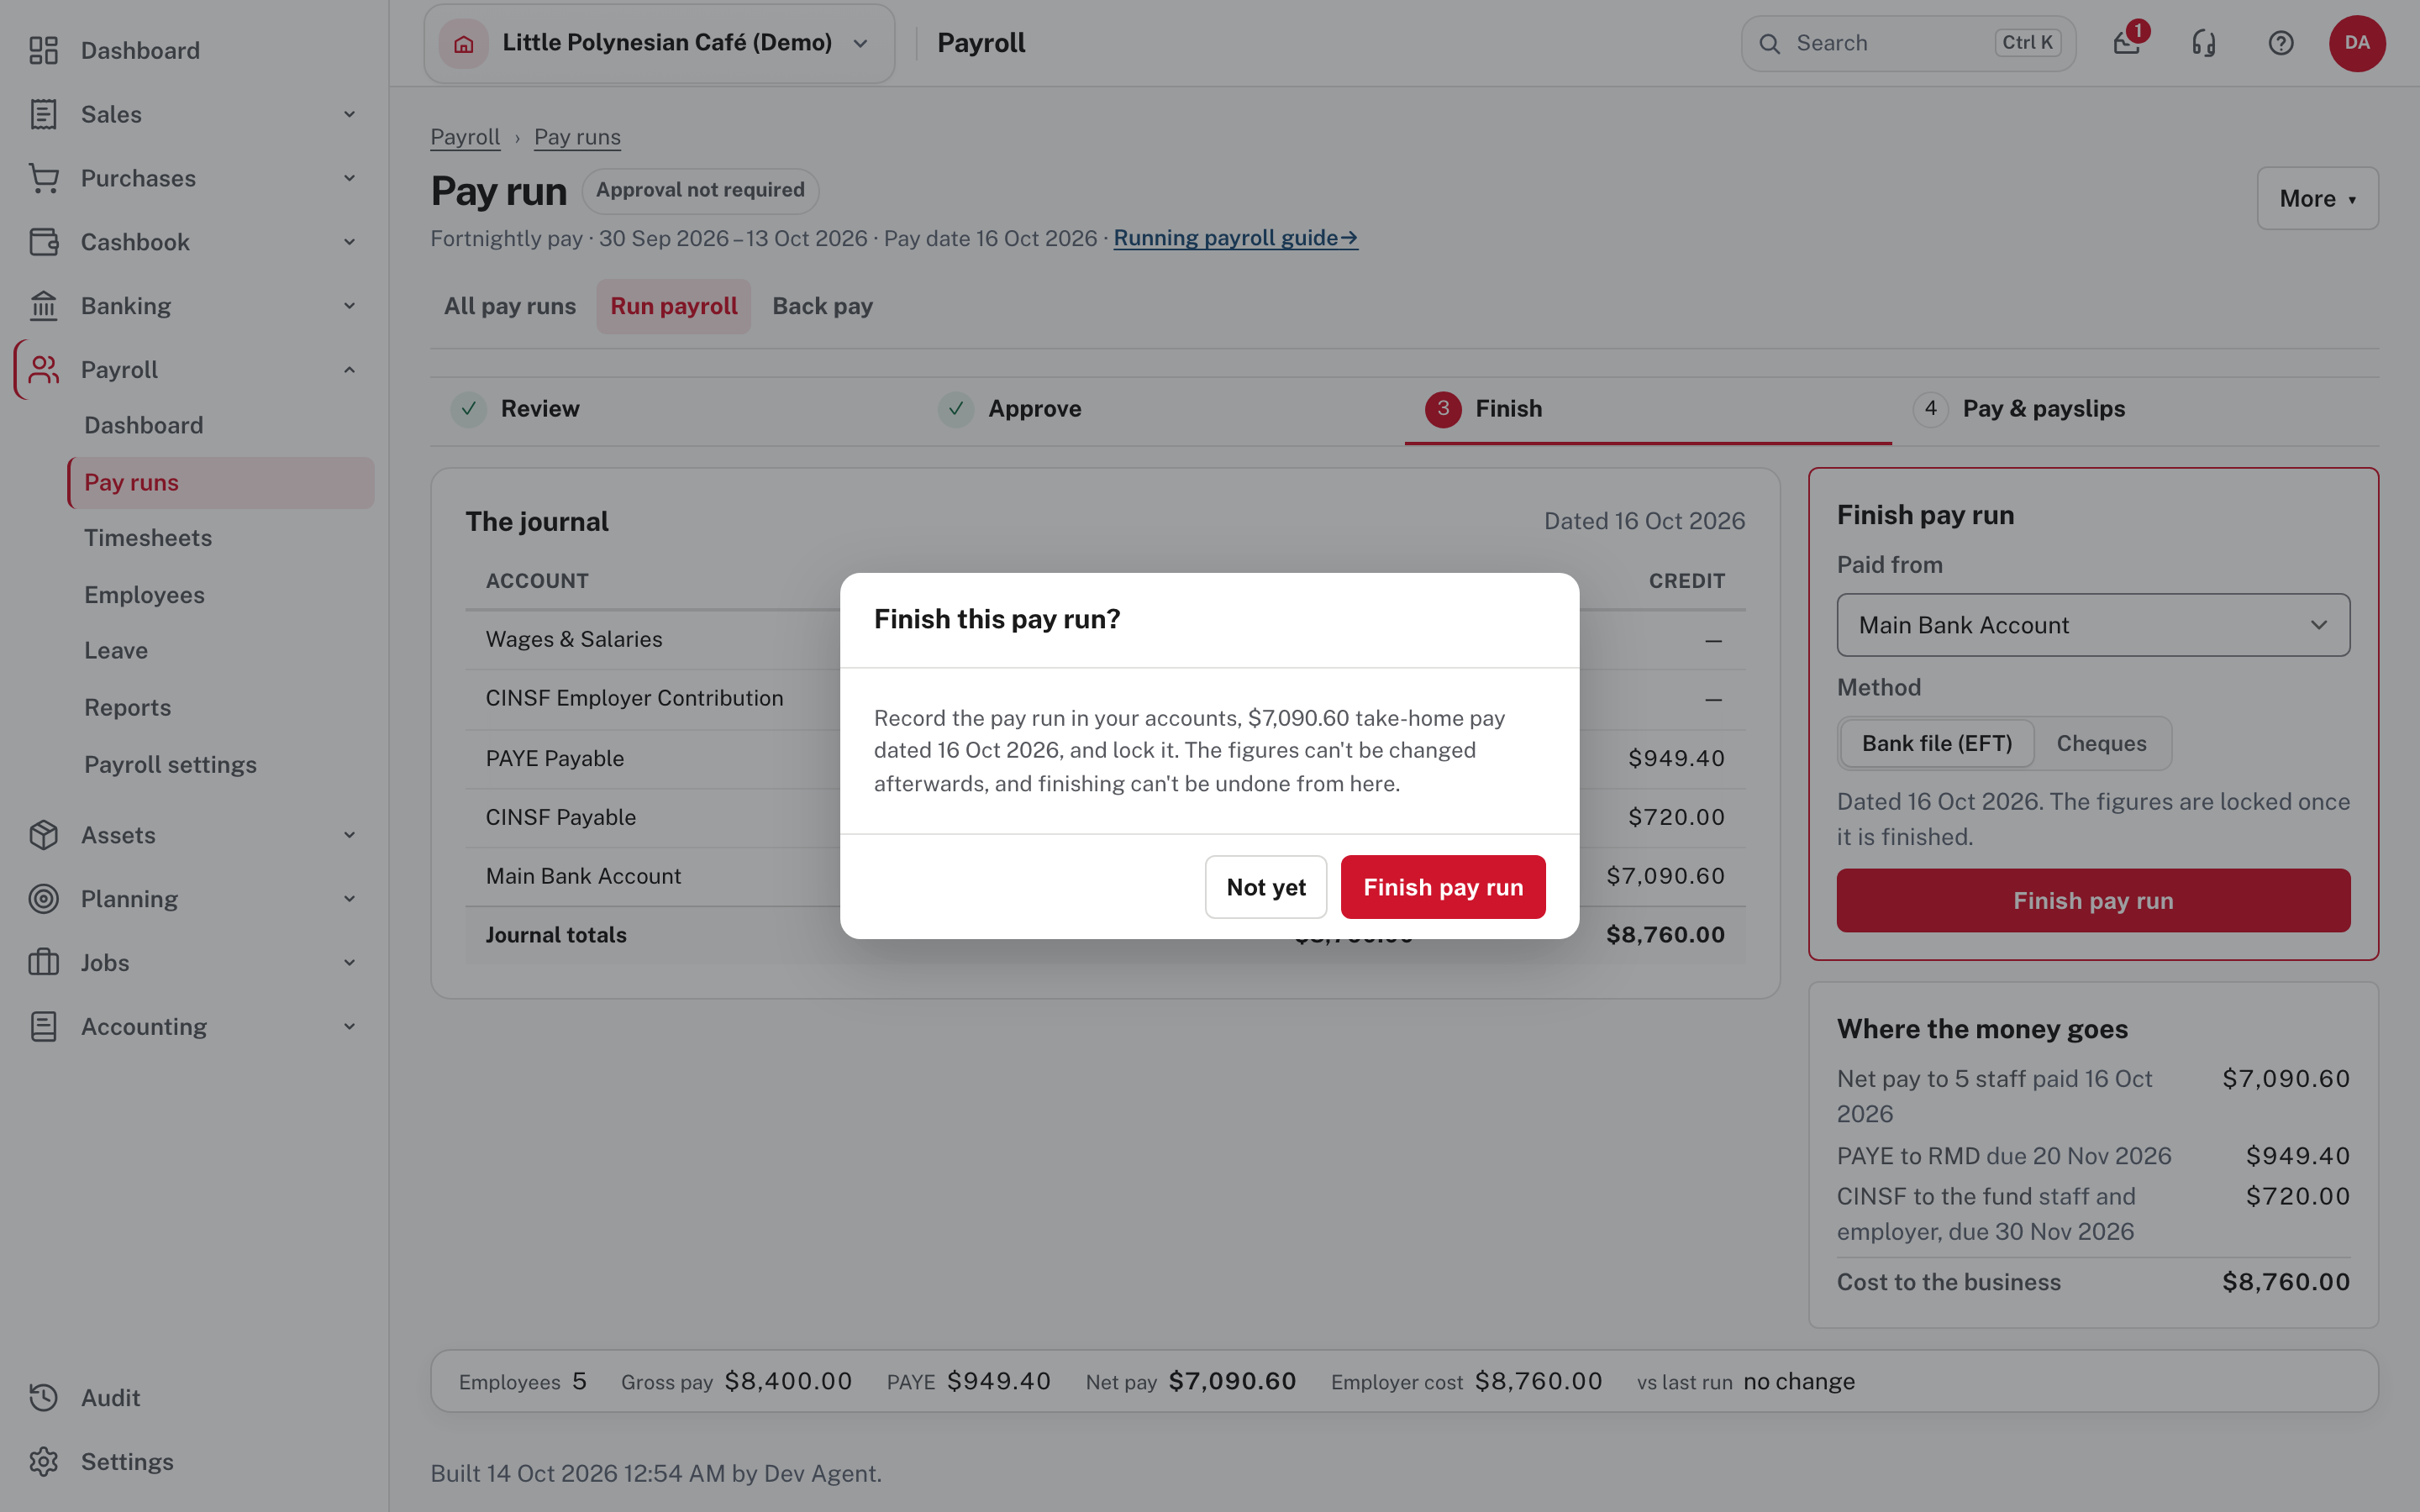
Finishing can't be undone from the run
It records one balanced entry dated the pay date and locks the run: the figures can't be changed afterwards. If a finished run turns out to be wrong, undo it from its payroll record (Payroll → Pay runs, open the run, More → Undo this pay run), then run it again.
On a large run finishing can take a minute. Easy says so, and asks you to stay on the page until it is done (from the screen's source).
The run now has its number (here PAY-2026-0014) and reads Done & locked.
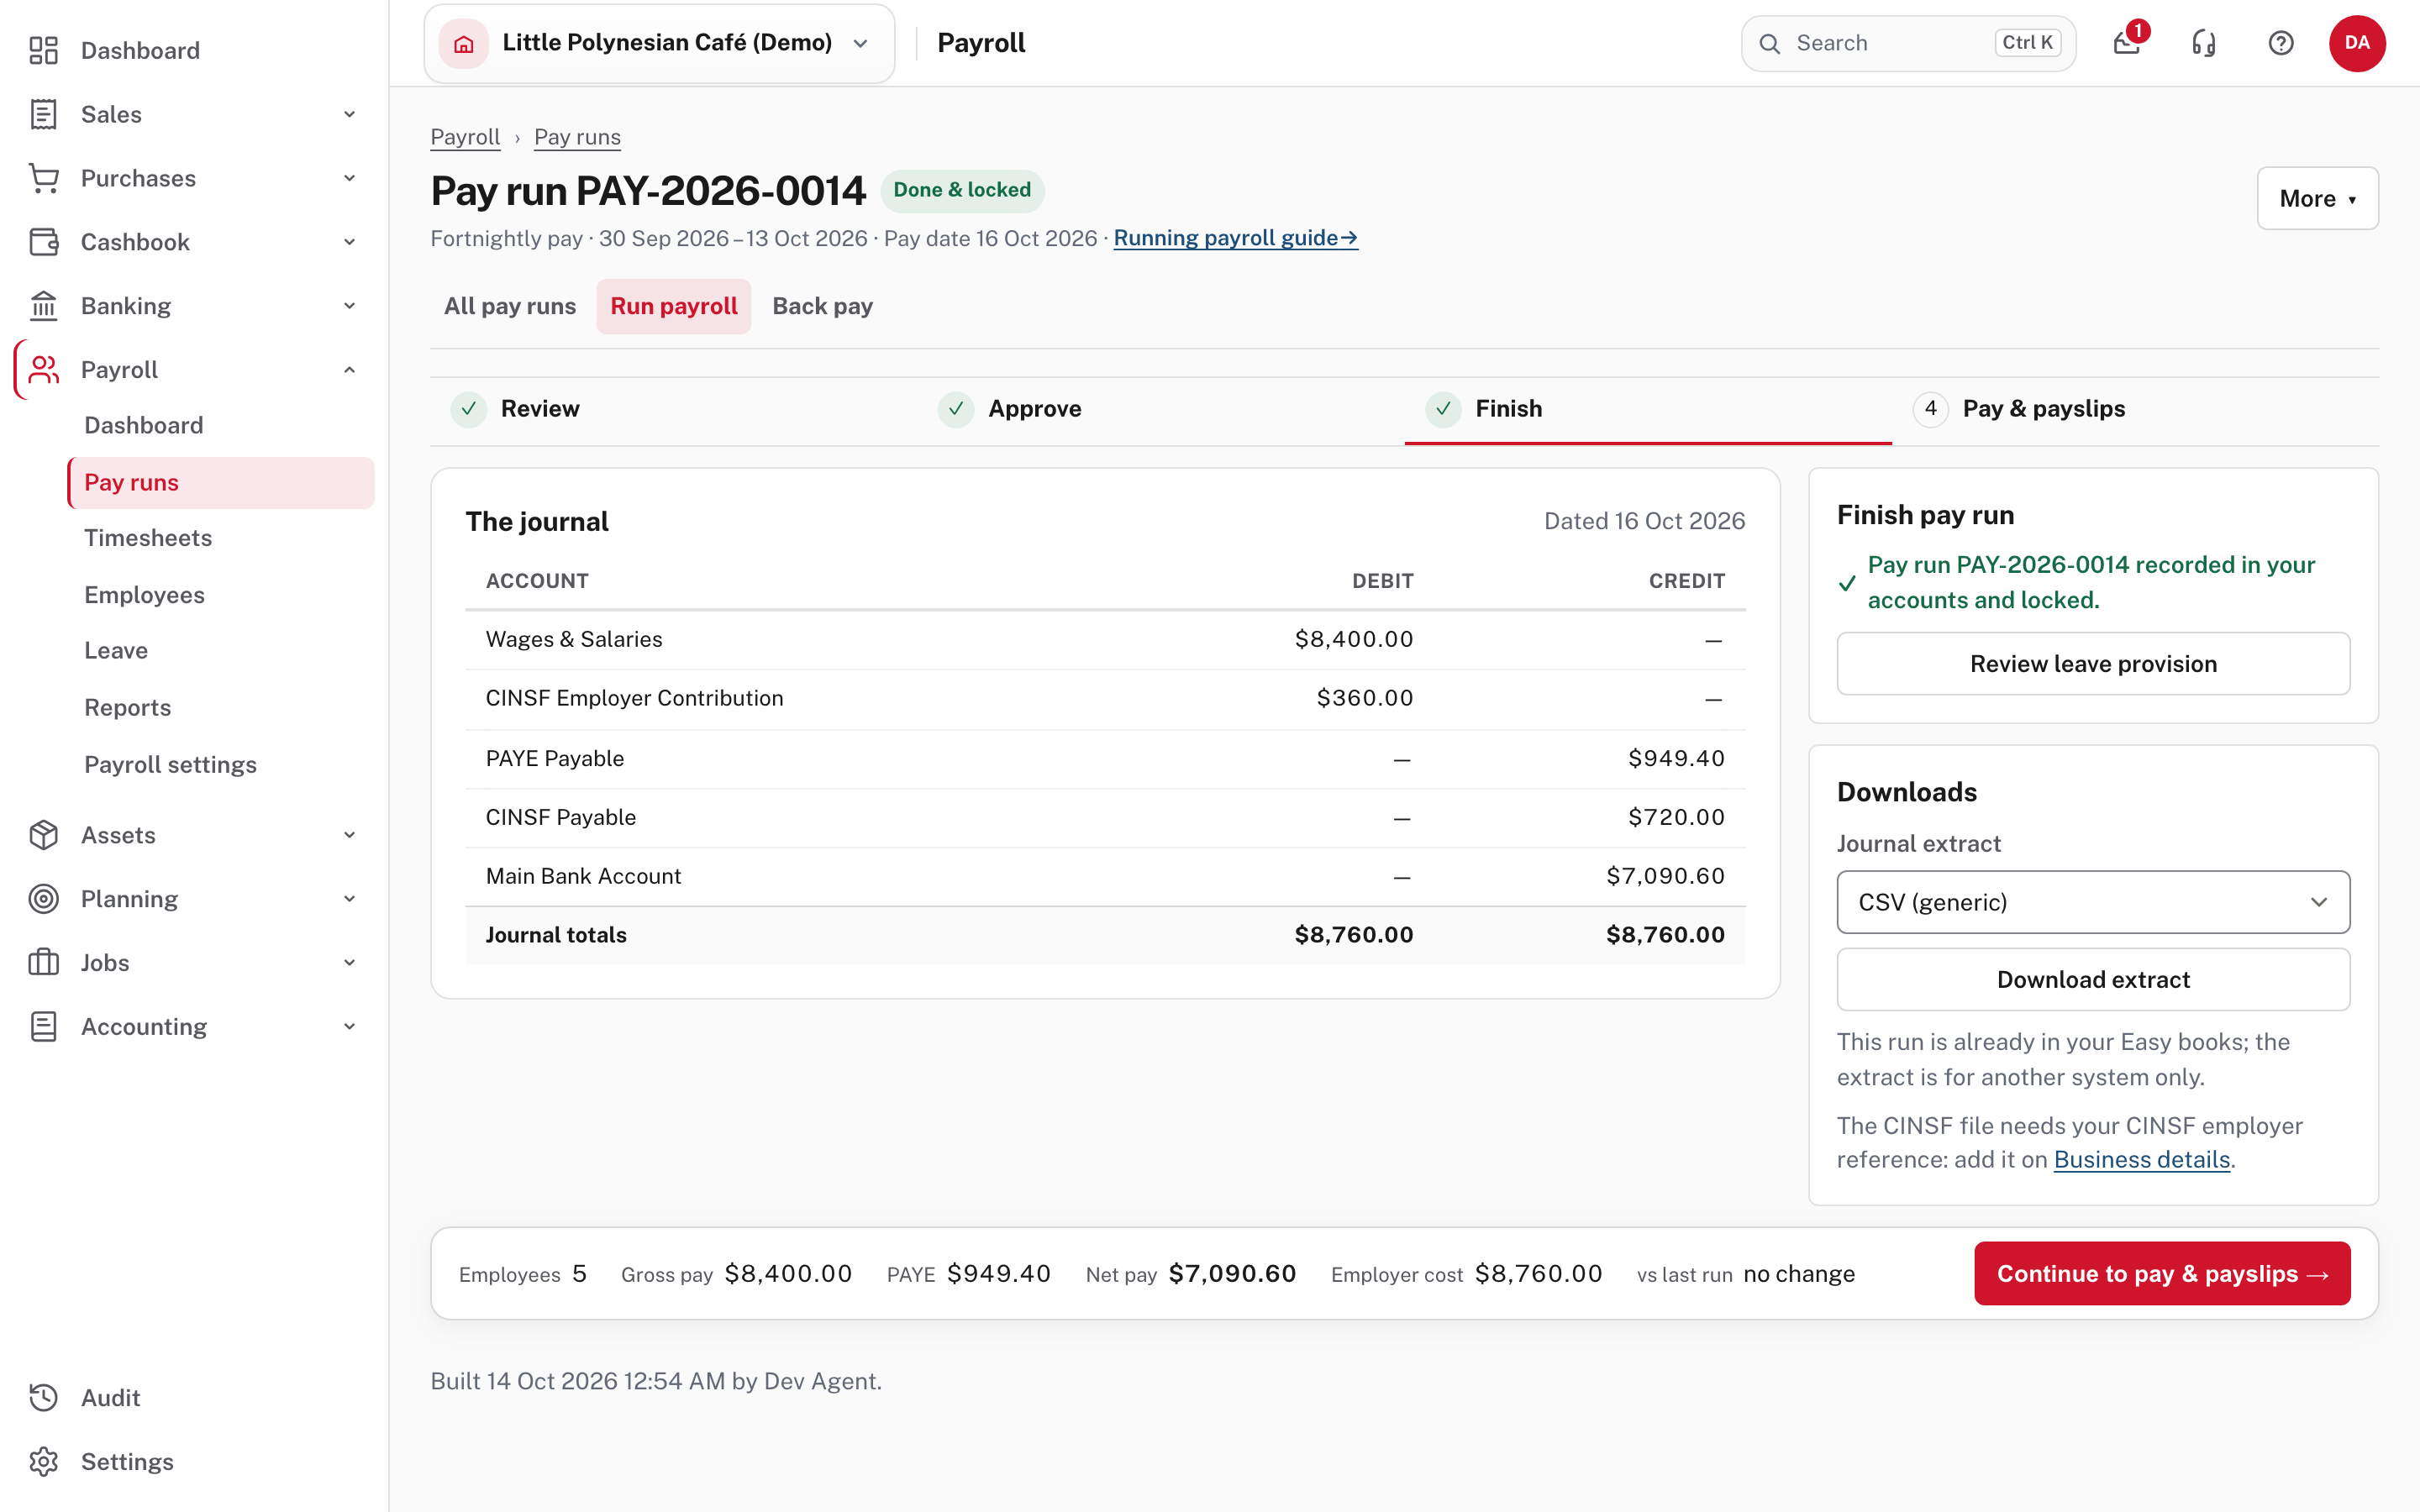
The Finish step then offers Review leave provision (see After the pay run) and Downloads: the journal as a CSV, a PDF voucher, or a file for MYOB or Xero. That is for companies that keep their accounts in another system (Easy Payroll); if your books are in Easy, the screen says the run is already in them.
More detail: Payroll records and reconciliation.
Step 6. Print the reports, pay staff and hand out the payslips
Choose Continue to pay & payslips →. Everything here is made from the finished run.
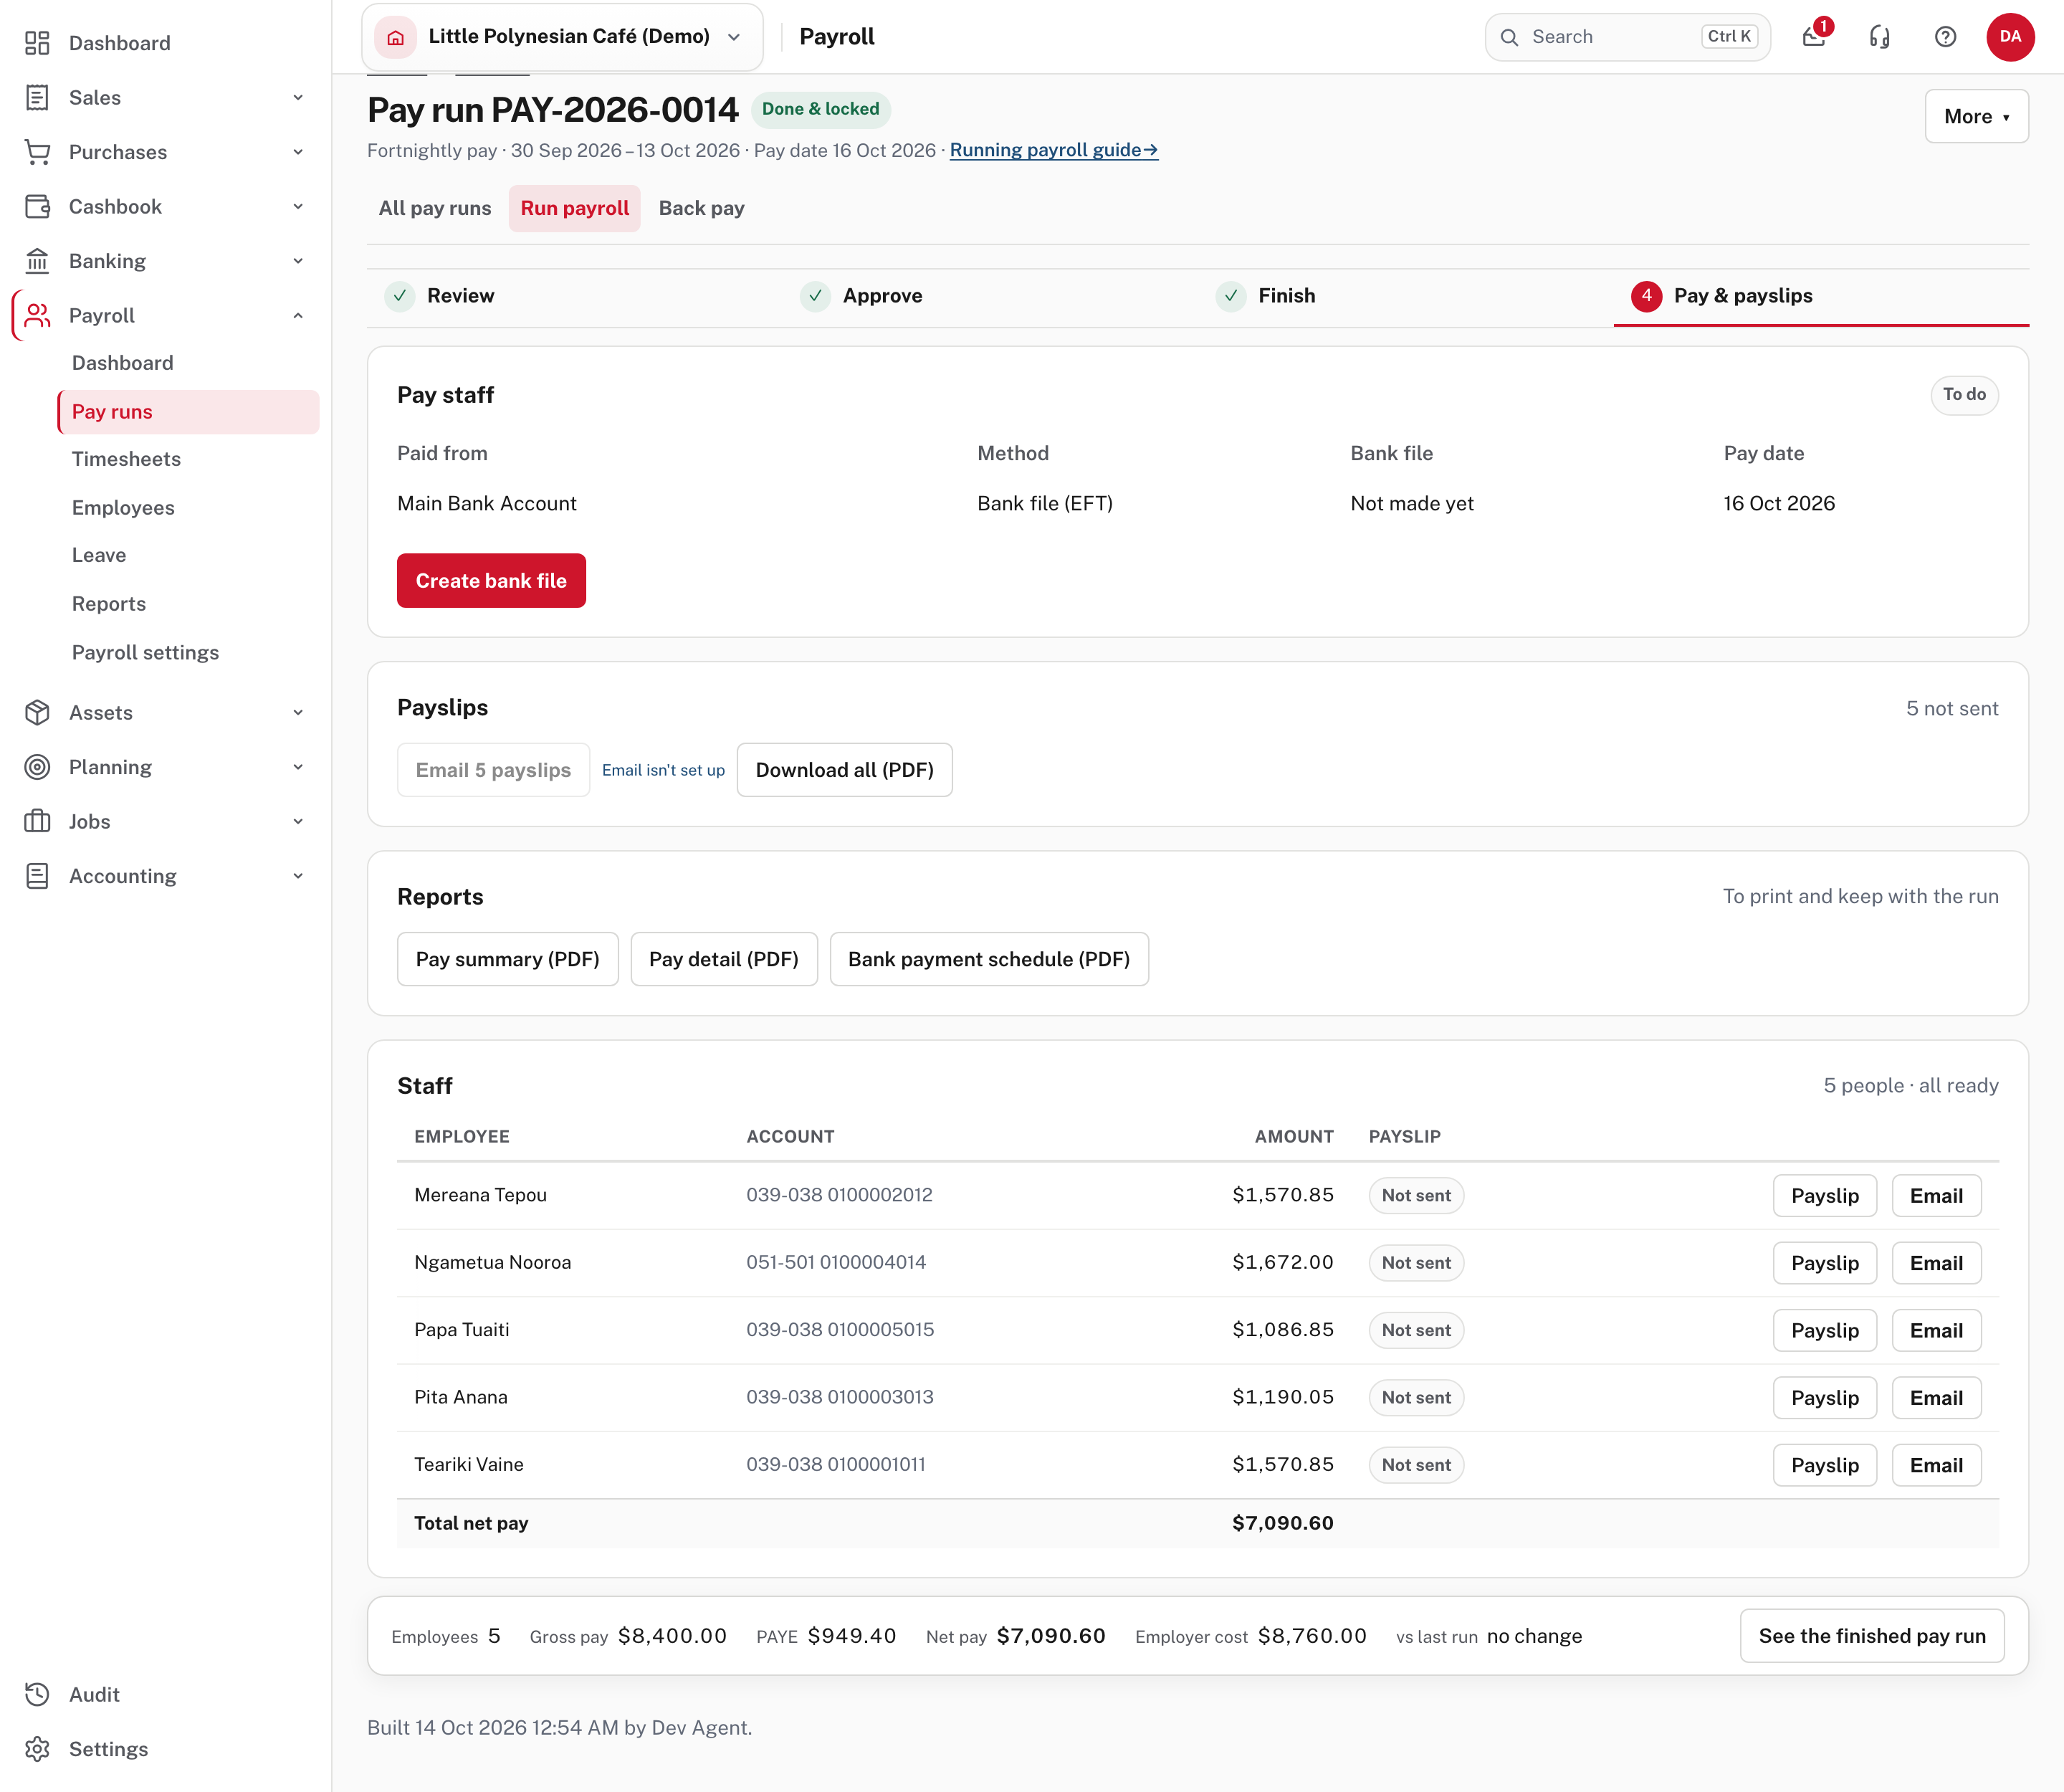
Print the reports
The Reports card, marked To print and keep with the run, has three PDFs. Each opens in a new tab: print it from there.
- Pay summary (PDF): one line for each person, with hours, pay, gross, PAYE, CINSF, deductions and net pay, and the totals for the run.
- Pay detail (PDF): each person's hours, rates, deductions and the bank account their net pay goes to, one block each.
- Bank payment schedule (PDF): shown for a bank file. Each bank's payees and amounts, and the total the bank file pays, with lines for the Authorised signatory and a Second signatory to sign and date. The schedule says it is valid only when signed.
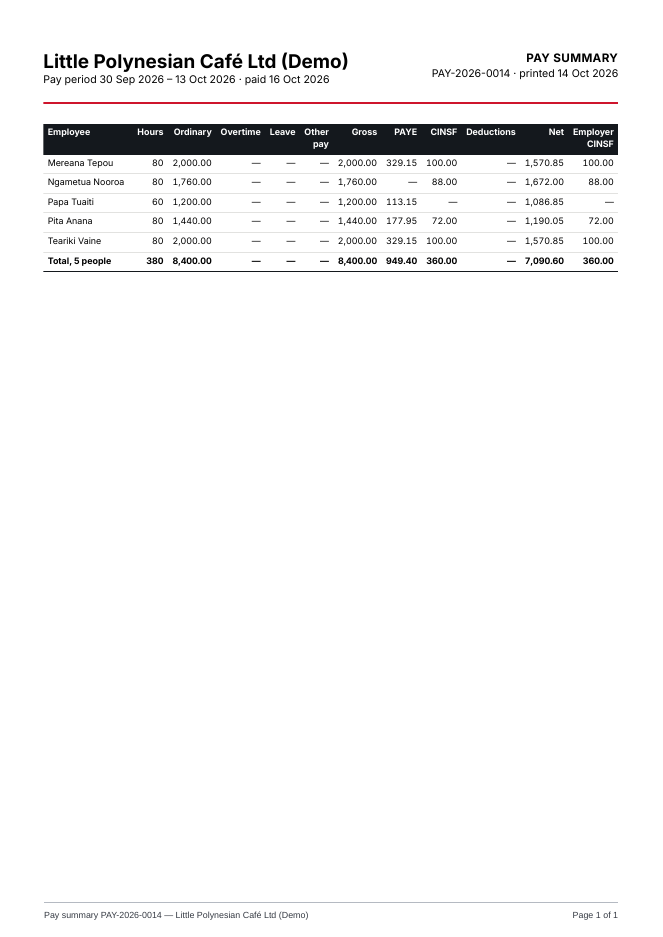
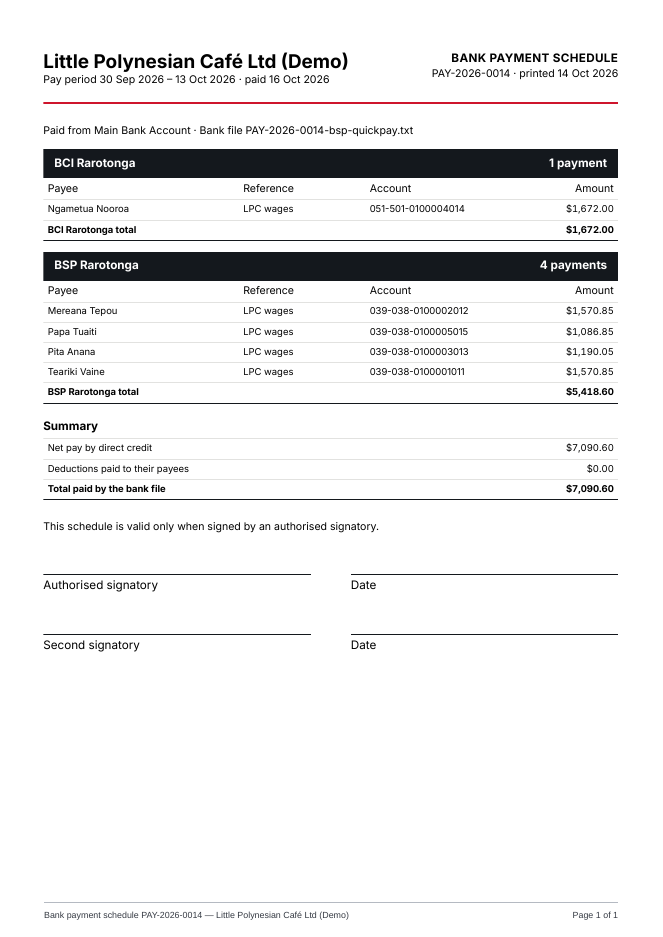
Because the run is finished, these are final figures. The same reports are under More on the finished run's payroll record.
Download the bank file
The Pay staff card shows Paid from, the Method, the Bank file (Not made yet) and the Pay date.
- Check Staff at the bottom. The heading should say all ready: a person with no bank account shows No bank account, and To confirm means a change of bank details is waiting for a second person (from the screen's source). The total net pay at the bottom is what the bank file will pay.
- Choose Create bank file. Easy makes the file and downloads it. Easy does not send the money. You upload the file to your bank yourself, as you would any other payment file.
- Check the file's total against the Bank payment schedule, sign the schedule, and keep it with the run.
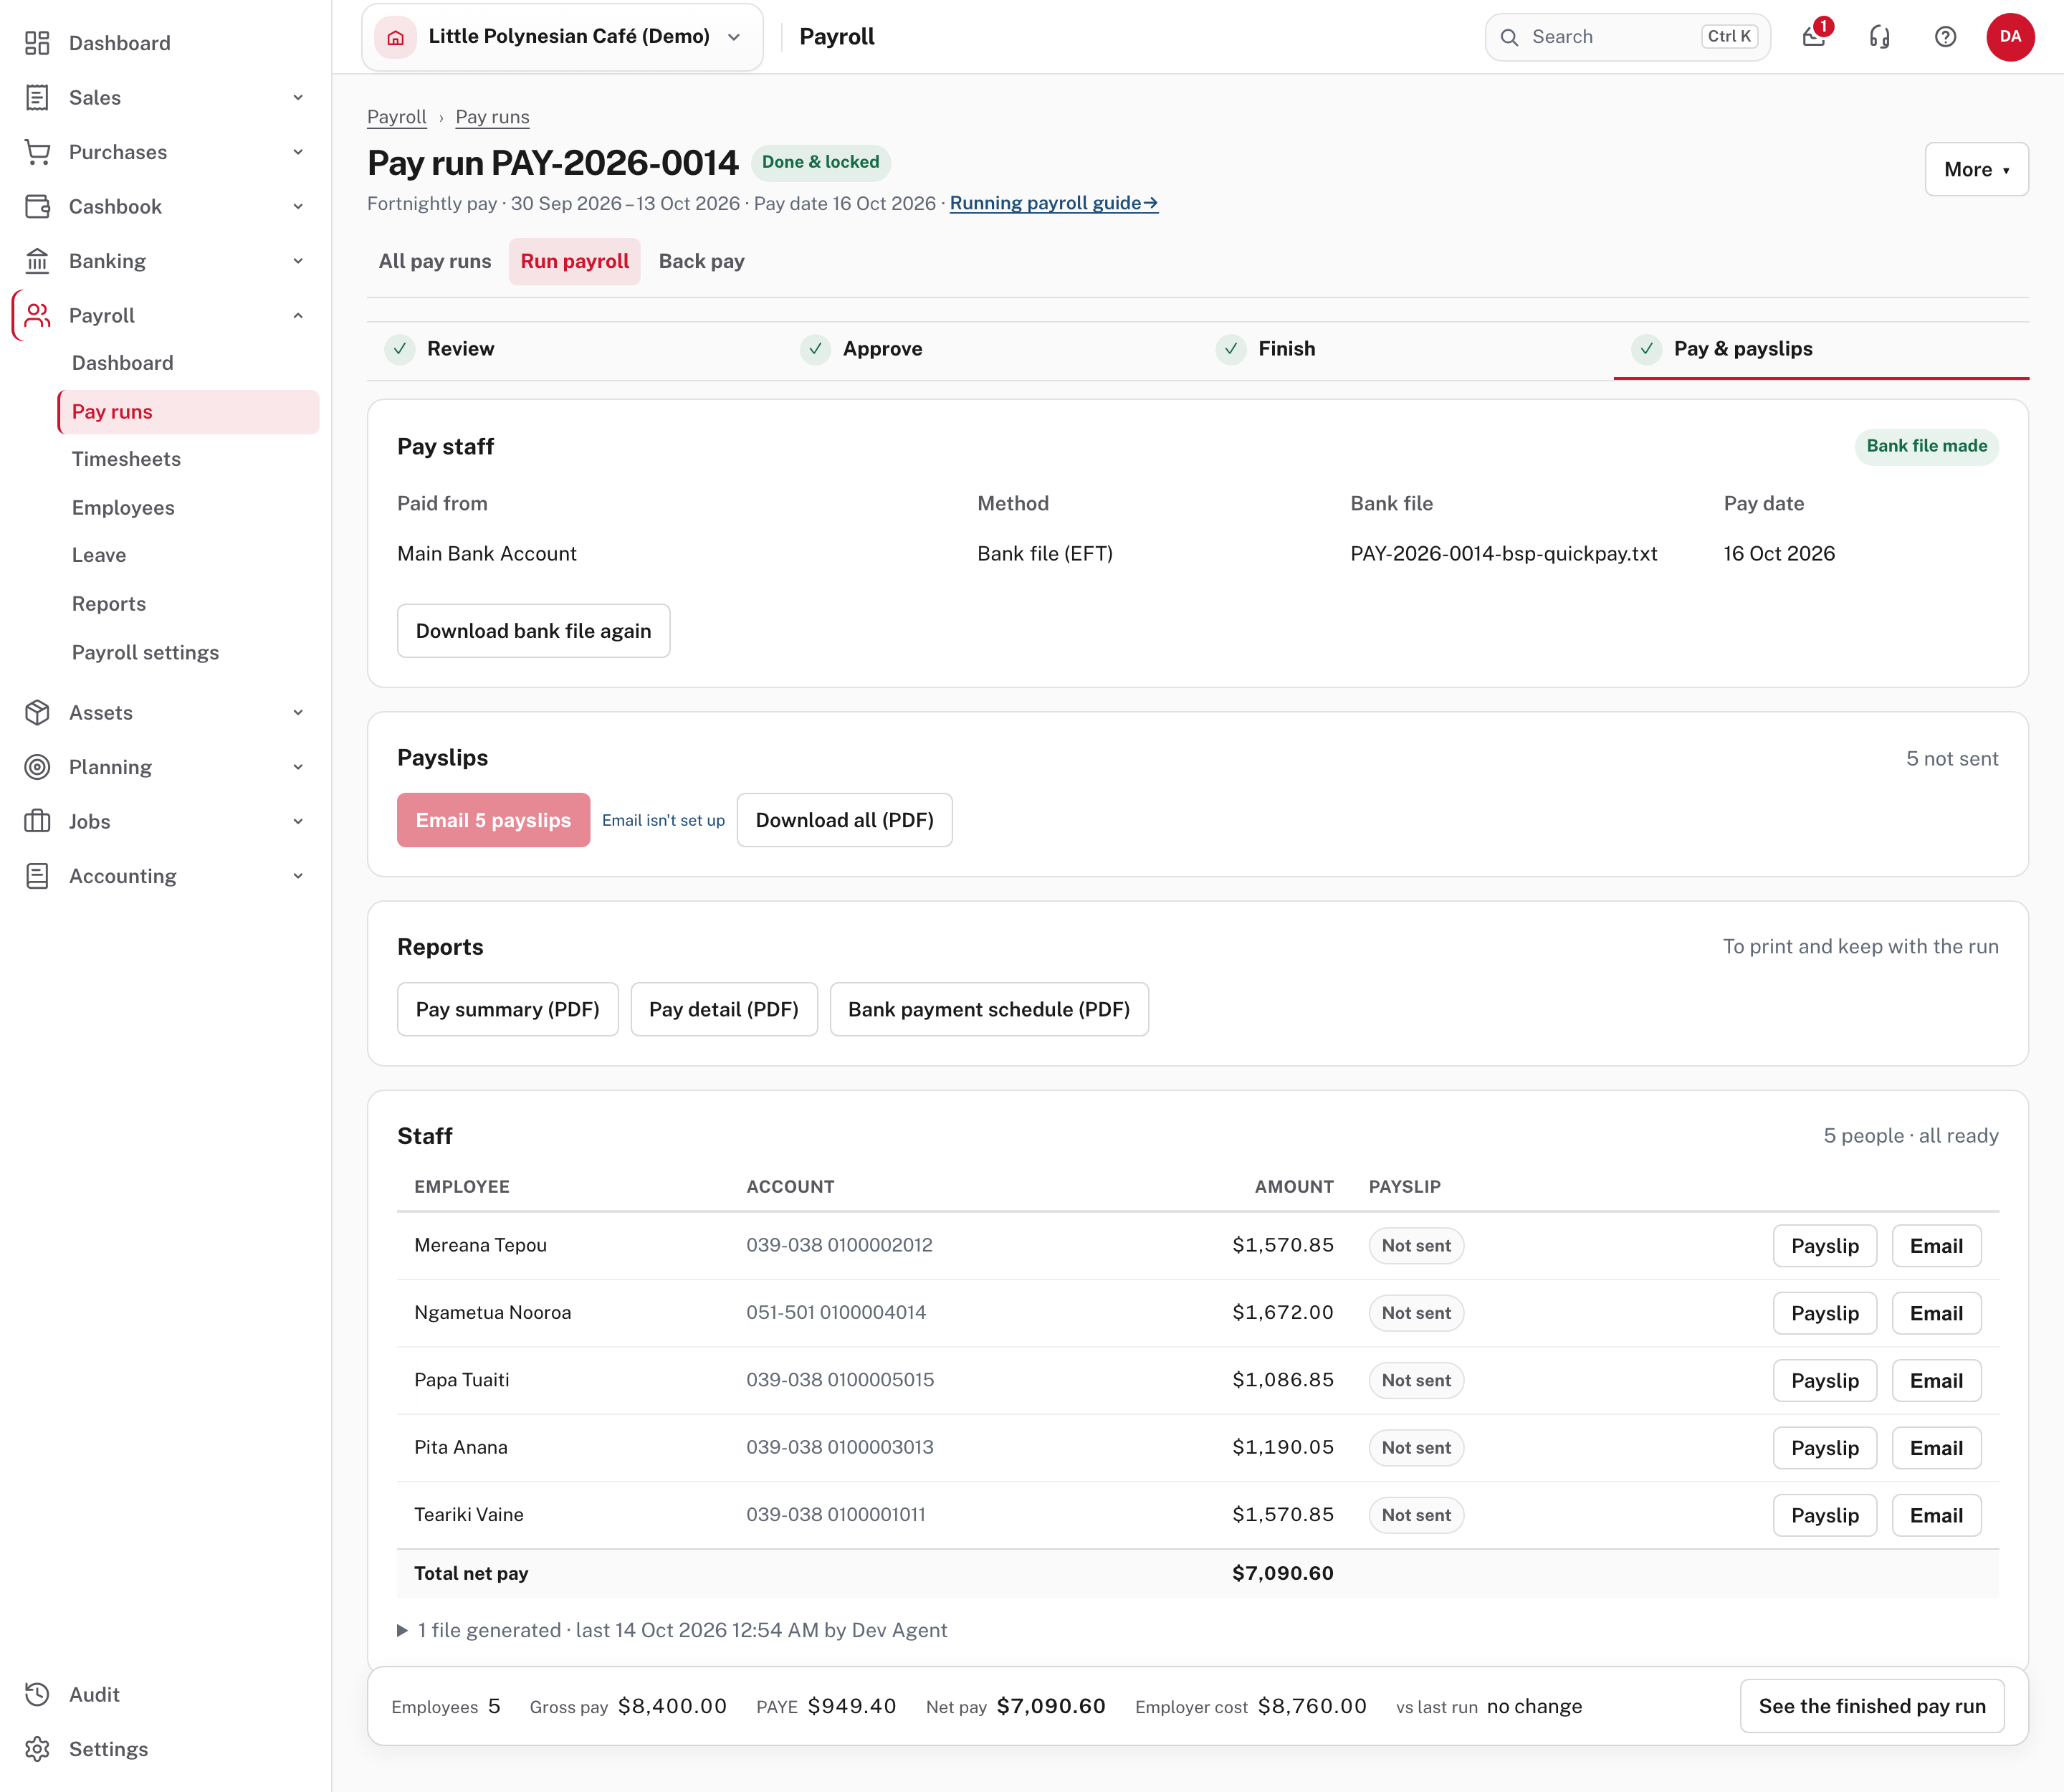
Once the file is made the status reads Bank file made and the file's name is shown. Download bank file again gives the same file. If the paying account's bank file setup is incomplete, one line says what is missing and Complete bank file setup opens it in Banking. (Not shown in the demo, where the setup is complete.)
For cheques, the card asks for the First cheque number, and Assign cheque numbers numbers them. (Not shown in the demo: taken from the screen's source.)
Hand out the payslips
Finishing the run sends nothing to staff. The Payslips card does it:
- Email N payslips emails each person theirs and skips anyone it can't reach. It sends only to people who have not had theirs yet, so nobody gets a second copy. If it is greyed out with Email isn't set up, as in the demo, email delivery hasn't been configured yet: download the payslips instead.
- Download all (PDF) gives every payslip in one file. In the Staff list, Payslip opens one person's and Email opens the message so you can change it before it is sent.
- Each person's Payslip delivery setting (on their record) decides what Email payslips does for them. Email sends the PDF. Print sends nothing and shows To print; Print N payslips downloads just those. Sign in to Easy emails a short notice and they read it in Easy. (Not shown in the demo: from Easy's Help.)
The bar at the bottom changes to See the finished pay run, which opens the run's payroll record. That record has a Bank file & payslips button that brings you back to this step later. When the bank file is uploaded and the payslips are out, the run is finished. The PAYE and CINSF you owe has to be paid on time (chapter 3).
More detail: Running payroll: Payslips.
If something looks wrong
| What you see | What to do |
|---|---|
| Someone is missing from the run | They have no approved timesheet (the Not included table on New pay run says so). Approve it, then Rebuild from the timesheets (under More), or pay them later. |
| An error in Exceptions | The row names the problem and links to where it is fixed, for example an employee's bank details or a missing account. Fix it, and the count drops. |
| Hours are wrong after approval | Change them on the person's payslip in the run and Save payslip. Approved timesheets are locked. |
| You saved a payslip after approving the run | The approval is withdrawn. Approve the run again. |
| The whole run is wrong, not yet finished | More → Rebuild from the timesheets, or Discard this payroll and start again. |
| A finished run is wrong | Undo this pay run from its payroll record, then run it again. |
Check at the end
Check before you finish for the day
- The run reads Done & locked and has a pay run number.
- The reports are printed, and the Bank payment schedule is signed.
- The bank file's total equals the run's net pay, and it has been uploaded to the bank.
- Payslips are downloaded or emailed.
- You know the due dates for PAYE and CINSF (chapter 3).